Configure SMTP settings for alerting
Use the CONFIGURE SMTP option to configure Email server settings to be able to send notifications over Email.
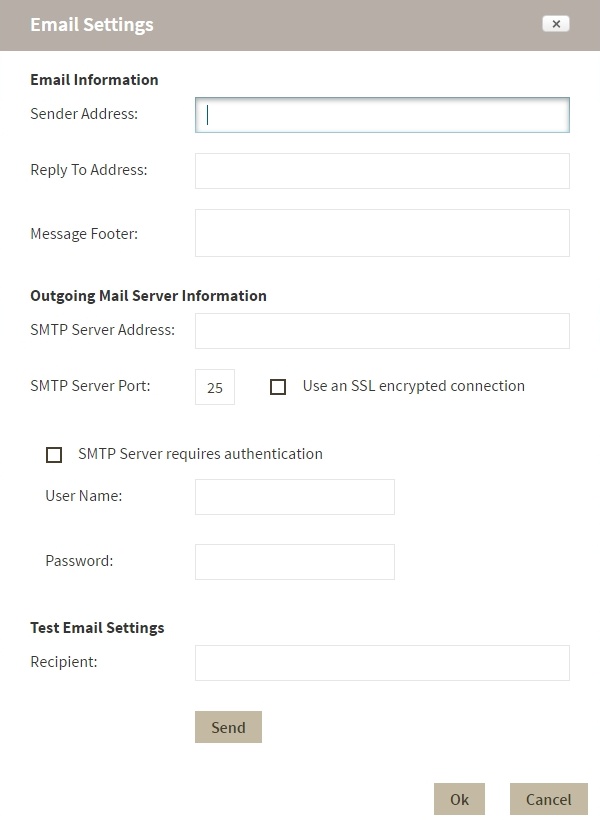
Configure the following settings:
Email Information
Sender Address:
Enter the Email address that SQL BI Manager will use as the sender of the Email notifications.
Reply To Address:
Specify a reply-to Email address to receive replies from Emails.
Message Footer:
Enter the text that you want to appear in the footer of Email notifications.
Outgoing Mail Server Information
In order to send email notifications, you must specify the settings of an email server you want to use. You need to provide the following information:
SMTP Server Address:
Enter the name or Internet Protocol (IP) address of your SMTP mail server.
SMTP Server Port:
Enter the IP port that the SMTP mail server uses. The default SMTP port is 25.
Use an SSL encrypted connection:
Select this checkbox to use an SSL encrypted connection to connect to the email server.
SMTP Server authentication:
Select this checkbox if your SMTP server requires authentication, specify then a valid user name and password to access the email server.
Test Email Settings
You can use this section to test your email settings. For this purpose, enter the Recipient of the test email and click SEND TEST EMAIL. SQL BI Manager sends a test email to the recipient you specify. You can verify this test email in the respective recipient account.
After you configure your Email settings, you can subscribe to alerts by configuring Email alerts.
Configure Email alerts
Use the CONFIGURE EMAIL ALERTS option to subscribe specific users to receive Email alerts on specific events occurring on specific monitored BI servers. SQL BI Manager sends an Email when the severity changes to Critical or Warning (regardless of the originating severity).

Follow these steps to Configure Email Alerts:
- Select the BI Service you want to receive alerts from.
- Select Critical or Warning to receive alerts only when a metric changes to either status.
- Click Add Email and enter the address of the recipient.