The Listener scenario is recommended for users who want to audit only AlwaysOn databases on the Primary node using LISTENER. If you want to audit read-only Secondary nodes, use the Nodes scenario.
Review the following steps to successfully configure your Listener:
- Install cluster agent services on all Listener nodes using the SQL Compliance Manager Cluster Configuration Console
- Install cluster agent services on all Listener nodes using the Failover Cluster Manager
- Add the Listener to SQL Compliance Manager
1. Install cluster agent services on all Listener nodes using the SQL Compliance Manager Cluster Configuration Console
Use the following steps on each node involved in the AlwaysOn group before adding the listener to SQL Compliance Manager for auditing.
Before stepping through the following instructions make sure that the SQL CM Collection Server, the Management Console and the Repository Databases are already installed.
- To install these components in a standalone server, please review step 10 in How to install SQL Compliance Manager.
- To install these components in a clustered environment, please review the steps to Install SQL Compliance Manager Collection Service on Cluster nodes.
- From the installation folder of the SQL Compliance Manager Collection Service on the Collection and Repository database server, copy the
SQLComplianceClusterSetup.exefile onto the nodes of the Availability Group, to install the Cluster Configuration Console on the nodes of the Availability Group you are going to be auditing. - Beginning with the primary node of the Availability Group. run
SQLcomplianceClusterSetup.exeto launch the installation wizard. - Follow the steps in the Setup wizard to install and configure SQL Compliance Manager in a clustered environment.
Once the installation is complete, go to the SQL Compliance Manager install path. Unless you have specified a different path, the one by default is
C:\Program Files\IDERA\SQLCompliance.- Once the setup wizard launches, click the Next button to proceed to the License Agreement.
- Read the license agreement, select the option to accept the terms of the license agreement, and click Next.
- Select the destination path in which you want to install the IDERA Cluster Configuration Console. Define the permissions for the software and click Next.
Click Install to complete the installation.
- The Cluster Configuration Console launches automatically after installation.
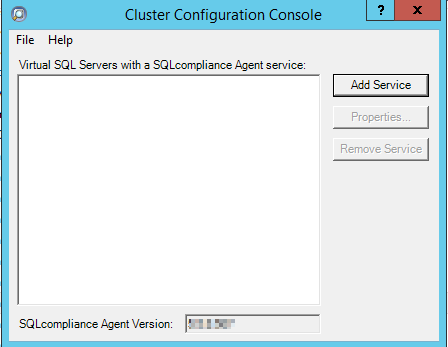
- Click Add Service to specify the listener. SQL Compliance Manager displays the Add SQLcompliance Agent Service - General window.
- On the General dialog window, type the name of the clustered instance to be audited by SQL Compliance Manager and click Next. If you receive a message stating that the selected SQL Server instance is not clustered, click Yes. This is correct behavior when configuring a Listener scenario and confirms that the selected SQL Server instance is hosted on a Windows Failover Cluster.
- On the Collection Server dialog window, specify the name of the server where SQL Compliance Manager Collection Service is installed, and click Next.
- On the SQLcompliance Agent Service Account dialog window, specify the login credentials for the Agent service account, and click Next. This account must have administrator privileges. IDERA recommends that you use the same account as used for the Collection Server.
- On the SQLcompliance Agent Trace Directory dialog window, specify the path on which trace files will temporarily reside before being transferred to the SQL Compliance Collection Service and click Next. Note that the administrator account specified for the cluster agent service has read/write permissions for this trace directory folder.
On the CLR Trigger Location dialog window, Specify the location where you want the SQL Compliance Manager Agent to store the corresponding CLR trigger assemblies, and click Next. Note that the administrator account specified for the cluster agent service has read/write permissions for this assembly folder.
Ensure the Agent Trace directory and the CLR Trigger location specified exist by creating the folder structure manually through Windows Explorer.
Review the configuration Summary and click Finish.
The IDERA Cluster Configuration Console displays a confirmation message stating that you have successfully added the SQL Compliance Manager Agent.
Click OK.
Repeat these steps on each node in your AlwaysOn Availability Group. When you are finished configuring all the nodes, proceed with the steps below.
2. Install cluster agent services on all Listener nodes using the Failover Cluster Manager
Use the following steps on each node involved in the AlwaysOn group before adding the listener to SQL Compliance Manager for auditing.
- After installing the cluster agent service on all Listener nodes, open Server Manager.
- On the Server Manager tree, click Server Manager > Features > Failover Cluster Manager. The system displays Failover Cluster Manager.
- Select the clusters' Service Group (Windows Server 2008) or Role (Windows Server 2012 and later) created for the cluster agent service.
- On the Server Name area, right-click the resource name and click Properties. Failover Cluster Manager displays the Properties window.
- Click the Dependencies tab.
- Verify that the Resource field displays the listener IP address.
- On the Other Resources area of the Failover Cluster Manager window, right-click the resource within the role, and select Properties. Failover Cluster Manager displays the Properties window.
- Click the Dependencies tab.
- Verify that the Resource field displays the listener name. Click Cancel to close this window.
- After adding the resource information, right-click the Service Group or Role, and point to Add a resource.
- Click on Generic Service. Failover Cluster Manager displays the New Resource Wizard.
- On the Select Service page, select the cluster service agent from the available list. The cluster service names are displayed in the format SQLcomplianceAgent$[listener name] where [listener name] is a virtual SQL Server name.
- Click Next, continue following the wizard, and click Finish.
- On the Other Resources area of the Failover Cluster Manager window, right-click the SQLcomplianceAgent$[listener name], and Bring Online the resource.
- While the cluster service is online, right-click the SQLcomplianceAgent$[listener name] cluster service, and click Properties.
- On the General tab verify that the Service Group or Role is added.
On the Registry Replication tab, click Add. Failover Cluster Manager displays the Registry Key window.
The Registry Replication tab is not available in Windows Server 2012.
If you are using Windows Server 2012, you must use the "Add-ClusterCheckpoint" PowerShell cmdlet to add the necessary setting.
For more information, see Add ClusterCheckpoint.
- Type the specific registry path. To obtain the correct path, go to the IDERA Cluster Configuration Console and copy the Replicated Registry Key from the SQLcompliance Agent details.
- Click OK. The new root registry key appears in the Registry Replication tab of the Properties window.
- Close the Properties window by clicking OK.
3. Add the Listener to SQL Compliance Manager
Use the following steps to add the listener to SQL Compliance Manager for auditing.
- Start the IDERA SQL Compliance Manager Management Console and click New > Registered SQL Server. SQL Compliance Manager displays the SQLcm Configuration Wizard - Add Server.
- On the SQL Server window, specify or browse the listener you want to register with SQL Compliance Manager, and click Next.
- On the SQL Server Cluster page, check This SQL Server instance is hosted by a Microsoft SQL Server Cluster virtual server box, and click Next. This step makes the listener into a virtual SQL Server name.
- On the SQLcompliance Agent Deployment page, verify that the Manually Deploy is selected, and click Next. This option is required for all virtual SQL Servers.
- On the Select Databases page, check the AlwaysOn database that you want to audit, and click Next.
SQL Compliance Manager displays the AlwaysOn Availability Group Details page including a list of all nodes where the AlwaysOn database is replicated.
This step is valid only if the database selected for auditing is AlwaysOn. The wizard skips this page for regular databases.
- If the AlwaysOn Availability Group Details window is displayed, click Next to continue.
- On the Audit Collection Level page, select the desired audit collection level for the database, and click Next.
- On the Permissions Check page, SQL Compliance Manager verifies that all the required permissions are in place on the SQL Server instance you want to audit.
- After all operations are complete and all permissions checks pass, click Next. The Summary page displays the audit settings for the SQL Server instance.
- Click Finish to close the wizard. SQL Compliance Manager displays the newly-added SQL Server instance and AlwaysOn database in the Explore Activity tree.
- Make all necessary audit settings for the listener and AlwaysOn databases, and then update the configuration and begin collecting data. It is recommended to update the configuration before collecting data because users are unaware of which node is PRIMARY. After updating the configuration, be sure to click Refresh in the node context menu to apply the settings to the displayed information.
After configuration, review some Additional information on SQL Compliance Manager and AlwaysOn Availability Groups.