Page History
...
| Note |
|---|
SQL |
...
You can click the headers of these columns to order your information; for example, click # of DBs to order all your instances according to the number of databases.
| Info | ||
|---|---|---|
| ||
Next to the instance name, you can find the following icons that represent the instance status:
|
| Tip | ||
|---|---|---|
| ||
You can set the number of instances you want SQL Inventory Manager to show per page. Go to the Display option at the bottom of the page, type the number you require, and then click Refresh. |
Available individual instance actions
When you select one instance, you can perform any of the following actions:
- View Details
- Refresh Data
- Edit Instance Properties
- Edit Tags
- Export
- Decommission
- Disable Monitoring
- Add SQL Server Instance
- Remove
Viewing instance details
You can access an instance details view by selecting the instance and clicking View Details on the action items bar or by clicking directly on the instance name. For more information about what information is available on the instance details view, refer to Viewing instance details.
Refresh Data
If you want to refresh the collected data for an instance, select the instance and click Refresh Data on the action items bar. You can also find this option by clicking the gear icon next to the respective instance. You can only perform this action for one instance at a time.
Edit instance properties
Select an instance and click Edit Properties on the action items bar. You can also find this option by clicking the gear icon next to the respective instance. On the properties dialog window you can change the owner, location, comments, and credentials. For more information go to Editing instances properties.
Edit Tags
By selecting an instance and clicking Edit Tags on the action items bar, SQL Inventory Manager opens a new dialog window where you can add new tags or change the currently assigned tags of the selected instance. You can also find this option by clicking the gear icon next to the respective instance. For more information about editing tags for a specific instance, go to Manage tags for a single instance.
More Actions
Under More Actions you can find additional options: Decommission, Disable Monitoring, Remove, and Add SQL Server instance.
Decommission
Using More Actions, select an instance and click Decommission on the action items bar to stop monitoring and alerting on that instance. You can also find this option by clicking the gear icon next to the respective instance. For more information about decommissioning an instance or database, see Decommissioned instances.
Disable Monitoring
If you want to disable the monitoring of an instance, select the instance, go to More Actions, and select Disable Monitoring. You can also find this option by clicking the gear icon next to the respective instance. For more information about disabling instances, click here.
Remove instance
If you no longer want to manage an instance, you can remove it by selecting the respective instance, going to More Actions on the action items bar, and selecting Remove. You can also find this option by clicking the gear icon next to the instance. SQL Inventory Manager displays all removed instances on the Ignored instances view. For more information about removing instances click here.
Add SQL Server instance
If you want to access the Add SQL Server instance wizard, go to More actions and select this option. The wizard opens and allows you to browse and register SQL Server instances.
Available bulk actions for multiple instances
Edit bulk properties
You can select several instances and change:
- Owner
- Location
- Credentials
- Tags
For example, if you have a new DBA, you can select all instances on this tab and click Edit Owner to change all instances owner at once.
You can also perform the following actions under the More Actions option:
- Decommission
- Disable monitoring
- Enable monitoring
- Remove
- Add SQL Server instances
To bulk edit several instances, select the instances you want to change and follow any of these paths:
- Click the option you want to perform on the action items bar: Refresh Data, Edit Owner, Edit Location, Edit Credentials, Edit Tags, Export, and More Actions including Decommission, Enable/Disable Monitoring, Remove, and Add SQL Server Instance.
- Or click the gear icon next to one of the selected instances. SQL Inventory Manager opens a dialog window that shows you on how many instances you are performing the changes.
| Info |
|---|
Take into account that Enable Monitoring will only be available if you have disabled instances. |
Exporting Instances view information
On the action items bar of the Managed Instances view, you can find the Export option which allows you to choose your preferred format for exporting the information available on this view. You can export as a PDF, XLS, or XML file. The filters you choose on this view will be taken into account for your exported reports.
Available filtering options
On the left side of the Instances view, you have options for filtering the instances that you want SQL Inventory Manager to display on your managed instances view. You can filter these instances by Tags, Owner, Location, and Version. These options will help you get a quick view of your required instances; for example, if you want to see your managed instances filtered by a specific Owner, just choose the respective option from the Owner filter.
Creating a useful filter to "weed out" unnecessary information takes time but is important when managing large environments. As a result, you may want to save that filter for future use. SQL Inventory Manager now allows you to save filters for use in the Explorer and Instances views. Simply create the filter, and then click Save as Explorer favorite or click Save as Instances favorite, depending on which view you are in when creating the filter. To use that filter, click Load Explorer favorite or click Load Instances favorite.
You can enable or disable the option Apply filter as it changes depending if you want to see the changes as you apply the filter, or if you prefer to select your filters first and see the results when you finish.
| Tip | ||
|---|---|---|
| ||
| SQL Inventory Manager displays the filters you select on the top section of your managed instances view under Filtered by. You can remove filters from this section too. |
| Info | ||
|---|---|---|
| ||
You can also access the Managed instances section by clicking Instances on the right sidebar of the overview. For more information, go to Viewing information on the SQL Inventory Manager Overview. |
Need more help? Search the IDERA Customer Support Portal.
Compliance Manager is ONLY compatible with IDERA Dashboard version 4.6 and with limited support. |
The IDERA SQL Compliance Manager Audit Reports view contains a simple interface that allows you to generate audit reports. Each report is based on a template file that is stored in the Reports folder in the SQLcompliance installation directory. When you generate a report, you are able to determine what is displayed by selecting from the options on each individual report. This allows you to generate reports tailored to your needs.
For additional information about SQL Compliance Manager reporting, see Report on Audit Data.
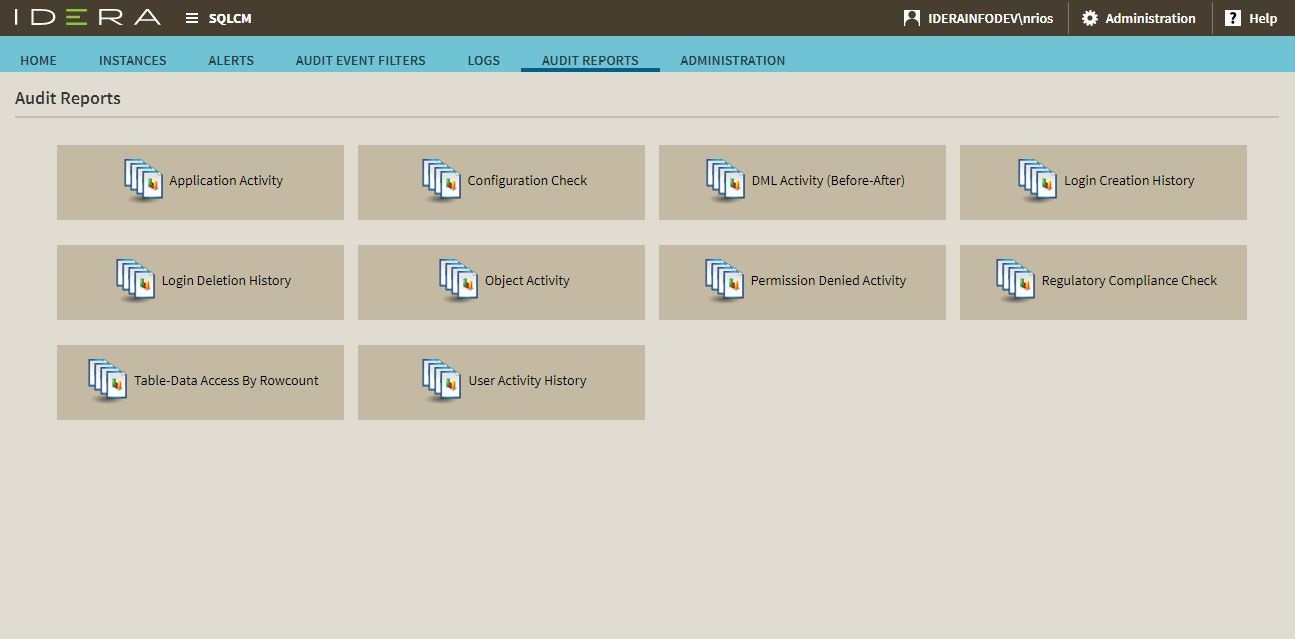
Available reports include:
- Application Activity. The Application Activity report lists the amount of activity that occurred on the SQL Server instance or designated database, on an hourly basis, for the dates specified. Use this report to audit overall activity levels on your SQL Server instances and databases.
- Configuration Check. The Configuration Check report displays a list of all the configurations that are set up for your servers and databases.
- DML Activity (Before-After). The DML Activity (Before-After) report lists DML events for which before and after data is available. Use this report to audit UPDATE, INSERT, and DELETE activity on critical or sensitive databases.
- Login Creation History. The Login Creation History report lists a history of login creation activities performed on a specific SQL Server instance. Use this report to audit user behavior and login management.
- Login Deletion History. The Login Deletion History report lists a history of login deletion activities performed on a specific SQL Server instance. Use this report to audit user behavior and login management.
- Object Activity. The Object Activity report lists activities performed on a specific SQL Server instance. Use this report to audit object behavior and settings.
- Permission Denied Activity. The Permission Denied Activity report lists unauthorized attempts to execute activities. Use this report to audit your SQL Server security settings and identify misconduct.
- Regulatory Compliance Check. The Regulation Compliance Check report displays which servers or databases continue to be in compliance with the selected Regulation Guidelines.
- Table/Data Access by Row Count. The Row Count reports on the frequency data is accessed. Use this report to audit sensitive data access and identify suspicious behavior.
- User Activity History. The User Activity History report lists activities performed by user account. Use this report to audit your user account settings and identify misconduct.
...