...
Manage Users option allows users to grant access to other team members or groups |
...
and manage their roles. Users with administrative privileges are divided in: - Dashboard administrators - the capability to manage access
|
...
- to Dashboard functions as well as individual products' functions.
- Product administrators - the capability to grant access to individual products for which they have administrative rights.
To add new users, edit their details (name, subscription, or email address), or remove them, select Manage Users in the Administration view |
...
. In the Manage Users window you can perform the following actions: Add a user / groupIn the IDERA |
...
 Image Removed
Adding a user in the Idera Dashboard
...
Dashboard access is granted to Windows users or groups. To add users follow these steps: 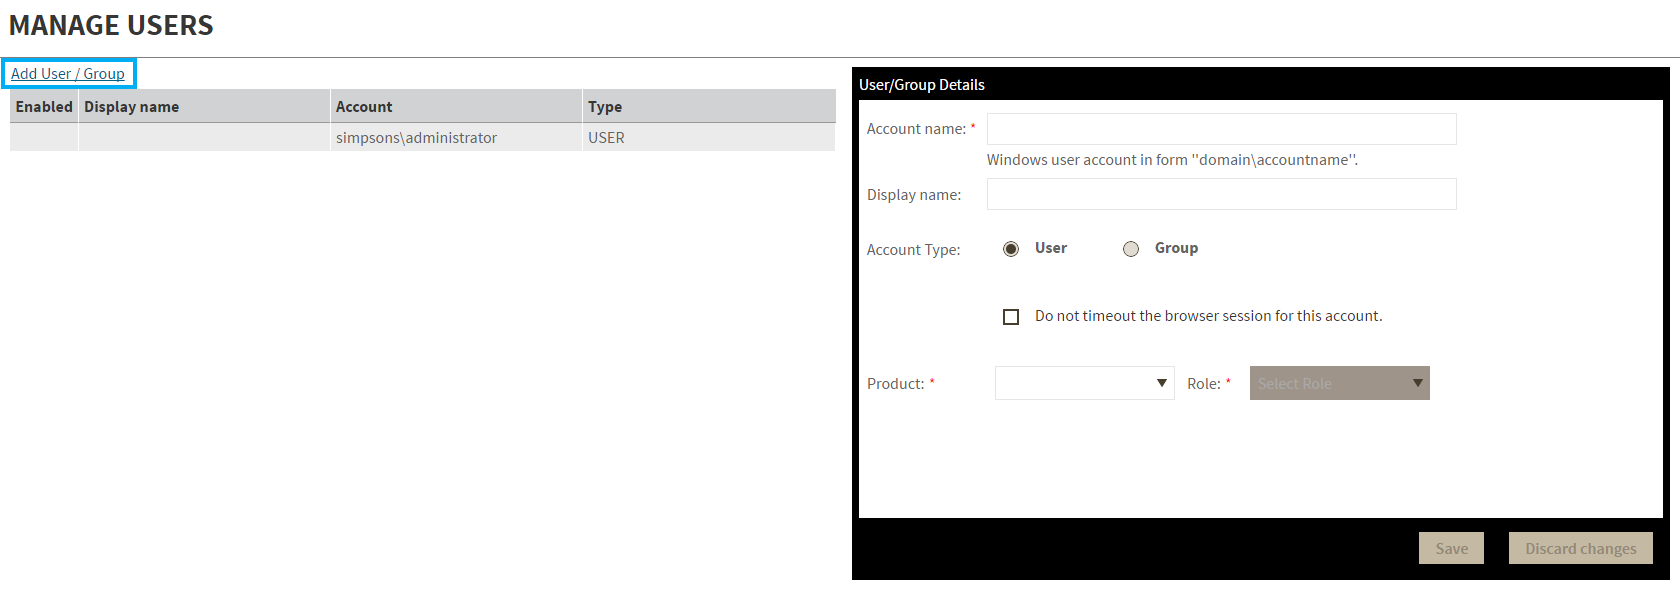 Image Added Image Added
- Click the Add User / Group option and the
|
...
...
...
- Type the Account name of the user you want to grant access to. You should enter a Windows user name in the following format: <domain\user>.
- Enter a Display name.
- Select User or Group in the Account
|
...
...
- Select the Do not timeout the browser session for this account
|
...
- checkbox to stay logged in.
|
...
- In the Product field, you can select to add a user to the
|
...
...
...
In the Role field, you can assign a user the Dashboard Administrator or Dashboard guest
|
...
role if you select the IDERA Dashboard in the Product field. If you select an IDERA product in the Product field, you can assign a user the Product Administrator, Product user, or Product guest
|
...
role. Click SAVE.
If you did not send a welcome email to , you should provide him/her with the following URL: http://<ServerName>:9290 or http://<localhost>:9290 |
to Idera |
...
...
/groupThis option allows you to edit the account name and display name, |
...
disable the account, and add new permissions. To edit a user or group follow these steps: - Select one user / group from the list of users
|
...
...
...
Delete a user / group from the |
...
...
...
or group, select the User / group from the list and click the DELETE button. A confirmation dialog displays; click YES to remove or NO to cancel. |
 Image Removed
- Select one user from the list of users, click the Remove icon (as seen above).
- A warning that requires a confirmation whether you want to delete the selected user or group displays.
| Warning |
|---|
If you remove a user, he/she is no longer able to log in to the Idera Dashboard. |
SQL Business Intelligence Manager identifies issues within the SQL BI environment to help optimize BI service performance. Learn more > >
...