Page History
...
Report Manager displays generated reports in PDF format for pre-defined reports or in Microsoft Excel format for customized reports. You can view reports only in the Data view. The following procedure describes how to view reports that have already been generated at pre-scheduled times. See Creating customized reports on page 23 and Running a report on page 21.
To view a report
- From the Tier Selection bar, select the Tier for which you want to view a report.
- From the Report Set Selector, select the Report Set that contains the required report. The Reports Table displays the reports of the selected report set.
- From the Reports Table, select the report you want to view and click View (or double-click the report). If the report is not yet generated or does not contain data (the Pages column indicates 0), Report Manager displays a message that allows you to rerun the report.
...
Report Manager generates a report according to the settings of its properties. You can rerun a selected report with different property settings for that particular run. For example, you can rerun the report to include only specific counters and a specific Time Frame. See Setting report properties on page 22 and Introducing Report Manager reports on page 29.
To run a report
- From a report view, click Rerun. The Properties for This Run dialog box is displayed. This dialog box contains similar tabs to the tabs of the report Properties dialog box (Description, General, Time Frame, and Filters).
- In the Properties for This Run dialog box, set the properties according to your preferences.
These settings affect only the current run of the report and do not affect the default properties of the report. - Click OK. Report Manager generates the report and then displays it.
...
Each report is assigned with a set of properties and schedule. If you want to have more than one report of the same set (Profile, Exception, and so on) and the same entity, but with different properties and schedule, you can create a copy of the report, and then modify the properties and schedule of the report copy. See Setting report properties on page 23 and Setting the schedule of a report generation on page 23.
To create a copy of a selected report
...
After creating a customized report, you can modify and redesign it. See Editing an existing customized report on page 26.
Defining a query statement
...
You can add, rename, or remove queries using the buttons located to the right of the Query Selection box, in the customized report data selection page.
Table 3- 1 Query selection icons
| Icon | Description |
|---|---|
 | Click to add a new query. |
 | Click to rename an existing query. |
 | Click to remove an existing query. |
To define a query statement:
...
The following figure shows how to set the filter conditions in your customized report.
Figure 3- 1 Customized report data selection page - filtering conditions example
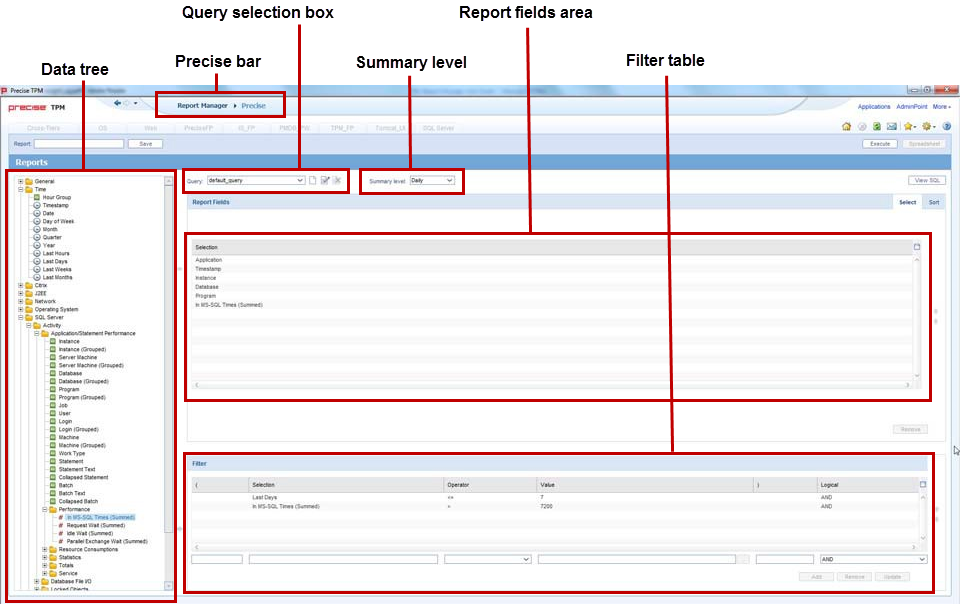
To set filtering conditions
- From the Data Tree, select the field for which you want to create the condition, and then click (arrow) of the Filter Table. The selected field appears in the Field Selection box.
- From the Operator box, select the required operator, such as Like, =, <, and In.
- In the Value box, do one of the following:
- Type a value by which the data of the field is filtered.
- Click the List icon and choose a data field from the List of Values dialog box.
- To remove a condition from the Selected Instances table, select it and then click Remove.
- To update a condition, select it from the Selected Instances Table, modify the condition parameters, and then click Update.
- To modify the order of the conditions, select the required condition from the Selected Instances Table and click UpArrow or DownArrow (located to the right of the Selected Instances Table).
...
- From the Precise bar, click Settings and from the menu select Multi Settings. The Multi Settings dialog box is displayed.
- From the Tier box, select the Tier (or all Tiers) you want listed in the Multi Settings reports table.
- From the Set box, select the report set (or all sets) you want listed in the Multi Settings reports table.
- To change report parameters and/or scheduling, Press Ctrl+Shift to select a range of reports.
- Click Properties to set report properties. See Setting report properties on page 23.
- Click Schedule to set the time schedule for the reports. See Setting the schedule of a report generation on page 23.
- Click Close to close the Multi Settings dialog box.
...
- From the Precise bar, click Settings and from the menu select Mail Settings. The Mail Settings dialog box is displayed.
- Select Integrate Report Manager with an Email server to enable the mail utility.
- Insert the Email server name and originator of the mail messages.
Precise. Performance intelligence from click to storage. Learn more > >
...