Page History
This section contains a brief walkthrough walk through for Solutions enabler deployment, for the purpose of monitoring by SQL Workload Analysis. for the full procedure and options of Solutions
Enabler deployment, see also the Solutions enabler Installation Guide document, which can be found in the document set on the EMC web site.
| Info |
|---|
...
A user with the administrator role is needed to complete the following procedure. |
On the SQL
...
Workload Analysis server
...
- Install Solutions Enabler.
...
- Select the destination folder.
...
- Select the Setup Type (use: Complete)
...
- On the Services List, leave the default settings for the Stordeamon Services.
...
- Click Next.
...
- Click Install.
...
- If your SQL Server instance stores its data on CLARiiON or VNX storage arrays, Statistics Logging should be enabled. The following procedure should be done per storage array:
...
- Open Navisphere GUI or Unisphere web GUI. Typically, this will require a user with Storage Administrator rights and the URL of the Navisphere software.
...
- Right-click on the APM storage System (or on CLARiiON unit ID in Unisphere GUI) and select Properties.
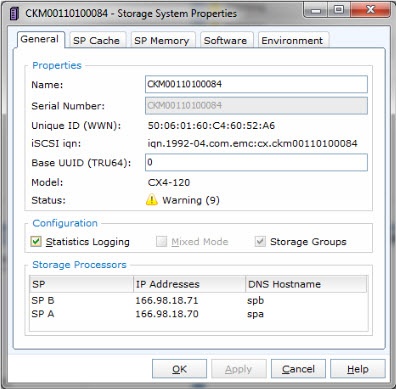
- Right-click on the APM storage System (or on CLARiiON unit ID in Unisphere GUI) and select Properties.
...
- On the General tab, select Statistics Logging.
...
- Click Apply.
...
- Click OK.
...
- Click File > Save and Exit.
...
- Initialize Solutions Enabler (building the
symapi\db\symapi_db.binfile).
...
- Open a
...
- Windows command prompt.
...
- Navigate to the directory in which the EMC Solutions Enabler is installed.
...
- Execute:
SYMCLI\BIN\symcfg.exe discover -all
The "No devices were found" message is expected and does not indicate an error.
- Execute:
On each monitored server
...
- Install Solutions Enabler.
...
- Select the destination folder.
...
- Select he Setup Type (use: Complete)
...
- On the Service List, use the defaults and also check the SYMAPI daemon checkbox.
...
- Click Next.
...
- Click Install.
...
- If your SQL Server instance stores its data on CLARiiON or VNX storage arrays , the monitored server should be authorized using a SYMCLI command as follows:
...
- Make sure you have the array's Storage Processors (SP) hostname or IP address, and the array's administrator username and password.
...
- Open the command prompt.
...
- Navigate to the directory in which EMC Solutions Enabler is installed.
- Execute:
SYMCLI\BIN\symcfg.exe authorization add -host {VNX-SP} -username {VNX Administrator} -password {VNX Administrator Password}
...
- If your SQL Server instance stores its data on Symmetrix (DMX or VMAX) storage arrays, gatekeeper devices must be installed.
...
- Gatekeeper device is a small device (less than 3 MB) used by Solutions Enabler to improve the communication with the storage array. The assistance
...
- of a storage administrator is
...
- required.
...
To verify which storage units and devices are attached to a monitored server, execute:
SYMCLI\BIN\syminq.exe
The following table shows an example of the command's output.
...
Device Product Device Name Type Vendor ID Rev Ser Num Cap (KB) \\.\PHYSICALDRIVE0 SEAGATE ST15150W HP12 02994239 4194157 \\.\PHYSICALDRIVE1 EMC SYMMETRIX 5265 93052361 4224000 \\.\PHYSICALDRIVE2 EMC SYMMETRIX 5265 93052461 4224000 \\.\PHYSICALDRIVE3 EMC SYMMETRIX 5265 93052561 4224000 \\.\PHYSICALDRIVE4 GK EMC SYMMETRIX 5265 93050161 2880 \\.\PHYSICALDRIVE5 GK EMC SYMMETRIX 5265 93051161 2880 - Gatekeeper devices are marked with GK in the
...
- Type column.
...
- The two most left digits (93 in this example) are the suffix of unit ID.
...
- If gatekeeper devices are missing, ask the storage administrator to define them. To verify, execute
SYMCLI\BIN\syminq.exeand check its output once again.
- If gatekeeper devices are missing, ask the storage administrator to define them. To verify, execute
...
- If the monitored SQL Server instance runs on a VMware guest server, the monitored server should be authorized using a SYMCLI command as follows:
...
- Make sure you have the ESX server hostname or IP address, and the ESX server's administrator username and password.
...
- Open a command prompt.
...
- Navigate to the directory in which EMC Solutions Enabler is installed.
...
- Execute:
SYMCLI\BIN\symcfg.exe authorization add -host {ESX server} -username {ESX server Administrator} -password {ESX server Administrator Password} -vmware
- Execute:
...
If the monitored SQL Server instance runs on a Microsoft Hyper-V guest server, the monitored server should be authorized using a SYMCLI command as follows:
Info title Note
...
Only pass-through devices are supported. Devices configured as VHD are not supported.
...
- Make sure you have the Hyper-V hostname or IP address, and Hyper-V's administrator username and password.
...
- Open a command
...
- prompt.
...
- Navigate to the directory in which EMC Solutions Enabler is installed.
...
- Execute:
SYMCLI\BIN\symcli.exe authorization add -host {Hyper-V hostname} -username {Hyper-V Administrator} -password {Hyper-V Administrator Password} -hyperv
- Execute:
...
- Initialize Solutions Enabler (building the
symapi\db\symapi_db.binfile}.
...
- Open a Windows command prompt.
...
- Change to the directory in which the EMC Solutions Enabler is installed.
...
- Execute the discover command:
SYMCLI\BIN\symcfg.exe discover -all
This time, "No devices were found" message should be considered an error. If no devices were found, retry carefully steps 1 to 6. If still not found
- Execute the discover command:
...
- , open a support case using the
...
- IDERA community portal.
...
If your SQL Server instance stores its data on Symmetrix (DMX or VMAX) storage arrays, execute
SYMCLI\BIN\symcfg.exe list
Its output
...
should list all attached Symmetrix storage units. Each of the units that are actually used to store SQL Server DB files should be marked as local in the
...
Attachment column.
...
See example:
...
Symmetrix Attachment Model Version 000190103692 Remote DMX3-24 5773 000190765393 Local VMAX-1 5875 - If your SQL Server
...
- instance stores its data on VNX or CLARiiON storage arrays, execute
SYMCLI\BIN\symcfg.exe list -clariion
Its output should list all attached VNX and CLARiiON storage units.
- instance stores its data on VNX or CLARiiON storage arrays, execute
Verifying Solutions Enabler's Deployment and Configuration
The last verification step should be done on each monitored serer. It should be verified regardless of the storage array series (SYMMETRIX or CLARiiON).
To manually verify that Solutions Enabler was successfully deployed and configured:1.
- Select a database file
...
- that is stored on an EMC sorage array (file size must be > 0).
...
- Open a Windows command prompt.
...
- Navigate to the directory in which the EMC Solutions Enabler is installed.
...
- Execute:
SYMCLI\BIN\symrslv.exe file <full path and name of the selected DB file>
...
- The output should contain a table with the following column titles:
Size,Array,Dev,Offset,PPdevName,Offset, andAttr.ArrayandDevshould present EMC unit and EMC device. If "N/A" is presented instead, then EMC Solutions Enabler failed to map the file. In this case, open a support case using the
...
- IDERA community portal.
...
Need more help? Search the Idera Customer Support Portal.
...
...