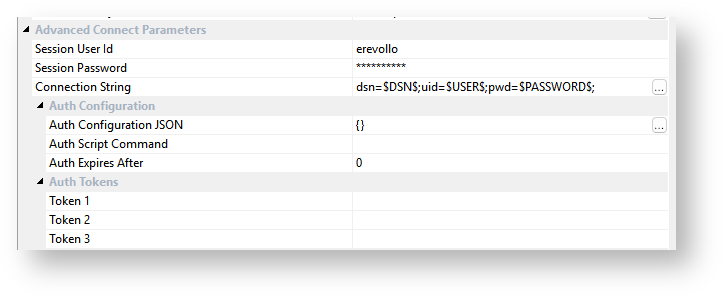
Advanced Connect Parameters
The following sections refer to the management of these fields in each connection properties screen in RED
All but one of the fields under Advanced Connect Parameters are stored in-memory, for the duration of the user's session of RED. Only the Connection String field is persisted to the RED Metadata.
Additionally, the users and passwords entered in the Scheduler Configuration screen in RED are never stored in the metadata and only persist, in-memory, for the duration of the user's session of RED.

Connection Strings
RED will always construct an ODBC connection string for connecting to any ODBC data source, therefore all ODBC, Database and applicable Extensible Source Connections in RED require a connection string to be entered. If no connection string is provided (such as for upgraded repositories pre RED 10.2) then a default is derived for the session duration based on the presence or absence of the user and password fields.
When saving a connection from the connection properties screen, the connection string is stored in the metadata and accepts the following RED tokens for automatic replacement at runtime to avoid storing any credentials in the metadata.
- $DSN$ - replaced at runtime with the ODBC Data Source Name of the connection.
- $USER$ - replaced at runtime with the Session User Id of the connection.
- $PASSWORD$ - replaced at runtime with Session Password of the connection.
- $AUTHTKN_1$ - replaced at runtime with the value of the first defined token.
- $AUTHTKN_2$ - replaced at runtime with the value of the second defined token.
- $AUTHTKN_3$ - replaced at runtime with the value of the third defined token.
Profiles and Session Credentials
For each ODBC, Database or Extensible Source Connection RED maintains an in-memory credential set including the username, password, and connection string for each connection. This in-memory credential set is what we term the ‘Profile’ for authentication during the session of RED.
Additionally the Scheduler Configuration credentials are also stored in-memory for the session and included in the Profile when saving it to disk.
The in-memory profile is session based and therefore the credentials are specific to the user logged on during that session. The connection string itself is however stored in the metadata so that each RED user still uses the same authentication method as other users while in the RED UI.
Saving Profiles to Disk
Profiles can be saved to disk so that users need not enter usernames and passwords into each of their connections whenever they log in to RED.
To save a Profile including session passwords, right click on the Connections node in the objects tree and select 'Save Profile'

Select a name to save the file as and choose to Include Session Passwords. To ensure that all credentials are stored then make sure to open each connection and set the session credentials prior to saving the Profile.
Passwords encrypted at rest

Note
Only Profile files stored in the Windows users AppData directory under sub folders 'WhereScape\RED' will be shown on the RED Login screen.
Tip
The users' AppData location can be found by typing %APPDATA% into the address bar of a Windows browser and pressing enter.
Updating the Scheduler Profile
Similar to saving a RED Profile to disk to persist between sessions for a User, the RED Scheduler also requires persistent storage of the Profile which can be shared securely across Jobs. The RED Scheduler Profile values are stored in a table using secure encryption methods. See the Scheduler Profile Maintenance section for more details.
Using OAuth or similar authentication methods
For some authentication methods you may need to include additional authentication tokens in your connection strings. If the token is static or long lived it can be added directly into one of the Auth Token fields in your connection and referenced in your connection string.
For short lived or expiring tokens a Scripted Authentication approach may be required. This is achieved by setting an Auth Script Command on your connection which could execute an authentication workflow script to retrieve access tokens or other authentication values and update the RED Profile file making them available to the RED UI and Scripts. If you use expiring tokens with the scheduler, you would need to create and schedule a script to refresh your tokens and update your scheduler profile records, see the Scheduler Configuration section for more details.
This would involve the following general steps to be implemented in a script:
- Log in to a server and get a new token (this should be a non-interactive process for the Scheduler).
- On RED startup, run a script that gets the tokens and sets environment variables you can use as connection parameters.
- The script saves tokens and parameters in the profile file in an encrypted form and then reloads the profile file.
- After the above profile record is updated, any further scheduler tasks will pick up the new token.
Tips for Using OAuth or similar authentication methods
For some authentication methods you may need to use a script (or web browser) to login to a data source and generate an access token to use in your connection string. The access token could then be added in the RED Profile file or Scheduler Profile table as the password or one of the Auth Token fields for a connection. If you use expiring tokens with a scheduler then you will need to create a script to refresh your tokens and update your scheduler profile records, see the Scheduler Configuration section for more details.
This would involve the following general steps to be implemented in a script:
- Log in to a server and get a new token (this should be a non-interactive process for the Scheduler).
- Use a script similar to wsl_scheduler_profile_maintence script in RED, that takes the Scheduler Profile Encryption Password and your new token then updates the affected profile record in the redadmin.ws_scheduler_profile metadata table using the WhereScape Encryption Utility.
- After the above profile record is updated, any further scheduler tasks will pick up the new token.
Creating Windows DPAPI Encrypted Base-64 Unicode strings using PowerShell
The encryption and decryption process below can also be achieved using the Encryption Utility
Example PowerShell script to create an encrypted base-64 Unicode string using Windows DPAPI:
If for some reason you need to decrypt the profile file passwords in a script the below method shows how to do this. Note that only the same Windows User that encrypted the password in the first place will be able to decrypt it.
Example PowerShell script to decrypt Windows DPAPI encrypted base64 Unicode string:
Example Profile file
The profile file is a .JSON file which makes it easy to programmatically update any connection attributes it contains.
The following example has had passwords truncated for display purposes.
Using Profiles
The following Environment Variables are created at run-time for Scripts associated to ODBC, Database and Extensible Source Connections:
Where User, Password and Connection Strings are set from the current RED session credentials in the in-memory Profile.
WSL_<META|TGT|SRC>_CONSTRING contains the complete connection string with tokens $DSN$, $USER$, $PASSWORD$ and $AUTHTKN_<1|2|3>$ replaced.
Metadata | Target | Source |
|---|---|---|
WSL_META_DSN | WSL_TGT_DSN | WSL_SRC_DSN |
WSL_META_DSN_ARCH | WSL_TGT_DSN_ARCH | WSL_SRC_DSN_ARCH |
WSL_META_SERVER | WSL_TGT_SERVER | WSL_SRC_SERVER |
WSL_META_DBID | WSL_TGT_DBID | WSL_SRC_DBID |
WSL_META_USER | WSL_TGT_USER | WSL_SRC_USER |
WSL_META_PWD | WSL_TGT_PWD | WSL_SRC_PWD |
WSL_META_CONSTRING | WSL_TGT_CONSTRING | WSL_SRC_CONSTRING |
WSL_META_AUTHCFG | WSL_SRC_AUTHCFG | WSL_SRC_AUTHCFG |
WSL_META_AUTHTKN_[1|2|3] | WSL_TGT_AUTHTKN_[1|2|3] | WSL_SRC_AUTHTKN_[1|2|3] |
Using Advanced Connect with Command Line Tools
Dedicated Command Line Interface (RedCli.exe)
For RedCli commands that only perform RED Metadata operations use:--meta-con-string "<connection string>"
For 'RedCli Deployment' commands a full Profile file will be required since both Metadata and Target connections will need to be established--red-profile "<full path to Profile file>"
Note
When using --red-profile the other --meta- arguments become optional since they can be retrieved from the Profile.
RED Client Command Line (med.exe)
For med.exe batch commands the connection string can be provided using:--meta-con-string "<connection string>"
Batch documentation creation example:
med.exe --create-docs --output-dir "C:\temp\my_doco" --meta-dsn "sql15" --meta-dsn-arch "64"
--meta-user-name "red1" --meta-password "mypass" --meta-con-string
"dsn=$DSN$;uid=$USER$;pwd=$PASSWORD$;database=sql15;"
Note
When using --meta-con-string argument both --meta-dsn and --meta-dsn-arch are still required but the other --meta- arguments become optional depending on your specific connection string requirements.
Enabling Advanced Connect on Extensible Source Connections
To enable Advanced Connect on an Extensible Source Connection you need to edit the UI Configuration for the connection. The new fields are shown below which enables the session credentials and connection string fields, enabling either of these fields will flag the connection as Advanced Connect. See the section Creating the Example Extensible Source Connection Set for more information.
Note
The Session Credentials fields can be enabled without enabling the Connection String field for Extensible Source Connections. This is due to Extensible Source Connections are designed to be flexible and sometimes the Connection String is not needed or is already covered by another configured field. When enabling the Connection String field you must also have Session Credentials enabled too.