Page History
...
- Log on with an administrator account to the computer on which you want to install SQLdm.
- Run Setup.exe in the root of the SQLdm installation kit on the first cluster node.
- Click SQL diagnostic manager on the Quick Start window.
- On the Welcome window of the setup program, click Next .
- Review and accept the license agreement by clicking I accept the terms in the license agreement , and then click Next .
- Accept the default installation folder, or click Change to specify a different folder, and click Next .
- Select the Typical setup type and click Next .
- Select the SQL Server instance and enter a database name.
- Enter the service account information and click Next .
- Click Install .
- In Windows Services, stop the SQLdm Management service and set the Startup type to Manual .
- In Windows Services, stop the SQLdm Collection service and set the Startup type to Manual .
- In Windows Services, stop the SQLdm Predictive Analytics service and set the Startup type to Manual .
Repeat the previous steps on each cluster node. Point to the SQLdm Repository installed on the first node.
...
- Select a disk that is configured in the Cluster Resource Group and create a directory on that disk that you want to use to hold local data for the services.
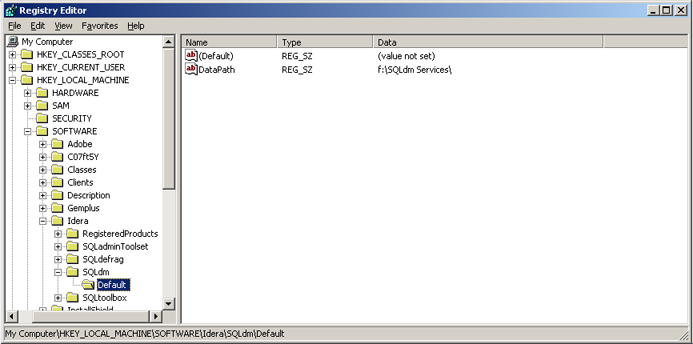
- On the primary node, edit the registry and add a new key named Default to the key \Software\Idera\SQLdm. In this key add a string value called DataPath. Set its value to the full path to the data directory created in step 1 (as shown in the image at the end of the steps).
- In the Failover Cluster Management tool, right-click on Services and Applications and select Configure a Service or Application .
- Provide a name for the service
- Select Generic Service
- Select the SQLdm Management Service
- Enter the network name and IP address for the services
- Select the clustered storage that hosts the path defined in step 1
- Skip the Registry Replication
- Verify the settings and click Next to complete the wizard
- In Services and Applications, click the newly created service name in the Other Resources section and then on the SQLdm Management service and take it offline.
- In Services and Applications, right-click on the newly created service and then on the SQLdm Management Service and select Properties.
- On the General tab, select Use Network Name for computer name
- On the Dependencies tab, add the name of service and disk, and then click Apply
- On the Registry Replication tab, if blank, add SOFTWARE\Idera\SQLdm\Default\DataPath
- In Services and Applications, right-click the newly created service and select Add a Resource and Generic Service .
- Select the SQLdm Collection Service.
- Select Next and finish out the wizard.
- In Services and Applications , right-click on the newly created service and then on the SQLdm Collection Service and select Properties .
- On the General tab, select Use Network Name for computer name
- On the Dependencies tab, add name of service and disk, and then click Apply
- On the Registry Replication tab, add SOFTWARE\Idera\SQLdm\Default\DataPath
- In Services and Applications, right-click the newly created service and select Add a Resource and Generic Service .
- Select the Predictive Analytics service from the list of resources.
- Select Next and then Finish to exit the wizard.
- In Services and Applications, click the newly-created service and then on the SQLdm Predictive Analytics service and select Properties .
- On the General tab, select Use Network Name for computer name
- On the Dependencies tab, add the name of the service and disk, and then click Apply
- On the Registry Replication tab, if blank, add SOFTWARE\Idera\SQLdm\Default\DataPath
- In Windows Services, bring the SQLdm Management service resource online.
- In Windows Services, bring the SQLdm Collection service resource online.
- In Windows Services, bring the SQLdm Predictive Analytics service resource online.
- On the active node on which you installed the SQLdm services, use the Management Service Configuration wizard ( Start > All Programs > Idera > SQL diagnostic manager > Tools > Management Service Configuration Wizard ) to force the services to re-register.
- Test the configuration from the Management Service Configuration wizard before finishing the wizard.
...