Page History
Beginning with version 9.9 (June 2018), you can install the Precise framework on AWS and Azure as well as monitor VMs in those environments.
While the Precise installation process is relatively straight forward, installing in an AWS or Azure environment includes some unique requirements.
| Note |
|---|
You must make sure that the correct inbound rules are open in AWS or Azure. |
| Table of Contents | ||||
|---|---|---|---|---|
|
Installing the Precise Framework
For information about installing the Precise Framework, see Precise framework installation.
Installing Precise for databases
For information about installing Precise for databases, see:
- SQL Server: Precise SQL agent installation
- Oracle: Precise Oracle agent installation
- Db2: Precise DB2 tier collector installation
- Sybase: Precise Sybase tier collector installation
Precise Ports
In order to access Precise and the monitored VMs, you must open certain ports. These ports must be open for environments that are on-premise as well as those that are on Cloud based environments.
The following table shows the standard set of ports that must be open.
| Tip |
|---|
The ports in the following table are by default. You can change the port number during installation, if necessary. |
| Precise Component | Port | Note |
|---|---|---|
| Precise GUI | 20790, 20798 | Verify that these ports are open on the Precise GUI-installed machine and from all of the machines that are going to access the Precise GUI. |
| Precise Framework | 20702 | Verify that this port is open on the main precise installation machine and is accessible from all of the listener machines and all of the product Focal Point machines, such as Oracle FP, SQL Server FP etc. |
| Precise Listener | 20702 | Verify that this port is open on each of the Precise listener machines and is accessible from the Precise framework machine and all of the product Focal Point machines, such as Oracle FP, SQL Server FP etc. |
The following table lists the default ports for the monitored database instances.
| Instance | Port | Note |
|---|---|---|
| SQL Server | 1433 | SQL Server default port. Verify that this port is open on the SQL Server database server machine and is accessible from all of the following machines:
|
| Oracle | 1521 | Oracle server default listener port. Verify that this port is open on the Oracle database server machine and is accessible from all of the following machines:
|
| Sybase | 5000 | Sybase server default port. Verify that this port is open on the Sybase database server machine and is accessible from all of the following machines:
|
| Db2 | 50000 | Db2 server default port. Verify that this port is open on the Db2 database server machine and is accessible from all of the following machines:
|
For more details on each instance installation, see Installing the Precise framework.
Enabling ports in an AWS server
You must enable the ports in the AWS server by adding inbound rules.
To add inbound rules
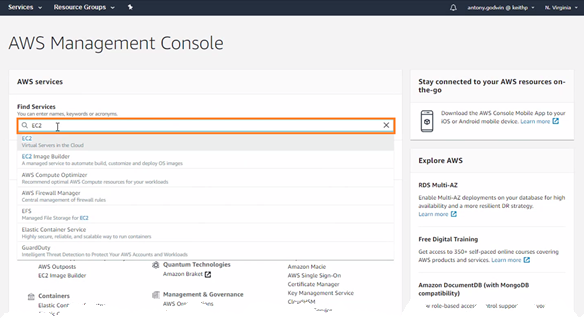
- Log in to the AWS console and search for EC2 services in the search bar.
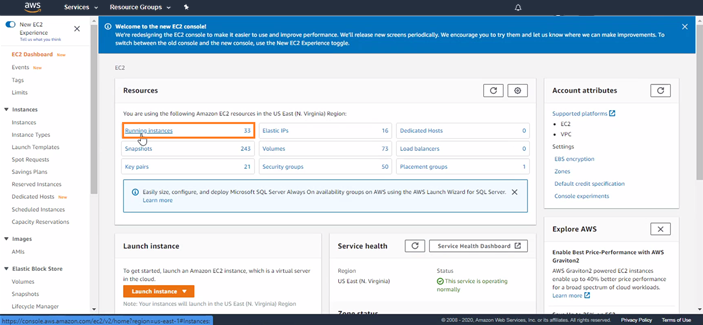
- From EC2 resources, select Running Instances.
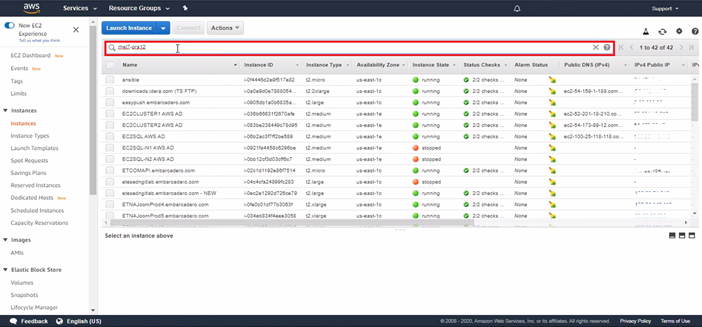
- Using the host name, search for any instance that needs its port opened, and then select the machine.
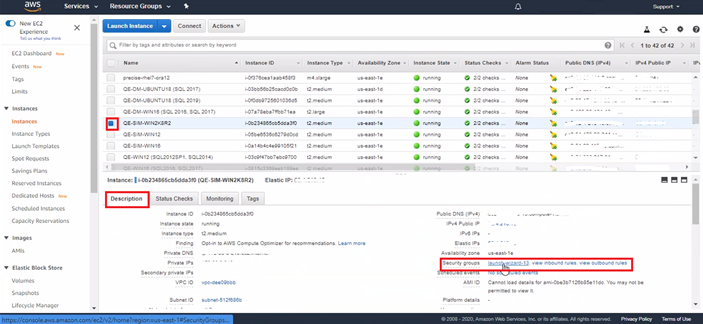
- In the Description section of the lower tab, select the Security group name as highlighted in the following image.
- In the Security Groups details tab, select Inbound Rules, and then edit the inbound rules.
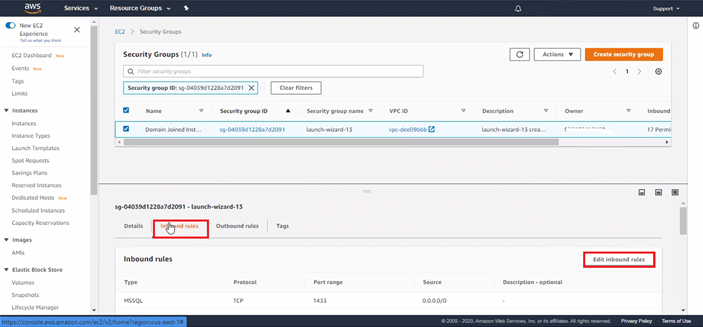
- Click Add rule.
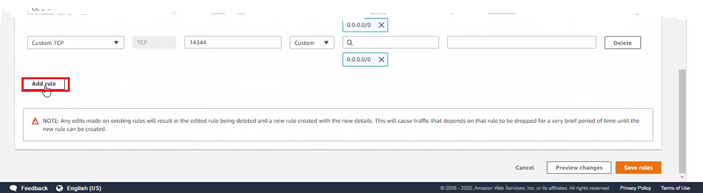
- Complete the details using the following parameters, and then click Save rules:
- Type of port you want to open, such as database server, web servers, some custom port, etc.
- Range of port you want to open, such as 1433 for SQL
Source information includes which machines can access this port.
The list of ports that must be open is summarised in the following table:Technology Open Port Notes Precise Framework 20790
20798Precise GUI port 20702 Precise port Precise PMDB Server (SQL Server) 1433 SQL Server listening port Precise PMDB Server (Oracle) 1521 Oracle listening port Oracle 1521 Oracle listening port 20702 Precise port SQL Server 1433 SQL Server listening port 20702 Precise port Sybase 5000 Sybase listening port 20702 Precise port Db2 50000 Db2 listening port 20702 Precise port 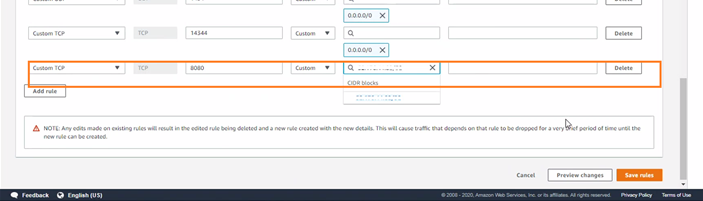
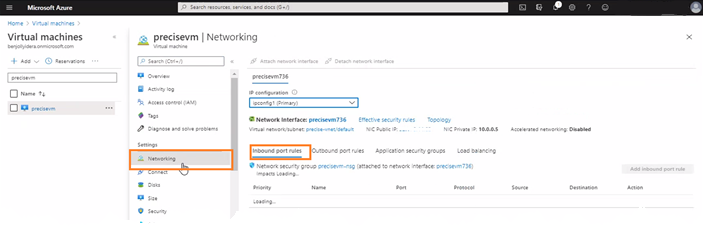
Enabling ports on Azure
To enable ports on Azure
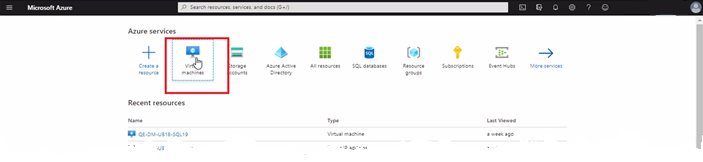
- Log in to the Azure portal, and then click Virtual machines in the Azure services search bar.
- In the results, select the name of the machine on which you want to open ports, and then click Networking on the left-side menu bar and Inbound port rules on the right-side menu bar.
- Click Add inbound port rule, and then complete the following parameters:
- Source. Machines from where access to this port should be allowed.
Destination port. Port that you want to open on the virtual machine.
The list of ports that must be open is summarised in the following table:Technology Open Port Notes Precise Framework 20790
20798Precise GUI port 20702 Precise port Precise PMDB Server (SQL Server) 1433 SQL Server listening port Precise PMDB Server (Oracle) 1521 Oracle listening port Oracle 1521 Oracle listening port 20702 Precise port SQL Server 1433 SQL Server listening port 20702 Precise port Sybase 5000 Sybase listening port 20702 Precise port Db2 50000 Db2 listening port 20702 Precise port 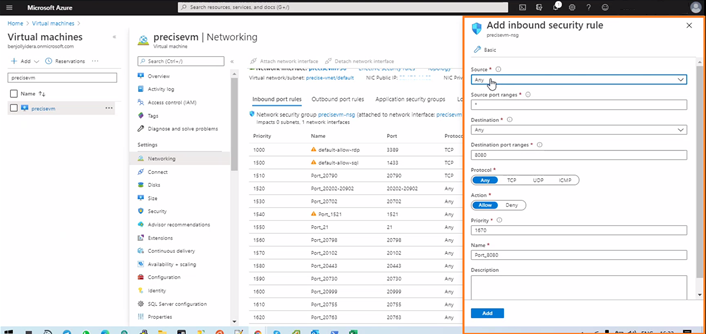
Before installing a SQL agent (collector), check Precise for MS-SQL requirements.
If the SQL instance is part of a SAP or PeopleSoft application, check the full installation guide for further details.
Internationalization
To facilitate SQL Server Internationalization, verify that:
- the locale of the PMDB, FocalPoint, PMDB instances, and servers with monitored SQL instances are valid (and are the same for all servers),
- the instance and database collation of the PMDB and monitored SQL instances are the same, and support chosen locale, and
- the PMDB database is case sensitive.
Adding a SQL instance for monitoring
To add a SQL instance for monitoring
- From the AdminPoint tab, select Installation.
- Click Add in the bottom right-hand corner, as shown in the following image.
The APMInstanceInstaller.exe opens. - Click Open APMInstaller.exe, and the Precise Application Installer opens.
- Select the appropriate Application Name, Application Type, and Database Vendor, and then click Next.
- In the Install Tiers area for the applications, select SQL Server, and then click Add.
- In the Properties tab, add the following SQL instance details:
- SQL Server instance name or <Host>,<Port>
- the server from which you want the instance monitored (local or remote monitoring)
- Windows or SQL authentication
- service credentials
- Click Next. The Preview tab appears.
- Review the details, and then click Install. The installation starts and installs all components for the SQL instance.
- Once the installation is complete, the Finish tab appears.
- Click Finish.
- Review the Application tab to make sure that the new instance appears.
- Repeat these steps to add more instances, and then click Finish.
- Refresh the applications and note that the new application appears.
- Select the Applications tab, and the new application appears with the added SQL Server instance(s).