Page History
1. On the Controls tab, select the Favorites group of controls.
Drag a Push Button onto column 2, in row 1.
2. Using the Layout ribbon change its Alignment to Bottom Center and Flow to Up.
3. Drag a second Push Button onto column 2, row 1.
Change its Alignment to Bottom Center and Flow to Up.
4. Hold down the Shift key and click on both buttons.
...
5. Use the Details / Properties tab to set up the two push buttons as follows:
Property | Value |
|---|---|
Caption | Save |
Name | SAVE |
Property | Value |
|---|---|
Caption | Close |
Name | CLOSE |
Your form should look like the following:

6. Use the Details / Events tab and double-click on the event to create a Click event for each button.
7. Add code to the CLOSE Click event to close the form. Your code should look like the following:
Evtroutine Handling Evtroutine Handling(#CLOSE.Click) #com_owner.closeForm Endroutine
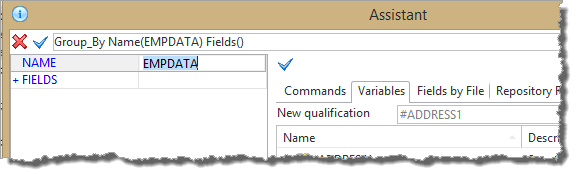
8. At the top of your code, below the Define_Com statements, define a GROUP_BY to include all fields on the form. Your code should look like the following
Group_By Name(#empdata) Fields(#xEmployeeIdentification #xEmployeeTitle #xEmployeeSurname #xEmployeeGivenNames #xEmployeeStreet #xEmployeeState #xEmployeeCity #xEmployeePostalCode #xEmployeeDateofBirth #xEmployeeGender)
You can use AutoComplete to prompt and then select each field. Begin typing each field name (#xEmpl…) and press enter on the required field in the AutoComplete prompt.
Alternatively, type GROUP_BY and press F4 to use the Command Assistant and then the Fields by Table tab.
a. In the Command Assistant, enter the name of the Group_by #EMPDATA.
b. Position the cursor in the Fields parameter.
| Note |
|---|
...
| Note: You may prefer to float and resize the Command Assistant tab so that it easily shows more information. |
| Note |
|---|
Notes:
|
9. Click in the Fields parameter and select the Fields by Table tab and enter xe in the Filter / Table Name:
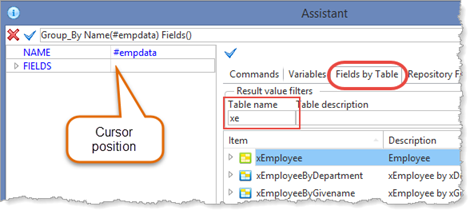
10. Expand the table xEmployee and hold down the Shift key, select xEmployeeIdentification and then xEmployeePostalCode and press Enter. Your Assistant dialog should now look like the following:

| Note |
|---|
...
| Note: The FIELDS parameter has been expanded in this image. |
...
Your Group_by should look like the following:
...
Select the INSERT command and press F1 to open its definition in the Technical Guide to see all its parameters. For example, note that the CHECK_ONLY(*YES) parameter enables "trial" insert to be performed. This would enable a check for errors, before continuing.
...
13. Without entering any data, click the Save button; Your form should look like the following:

14. Click on the ![]() down button on the Status Bar to scroll through all the validation error messages.
down button on the Status Bar to scroll through all the validation error messages.
Having completed the Repository tutorials, you should know that the error messages have been generated by the table's OAM, based on the field and table validation rules.
The Status Bar monitors the Sys_Msgq.MessageAdded and Sys_Msgq.MessageRemoved events and retrieves and displays all messages.
...
15. The INSERT command has a default parameter VAL_ERROR(*LASTDISPLAY). In a form, this will branch to the ENDROUTINE for the event or method routine. To demonstrate this point, add the following MESSAGE command after the INSERT command in the SAVE.Click event routine.
Message Msgtxt Message Msgtxt('This message only displayed on successful INSERTThis message only displayed on successful INSERT')
Recompile your form and retest "add a blank record". Scroll to the end of the status bar messages. The above message will not be shown.
...
17. Change the message following the INSERT command as follows:
Message Msgtxt Message Msgtxt('Employee number Employee number ' #xEmployeeIdentification ' has been added')
Suitable parameter values can be written as expressions.
In In your own applications, you will usually use a message file message for this type of feedback.
18. After the INSERT, add code to reset the employee fields to their default values, using the Group_by:
#EMPDATA #EMPDATA := *default
19. Recompile your form and retest it by adding another employee record. All field values should be reset to their default values as defined in their Repository field definitions, in this case, they are all blank or zeroes.
...
An event routine has an OPTIONS setting with default values as follows:
Evtroutine Handling Evtroutine Handling(#SAVE.Click) optionsoptions(*CLEARERRORS CLEARERRORS *CLEARMESSAGES)
Each time an event routine is executed, by default, it clears field errors conditions and messages.