Page History
...
The Interpoint for Siebel extension of Precise for SQL Server and Precise for Oracle can only receive notifications of user events if specific objects are included in the Siebel Repository File (SRF). Before you can use Interpoint for Siebel, you need to modify the SRF file. This document describes how to add the required objects to the file.
| Anchor | ||||
|---|---|---|---|---|
|
...
- Open Siebel Tools.
- In the Object Explorer, on the Types tab, select Project.
- Create a new project by holding down the pressing Ctrl+n.
- Name the new project, "Precise Interpoint."
- Lock the project by clicking the Locked column to the right.
| Anchor | ||||
|---|---|---|---|---|
|
...
To create the CX_VTSSPID table1. From
- From the File menu, select New Object.
...
- In the New Object Wizard, on the General tab, select Table; then click OK.
...
- In the General dialog box, do the following:
- In the Enter a name for the new Table text box, type CX_VTSSPID.
- From the Choose a Project in which you wish to create the Table list, select Precise Interpoint.
- Under Select the type of the Table, select A stand-alone Table.
...
- Click Next; then click Finish to close the dialog box.
...
- In the Tables workspace, click Apply.
...
- In the Apply Schema dialog box, if needed, type a valid privileged user ID and privileged user password into the relevant text boxes.
...
- Click Apply. The dialog box closes, and the table is created.
...
- In the Tables panel, click Activate to activate the new table.
| Anchor | ||||
|---|---|---|---|---|
|
...
To create the business component1. In
- In Siebel Tools, from the File menu, select New Object. The New Object Wizard opens.
...
- On the General tab, select BusComp.
3. Click OK.
...
- Click OK.
- In the New Business Component dialog box, do the following:
- In the Enter a name for the new Business Component text box, type VTS_SPID.
- From the Select the Project this Business Component will be part of list, select Precise Interpoint.
- From the Select the Table this Business Component will operate on list, select CX_VTSSPID.
...
- Click Next.
...
- In the Single Value Fields dialog box, from the Select a column in the Base table list, select ROW_ID. A default Field name automatically appears in the Enter a name for the Field text box.
...
- Click Add to move the selected row to the table; then click Finish to create the business component.
| Anchor | ||||
|---|---|---|---|---|
|
...
To create the business object1. In
- In Siebel Tools, in the Objects Explorer, on the Types tab, select Business Object.
...
- In the Business Objects panel, from the Edit menu, select New Record. A new record is added to the table in the Business Objects panel.
...
- In the Name column, type: VTS_SPID.
...
- In the Project column, assign the new record to the VERITAS Interpoint project.
...
- On the Types tab in the Object Explorer, select Business
...
- Object > Business Object Component.
...
- From the Edit menu, select New Record. A new record is added to the table in the Business Object Components panel.
...
- In the BusComp column, type: VTS_SPID.
...
- From the Tools menu, select Compile Project.
| Anchor | ||||
|---|---|---|---|---|
|
...
To add the Application_PreNavigate() function1. In
- In Siebel Tools, from the View menu, select Options.
...
- In the Development Tools Options dialog box, on the Scripting tab, note the value of the Scripting Language list and click OK.
...
- In the Object Explorer, on the Types tab, expand Application.
...
- Right-click on the application to be modified and select Lock Object.
...
- Right-click on the application to be modified and select Edit Server Scripts.
...
- In the Server Script Editor, select the Application_PreNavigate function. The function's default script appears in the text panel.
If this function already contains a custom script, contact Precise Customer Support for alternative instructions.
...
- Replace the default script with the following script:
Function Application_PreNavigate (DestViewName As String,
...
 DestBusObjName As String) As Integer
     Dim cmd As String
     Dim oActionBO As BusObject
     Dim vtsBC As BusComp
     Dim spid As String
     Const appName = "Siebel Sales Enterprise"
     On Error Resume Next Set oActionBO = theApplication.GetBusObject("VTS_SPID")
...
 Set vtsBC = oActionBO.GetBusComp("VTS_SPID")
With vtsBC
     ClearToQuery
     ActivateField "Row Id"
     ExecuteQuery ForwardOnly
     FirstRecord
     i = .GetFieldValue("Row Id")
End With
     Set oActionBO = Nothing
     Set vtsBC = Nothing
     cmd = "vrts_srf_agent.exe " + i + " """ + appName + """ """ +
...
DestViewName + """ """ + DestBusObjName + """ """ + LoginName
...
 + """"
     Shell(cmd)
     Application_PreNavigate = ContinueOperation
End Function
If the Scripting Language in use is eScript, use the following script:function Application_PreNavigate (DestViewName, DestBusObjName)
{
try
{
var cmd;
var oActionBO;
var vtsBC;
var appName = "Siebel Sales Enterprise";
oActionBO = TheApplication().GetBusObject("VTS_SPID");
vtsBC = oActionBO.GetBusComp("VTS_SPID");
vtsBC.ClearToQuery();
...
               vtsBC.ActivateField("Row Id");
               vtsBC.ExecuteQuery(ForwardOnly);
               vtsBC.FirstRecord();
               cmd = "start cmd /c vrts_srf_agent.exe " +
               vtsBC.GetFieldValue("Row Id") +//SPID
               " \"" + appName +
               "\" \"" + DestViewName +
               "\" \"" + DestBusObjName +
               "\"\"" + TheApplication().LoginName() +
               "\"";
          vtsBC = null;
          oActionBO = null;
          Clib.system(cmd);
     }
     catch (obj)
     {
          Clib.system( "start cmd /c vrts_srf_agent.exe \"" + obj +
...
 "\"" );
          return (ContinueOperation); //Ignore all exceptions
     }
}
...
- Modify the appName variable to match the name of the Siebel application.
| Anchor | ||||
|---|---|---|---|---|
|
The following procedure replaces the table with a custom view. To replace the table with a custom view1. Log
- Log on to your Siebel database using Query Analyzer. Make sure to log on with a privileged account.
...
- Run the following script:
     DROP TABLE CX_VTSSPID
     GO
     CREATE VIEW [CX_VTSSPID] as select
          '1' as [CONFLICT_ID],
          getdate() as [CREATED],
          '--' as [CREATED_BY],
          getdate() as [LAST_UPD],
          '2' as [LAST_UPD_BY],
          1 as [MODIFICATION_NUM],
          @@spid as [ROW_ID]
     GO
     GRANT SELECT ON [CX_VTSSPID] TO public
     GO
| Anchor | ||||
|---|---|---|---|---|
|
...
To complete the modification1. Save
- Save all changes.
...
- Compile the Siebel project. This will create a new Siebel.srf file.
...
- Test the project on your development machine.
...
- On each of your production Siebel Servers:
...
- Stop the Siebel Server.
...
- Deploy the new Siebel.srf file
...
- Verify that the EnableScripting option in the application CFG file is set to TRUE.
...
- Start the Siebel Server.
| Anchor | ||||
|---|---|---|---|---|
|
The following procedure debugs the script.
To debug the script1. Before
- Before attempting to debug, from the View menu, select Options.
...
- On the Debug file tab, open the file that is specified in the CFG file text box in a text editor.
...
- Make sure that the RepositoryFile and ApplicationName options are set correctly.
...
- Make sure the EnableScripting option is set to TRUE.
| Anchor | ||||
|---|---|---|---|---|
|
For Siebel batch processes to be sampled by the Interpoint for Siebel Collectors, create a tab-delimited text file that contains the mapping of each Siebel server to its host machine, as it appears in Oracle.
To create the text file:1. Log
- Log on to the server where your Siebel AppTier Collector instance is installed.
...
- Create the following tab-delimited text file:
...
- Windows
...
...
<Precise_
...
root>\products\oracle\<SID>\etc\siebel_machines.txt
...
- UNIX
...
...
<Precise_
...
root>/products/oracle/<SID>/etc/siebel_machines.txt
To obtain the list of Siebel servers:1. Log
- Log on to the SrvrMgr utility.
...
- Execute the following command:
list servers
The following list is an example of the results:
Table 1-1 List List of Siebel servers
SBLSRVR_ |
|---|
...
NAME | HOST_NAME |
|---|
...
AsDev1 | POOL-SIEBEL1 |
...
AsDev2 | POOL-SIEBEL2 |
Each returned row represents a Siebel server. The row information can be split into two columns:• The
- The first column,
SBLSRVR_NAMErepresents the name of the Siebel server, for exampleAsDev1.
...
- The second column
HOST_NAMErepresents the corresponding physical machine name, but not necessary as it appears in Oracle.
To find the physical machine name as it appears in Oracle, connect to the Siebel database and execute the following command:
SELECT DISTINCT MACHINE FROM V$SESSION;
The following list is an example of the results:
Table 1-2 Machine 2 Machine name list
MACHINE |
|---|
PRECISE\POOL-SIEBEL1 |
PRECISE\POOL-SIEBEL2 |
If there is no entry in V$SESSION with the physical machine name, use the results from the HOST_NAME column. After inserting the previous results into the siebel_machines.txt file, the contents is as follows:
AsDev1 PRECISE\POOL-SIEBEL1 AsDev2 PRECISE\POOL-SIEBEL2
| Anchor | ||||
|---|---|---|---|---|
|
...
| Anchor | ||||
|---|---|---|---|---|
|
...
- Open Siebel Tools.
...
- In the Siebel Tools, on the Types tab in the Object Explorer, select Project.
...
- Create a new project by
...
- pressing Ctrl+n.
- Name
...
- the new project, "Precise Interpoint."
...
Lock the project, by choosing the Locked column to the right option.
...
Info All objects created in subsequent steps will be grouped under this project.
| Anchor | ||||
|---|---|---|---|---|
|
| Info |
|---|
...
This procedure includes some steps for versions up to version 8.0, and other steps for version 8.0 and higher. For steps where there are differences between versions, the difference has been clearly specified. |
...
- From the File menu, choose New Object. The New Object Wizard opens.
...
- On the General tab, select Table.
...
- Click OK. The General dialog box opens.
Figure 1
...
- General Dialog Box
...
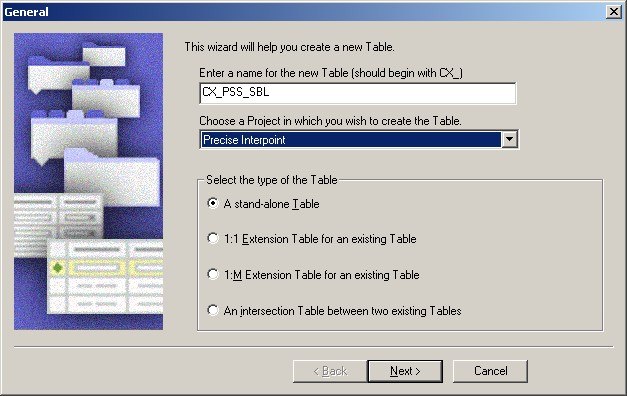
- In the Enter a name for the new Table field, type
...
- CX_PSS_SBL.
...
- From the Choose a Project in which you wish to create the Table drop-down list, select Precise Interpoint.
...
- Under Select the type of the Table, select A stand-alone Table.
...
- Click Next.
...
- Click Finish to close the dialog box.
...
- For versions prior to version 8.0,
...
- in the Tables workspace, click Apply. For version 8.0 and higher, in the Tables workspace, click Apply/DDL. In the displayed dialog box, click Apply.
...
- The Apply Schema dialog box is displayed.
Figure
...
- 2 Apply Schema dialog box
...
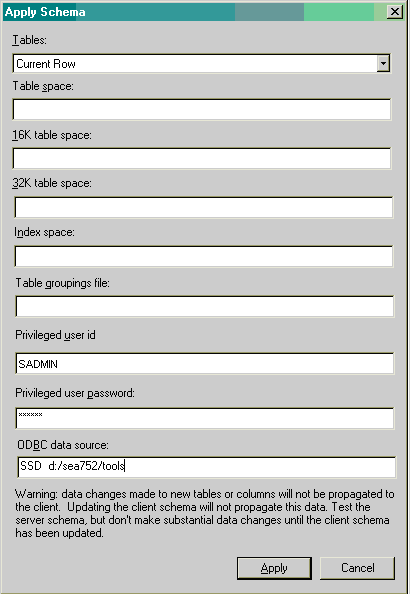
- If needed, type a valid privileged user ID and privileged user password into the relevant text boxes.
...
- Click Apply. The dialog box closes and the table is created.
...
- In the Tables panel, click Activate to activate the new table.
...
- In Siebel Tools, on the Types tab in the Object Explorer, select Table. The Tables panel opens.
- Select table
...
- CX_PSS_SBL.
...
- On the Types tab in the Object Explorer, Expand Tables and select Column. The Columns panel opens.
...
- From the Edit menu, choose New Record. A new record is added to the table in the Columns panel.
...
Add two new columns to the table as follows:
Table
...
3 Table with new columns
Name User Name Physical Type Length
CLIENT_INFO Client Info Varchar 64
ACTION Action Varchar 32
...
Name User Name Physical Type Length CLIENT_INFOClient Info Varchar 64 ACTIONAction Varchar 32 - For versions prior to version 8.0, in the Tables workspace, click Apply. For version 8.0 and higher, in the Tables workspace, click Apply/DDL. In the displayed dialog box, click Apply.
...
- The Apply Schema dialog box is displayed (see Figure
...
- 2).
...
- If needed, type a valid privileged user ID and privileged user password into the relevant text boxes.
...
- Click Apply. The dialog box closes and the records are created.
...
- In the Tables panel, click Activate to activate the table with the new columns.
Figure
...
- 3 Siebel Repository - Column List Dialog Box

| Anchor | ||||
|---|---|---|---|---|
|
...
- In Siebel Tools, from the File menu, choose New Object. The New Object Wizard opens.
...
- On the General tab, select BusComp.
...
- Click OK. The New Business Component dialog box opens.
Figure
...
- 4 New Business Component Dialog Box
...
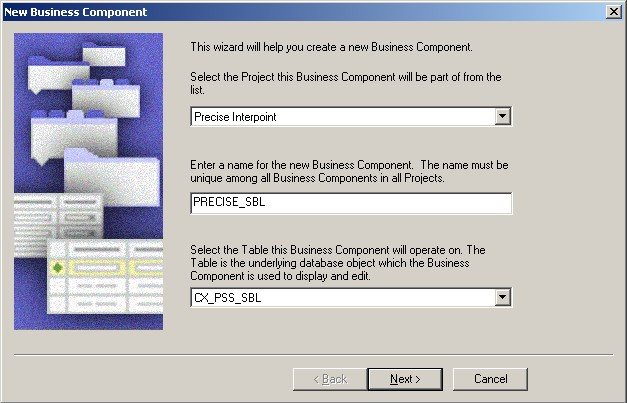
- In the Enter a name for the new Business Component field, type
...
- PRECISE_SBL.
...
- From the Select the Project this Business Component will be part of drop-down list, select Precise Interpoint.
...
- From the Select the Table this Business Component will operate on drop-down list, select CX_PSS_SBL.
...
- Click Next. The Single Value Fields dialog box opens.
Figure
...
- 5 Single Value Fields Dialog Box
...
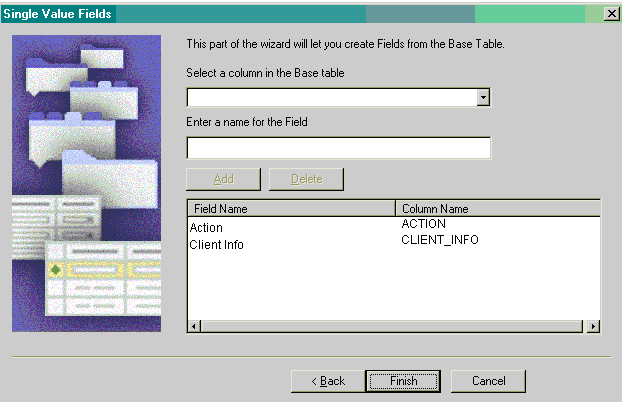
- From the Select a column in the Base table drop-down list, select ACTION. A default field name automatically appears in the Enter a name for the Field text box.
...
- Click Add to move the selected row to the table.
...
- From the Select a column in the Base table drop-down list, select CLIENT_INFO. A default field name automatically appears in the Enter a name for the Field text box.
...
- Click Add to move the selected row to the table.
...
- Click Finish to create the Business Component.
| Anchor | ||||
|---|---|---|---|---|
|
...
- In Siebel Tools, on the Types tab in the Object Explorer, select Business Object. The Business Objects panel opens.
...
- From the Edit menu, choose New Record. A new record is added to the table in the Business Objects panel.
...
- In the Name column, type
...
- PRECISE_SBL.
...
- In the Project column, assign the new record to the Precise Interpoint project.
...
- On the Types tab in the Object Explorer, select Business Object > Business Object Component.
Figure
...
- 6 Siebel Repository - Business Object Component List Dialog Box
...
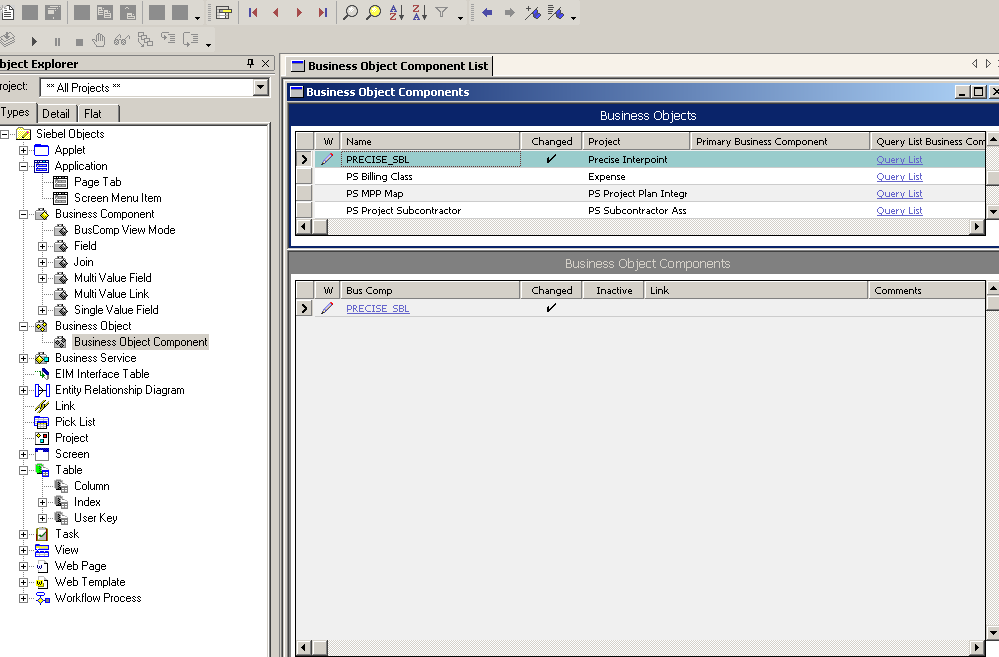
- From the Edit menu, choose New Record. A new record is added to the table in the Business Object Components Panel.
...
- In the Bus Comp column, type
...
- PRECISE_SBL.
...
- From the Tools menu, choose Compile Project.
| Anchor | ||||
|---|---|---|---|---|
|
...
- In Siebel Tools, from the View menu, select Options. On the Scripting tab, note the value of the Scripting Language list. If no language is selected, select the eScript option.
Figure
...
- 7 Development Tools Options Dialog Box
For versions prior to version 8.0: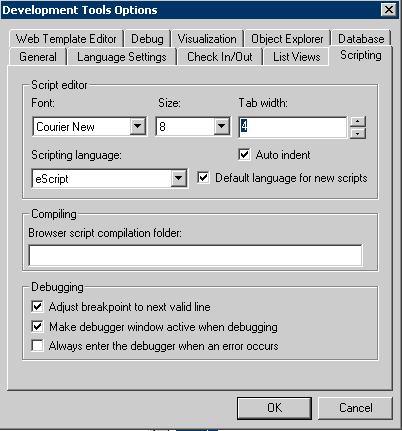
For version 8.0 and higher:
...
- In the Object Explorer, on the Types tab, expand Application.
...
- Right-click on the application to be modified and select Lock Object.
...
- Right-click on the application to be modified and select Edit Server Scripts.
...
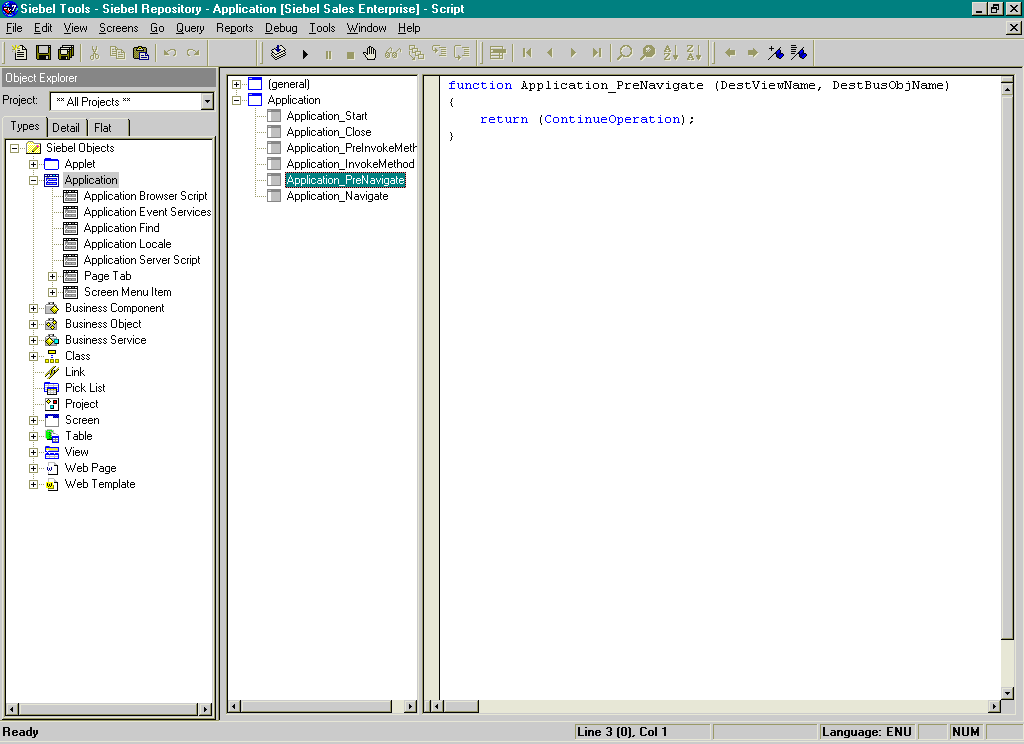
In the Server Script Editor, select the Application_PreNavigate function. The function's default script appears in the text panel.
Figure
...
8 Siebel Repository - Application [Siebel Sales Enterprise] - Script Dialog Box
...
Info If this function already contains a custom script, do not continue. Contact Precise Technical Support for alternative instructions.
...
If the used Scripting Language is eScript, use the following script:
...
Info Modify the appName variable to match the name of the Siebel application.
...
Function Application_PreNavigate (DestViewName, DestBusObjName)
{
     try
     {
          var    oActionBO;
          var    pssBC;
          var    appName = "Siebel Sales Enterprise";
          var    action; //(32)
          var    client_info; //(64)

     oActionBO =
          TheApplication().GetBusObject("PRECISE_SBL");
               pssBC = oActionBO.GetBusComp("PRECISE_SBL");

               action = DestViewName.substring(0,32);
          client_info="S," +
          TheApplication().LoginName().substring(0,14) + "," +
               DestBusObjName.substring(0,31) + "," +
               appName.substring(0,17);

               pssBC.NewRecord(1);
          pssBC.SetFieldValue("Action", action);
               pssBC.SetFieldValue("Client Info", client_info);
               pssBC.WriteRecord();

               pssBC = null;
               oActionBO = null;
     }
     catch (obj)
     {
          pssBC = null;
          oActionBO = null;
          var sText = obj.errText;
          var nCode = obj.errCode;
     }
     finally
     {
          return (ContinueOperation);
     }
}
...
If the used Scripting Language is Visual Basic, use the following script:
...
Info Modify the appName variable to match the name of the Siebel application.
Function Application_PreNavigate (DestViewName As String, DestBusObjName As String) As Integer
     Dim    oActionBO As BusObject
     Dim    pssBC As BusComp
     Dim    action As String
     Dim    client_info As String
     Const appName = "Siebel Field Service"

     On Error Resume Next
     Set oActionBO = TheApplication.GetBusObject("PRECISE_SBL")
     Set pssBC = oActionBO.GetBusComp("PRECISE_SBL")

     action = Left(DestViewName,32)
     client_info="S," + Left(LoginName,14) + "," + Left(DestBusObjName,31) + "," + Left(appName,17)

     pssBC.NewRecord 1
     pssBC.SetFieldValue "Action", action
     pssBC.SetFieldValue "Client Info", client_info
     pssBC.WriteRecord
     Set oActionBO = Nothing
     Set pssBC = Nothing

     Application_PreNavigate = ContinueOperation
End Function
...
Compile the project.
| Anchor | ||||
|---|---|---|---|---|
|
...
- Log in to your Siebel database, using SQLPLUS. Make sure to log in with a privileged account.
...
- Run the following statement:
create table CX_PSS_SBL_TAB as select * from CX_PSS_SBL where 1=2;
...
- Drop the following table:
DROP TABLE CX_PSS_SBL;
...
- Set the following grant for the table:
GRANT SELECT, INSERT, UPDATE, DELETE ON CX_PSS_SBL_TAB to SSE_ROLE;
...
- Create the following view:
create view CX_PSS_SBL as
Select * from CX_PSS_SBL_TAB;
...
- Set the following grant for the view:
GRANT SELECT, INSERT, UPDATE, DELETE ON CX_PSS_SBL TO SSE_ROLE;
...
- Create the following trigger:
CREATE OR REPLACE TRIGGER CX_PSS_SBL_TRG
INSTEAD OF INSERT on CX_PSS_SBL
BEGIN
DBMS_APPLICATION_INFO.SET_CLIENT_INFO (:new.client_info); DBMS_APPLICATION_INFO.SET_ACTION (:new.action);
END;
/
| Anchor | ||||
|---|---|---|---|---|
|
...
- Save all changes.
...
- Compile the Siebel project. This will create a new Siebel.srf file.
...
- Test the project on your development machine.
...
- On each of your production Siebel Servers:
...
- Stop the Siebel Server.
...
- Deploy the new Siebel.srf file
...
- Verify that the EnableScripting option in the application CFG file is set to TRUE.
...
- Start the Server.
| Anchor | ||||
|---|---|---|---|---|
|
...
- Before attempting to debug, select Options from the View menu.
...
- Click the Debug file tab.
...
- Note the file specified in the CFG file field and open it in a text editor.
...
- Make sure the RepositoryFile and ApplicationName options are set correctly.
...
- Make sure the EnableScripting option is set to TRUE.
Precise. Performance intelligence from click to storage. Learn more > >
...