Page History
...
If the Oracle instance is part of an SAP or PeopleSoft application, check the full installation guide for further details.
Installing on Oracle Multitenant architecture (Containerized databases)
You can install Precise on Oracle Multitenant architecture (containerized databases) on Oracle 12c R2 and later.
...
When a new PDB is added to an Oracle instance monitored with Precise, the Precise for Oracle schema must be created on it based on the instructions for Precise for Oracle manual schema collector installation and the Precise for Oracle collectors must be restarted.
Installing an Oracle cluster
Configuring a cluster is supported for Oracle RAC (Real Application Clusters). For more information on how to install an Oracle instance for RAC, see the Installing the Oracle instance section. The Cluster setting dialog is available only in case you have Oracle clusters or instances. For information on editing or removing an existing instance, see Editing or removing tier instances or clusters.
Adding an Oracle instance for monitoring
You can add a new tier instance on the AdminPoint Instances screen. Before adding a tier instance, create a list of all required inputs based on the following information.
...
| Info |
|---|
It is important that you always refresh AdminPoint after adding an instance. |
Defining Oracle property settings
To add properties for an Oracle tier instance
- From the available drop-down menu, select the server containing the Oracle instance.
- Click Add to type the name of a server not in the list. For more information about adding a server, see Adding a new server.
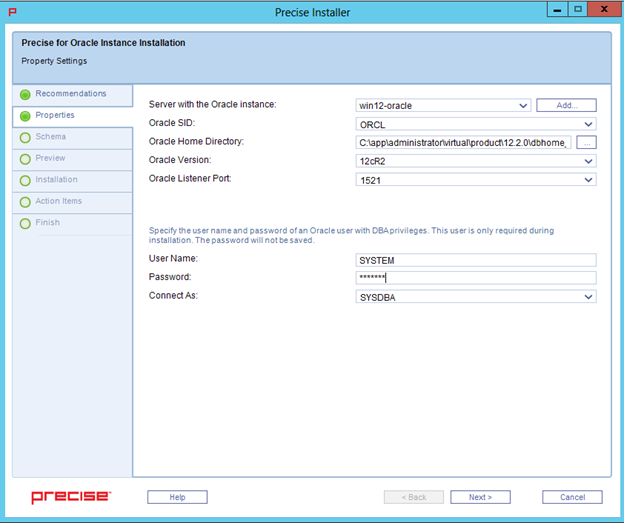
- Select the Oracle SID from the drop-down list, If this is a container database, this must be the CDB name.
- Verify the Oracle home folder path. If this is not correct, use the browse (...) feature to search for, and then select the appropriate location.
- Select the appropriate Oracle release version for the instance.
- Select the appropriate Oracle listener port.
- Type the appropriate user name, and then type the associated password. This is the name of the Oracle user account that has DBA privileges. This account is used for the initial connection with the Oracle database and to create a user account named, "precise" in the database. The DBA user is used only for these tasks during installation and it not used after that process. The password is not saved by Precise.
- In the Connect As field, select the method of connection.
- The Oracle Tier installation requires creating objects (views and packages) in the SYS schema and requires privileged access to the SYS schema. This option allows connecting to your Oracle instance with a user that has SYSDBA privileges.
- If you did not use the manual schema installation, you must connect using a DBA user as 'SYSDBA'. For more information about using the manual schema, see Manually installing Precise for Oracle database schemas.
- To connect as 'SYSDBA,' type the Oracle initialization parameter
remote_login_passwordfileas a password file, meaning that this parameter must be set to share or exclusive. You also must grant SYSDBA privileges to the DBA user for the Oracle Tier installation.
- Click Next.
Entering a user for an Oracle schema credential
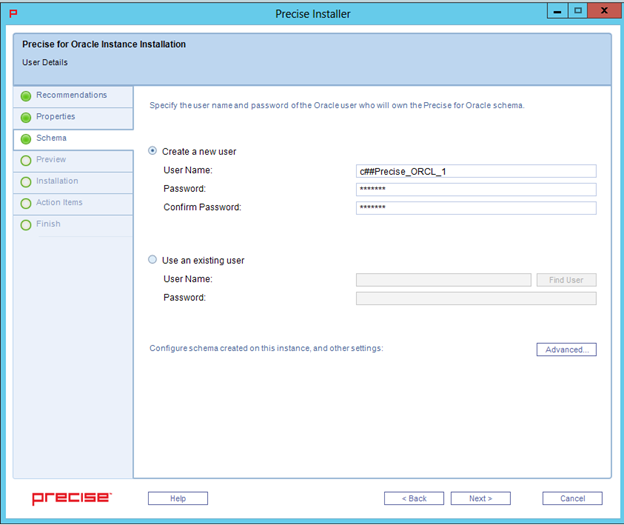
To enter a new user for an Oracle Schema credential
...
- Select Use an existing user.
- Click Find User to locate an existing user name.
- On the Find User window, click Find to filter for an existing (available) user name.
- Select an available user name, and then click OK. If this is installed in an Oracle Container Database, the user must be prefixed C##.
The selected user name now appears on the Oracle Schema credential screen. - On the Oracle Schema credential screen, type the password associated with the existing user.
- If you want to see the tablespaces definition, click Advanced.
- Click Next.
About the tablespace creation page
The tablespace creation script page enables the user to activate default tablespace creation, or to create customized tablespaces.
...
If you want to modify Oracle instance tablespace creation, copy the text that appears on the screen to SQL*PLUS and run as you wish. Then click Next to continue installation while using the tablespaces you have created.
Oracle tier installation Preview page
The Preview page signifies that the AdminPoint Tier installer gathered enough information to begin installation.
...
You can make any necessary changes at this point. Click Back to go to the appropriate screen to make a change, and then click Next to continue installation. Click Cancel to stop the installation process.
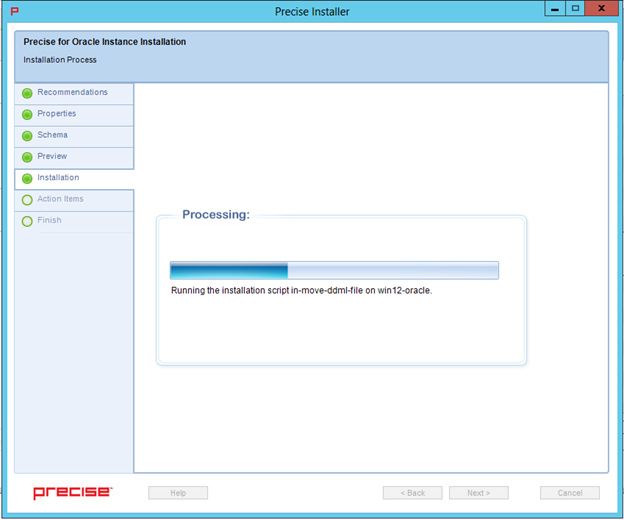
Oracle tier Installation progress page
This page appears when the AdminPoint Tier installer is performing the installation and displays the progress of actual installation on selected servers. The installation process may take several minutes.
Oracle tier installation complete page
This page appears when the AdminPoint tier installer completes installation of all tier instances.
...