Page History
...
Mapping is the process of pairing data source elements between the source and target of a job. These elements (databases, tables, and rows) are compared when the job runs to determine matches and mismatches between the two sources.
Mapping details are shown on the Mapping tab of the editor.
Customize Database Mapping
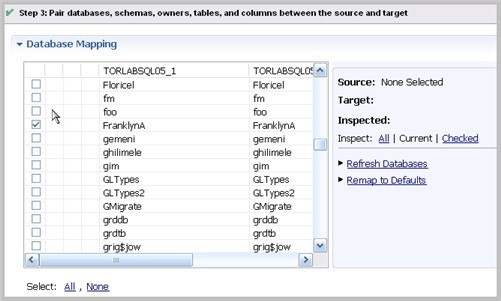
When you first click into the Mapping tab, the Database Mapping table lists the two data sources and lists all of their databases. If you previously selected a database in the Overview tab, it will be is selected. You can scroll right to see the Last Inspected column, which indicates that the pair has not yet been analyzed, or inspected, by DB Change Manager. The right side of the pane provides similar information.
To select databases to compare
Use the check boxes to select the databases you want to compare.
The Select All or None option is helpful if there are many databases in the list.
To change the default target database
- In the database row, select the target.
- From the dropdown menu, select a new database.
Inspect the Databases
Before you can see the default, initial table mappings, you run an inspection process.
To run the database comparison inspection
On the right side of the Database Mapping pane, click one of the following Inspect options:
All inspects all pairs in the table. This is not recommended if you have a large number of databases.
Current inspects the current object mappings.
Checked inspects only those pairs selected in the table.
Alternatively, you can select a row and in the Table Mapping pane click Yes, retrieve the objects in this pair.
Once inspected, icons in the table that indicate how much of the selected objects matched. Hover over the icon to see more information.
To restore the Database Mapping table to its original settings
In the Database Mappings pane, click Remap to Defaults.
All settings revert to the original object mappings saved with the job, based on the options you selected in the Mapping tab.
Customize Table Mapping
The Table Mapping pane lists the paired tables. The icons indicate whether mappings were complete, and if not, error icons indicate what problems were encountered, if any.
To change the mapping to a new target column
In the table row, select the target.
From the dropdown menu, select a new target column.
To view or update the column mappings of a pair of tables
Select a row by highlighting it with the cursor. (The check box is irrelevant for this task.)
On the right side of the pane, click View Column Mapping.
In the Columns and Comparison Key pane, you can:
Select or deselect columns to use in the comparison job. Since this could affect referential integrity, see also: Resolution Options.
Change or add a comparison key if multiple keys are available. In the Comparison Filter pane, you can:
Write a WHERE clauses to use during the comparison.
Create a different WHERE clause per table in the pair. Select Separate Where Clause and an additional text box is added for a second WHERE clause.
When entering selective WHERE clauses, do not include the WHERE keyword; for example, use “AGE>12” instead of “WHERE AGE>12”.
Reconfigure the Data Source Mapping
After configuring and running a comparison job, you may discover that you need to set different mapping options. You can reconfigure the way DB Change Manager maps data source elements and then run the job again.
To reconfigure the automatic mapping process
In the Options tab, select or deselect Mapping Options. The options are also described in Mapping Options.
If you change the mapping options in Preferences, they will become the defaults for all new jobs.
In the Mapping tab, click Refresh Databases and Owners to update the automatic comparison.
Set Job Notification Options
When a job completes, DB Change Manager provides various ways of notifying you. See Setting Job Notifications for details.
Run the Data Comparison Job
After you have specified the options and mappings for a data comparison job, you can run it.
To run a job
Click File > Save to save the job before you run it.
In the upper right of the Data Comparison Job editor, click the Run icon.
While the process runs, the Results tab appears and displays the Comparison Summary pane. This information includes:
Source and target data source names
When the job started
Estimated remaining time for the job to run
Elapsed time of the job
The names of objects currently being compared
A progress bar showing percentage completion
Review Comparison Results
After a job run completes, the Results tab shows the Comparison Results table.
The Comparison Results table lists:
The source and target databases
Progress status; either Done, Failed, or, if no pairs were specified, Nothing to Compare
The Compare Index percentage of matches
The Results column View icon links to details about the comparison job
After running a data comparison job, you may decide to synchronize one to the other. For more information, see Synchronizing Data Repositories.
...