Page History
...
- License: SQL DM for MySQL ships with 1 year of free upgrades. After that you will be offered an upgrade with discount. Our website always tells the terms and conditions. Also our website has a Portal for registered users from where you can download free upgrades and purchase upgrades after the expiry of the free upgrade period.
- Technical: The automatic installers (the Windows version and the RPM build for Redhat type Linux) handles everything automatically. The gz-compressed build for other Linux's requires that you run execute a few installation scripts from a command shell. We constantly improve and simplify this. After extracting the tar.gz package, you get a file called README. Please refer to that file for details.
- Need to monitor more servers: You can upgrade anytime your SQL DM for MySQL installation from monitoring a certain number of servers to higher numbers by opening the License Manager and enter a new license key. If you need this please first contact us through our ticket system. We will consider the value of your existing license and compensate you (details depend on what license you have and what you need and how old your existing license is).
| Note | ||
|---|---|---|
| ||
Do not forget to backup whatever JavaScript you have edited, as they get overwritten when you upgrade. You can take a back-up of Counters.def and Udo.def located inside SQL DM for MySQL folder: MONyog for this. Alternatively, you can directly upgrade. After upgrade you get your JS changes as a conflict in SQL DM for MySQL UI, you can resolve those and keep your changes. |
...
Create a directory
Code Block theme Confluence mkdir sslcert
Now protect the directory,
Code Block theme Confluence chmod 0700 sslcert
Create two sub-directories
Code Block theme Confluence mkdir certs private
Create a database to keep track of each certificate
Code Block theme Confluence echo '100001' >serial touch certindex.txt
Create a custom config file for OpenSSL to use similar to openssl.cnf in your /etc/pki/tls folder.
Code Block theme Confluence dir = . [ ca ] default_ca = CA_default [ CA_default ] serial = $dir/serial database = $dir/certindex.txt new_certs_dir = $dir/certs certificate = $dir/cacert.pem private_key = $dir/private/cakey.pem default_days = 365 default_md = md5 preserve = no email_in_dn = no nameopt = default_ca certopt = default_ca policy = policy_match [ policy_match ] countryName = match stateOrProvinceName = match organizationName = match organizationalUnitName = optional commonName = supplied emailAddress = optional [ req ] default_bits = 1024 # Size of keys default_keyfile = key.pem # name of generated keys default_md = md5 # message digest algorithm string_mask = nombstr # permitted characters distinguished_name = req_distinguished_name req_extensions = v3_req [ req_distinguished_name ] 0.organizationName = Organization Name (company) organizationalUnitName = Organizational Unit Name (department, division) emailAddress = Email Address emailAddress_max = 40 localityName = Locality Name (city, district) stateOrProvinceName = State or Province Name (full name) countryName = Country Name (2 letter code) countryName_min = 2 countryName_max = 2 commonName = Common Name (hostname, IP, or your name) commonName_max = 64 0.organizationName_default = My Company localityName_default = My Town stateOrProvinceName_default = State or Providence countryName_default = US [ v3_ca ] basicConstraints = CA:TRUE subjectKeyIdentifier = hash authorityKeyIdentifier = keyid:always,issuer:always [ v3_req ] basicConstraints = CA:FALSE subjectKeyIdentifier = hashCreate a root certificate. All other certificates you create will be based of this. Since this is not a commercial certificate software may complain when they use your certificates. You may give people the "public" certificate and your certificate works like the commercial ones when they import it. To create, while in the 'sslcert' directory type:
Code Block theme Confluence openssl req -new -x509 -extensions v3_ca -keyout private/cakey.pem -out cacert.pem -days 365 -config ./openssl.cnf
You will be prompted for information and a password. Do not lose this password, make sure it is a secure one and back-up the two files that are created.
The two files that are created are cacert.pem, which is the one you can give to others for import in their browsers, and cakey.pem, which will be in the private directory.Create a key and signing request
Code Block theme Confluence openssl req -new -nodes -out name-req.pem -keyout private/name-key.pem -config ./openssl.cnf
You will be prompted for information. The critical part is the "Common Name". This must be the server's hostname, such as mail.your.domain or the IP address. If you want to cover all subdomains you can enter *.your.domain. Use the "Organizational Unit" to remind you what the certificate is for, such as "Web Server". This generates two files:
name-req.pem - the request
name-key.pem - the private key in the private directory
Sign the request. This generates the certificate:
Code Block theme Confluence openssl ca -out name-cert.pem -config ./openssl.cnf -infiles name-req.pem
You will be prompted for the password used when creating the root certificate. Two files are created:
- <number.pem> - a copy of it in the certs directory
- name-cert.pem - which is the certificate
Copy to the correct location For Apache 2.x on Red Hat using the default location, the directory is:
For the name-key.pem:
Code Block theme Confluence cp name-key.pem /etc/httpd/conf/ssl.key/
For the certificate:
Code Block theme Confluence cp name-cert.pem /etc/httpd/conf/ssl.crt/
Create a Virtual Host
Code Block theme Confluence <VirtualHost ip-system-A>:443> DocumentRoot /var/www/html ServerName myserver ErrorLog /etc/httpd/logs/ssl_error_log TransferLog /etc/httpd/logs/ssl_access_log SSLEngine On SSLCertificateFile /etc/httpd/conf/ssl.crt/name-cert.pem SSLCertificateKeyFile /etc/httpd/conf/ssl.key/name-key.pem </VirtualHost>Configure proxy in Apache described in FAQ 13 and restart Apache.
Edit the Hosts file [/etc/hosts]Code Block theme Confluence <ip-system-A> myserver
...
Check if the server is filtered based on a particular state, change your server filter to All Servers and now you can see your server between the servers if you had successfully registered it. You can also use the search bar next to the server filter to search for your server name or tag name to get to your server.


| Anchor | ||||
|---|---|---|---|---|
|
...
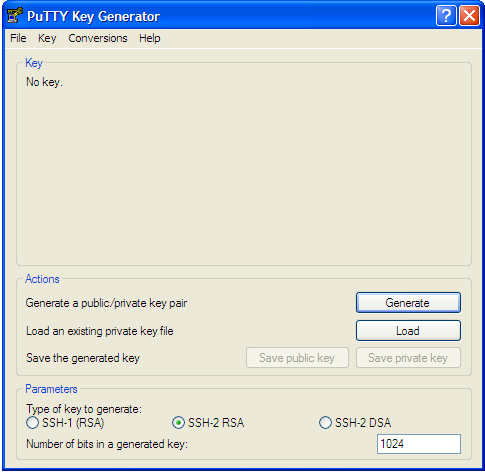
- Go to PuTTY key generator, and generate a public/private key on your local system (refer the screenshot). Click the Generate button to generate the keys.
- Copy the public key generated under the "Key" space to the authorized_keys file, which is located in the .ssh directory on the remote host that you want to connect to.
- Go to "Conversions" in PuTTY key generator and click "Export openssh key" and save the new converted private key in a file.
- Now open the file containing the converted OpenSSH private key, copy this key and paste in the "Private key" field in SQL DM for MySQL (Edit server -> SSH settings -> Private key).
...