Page History
...
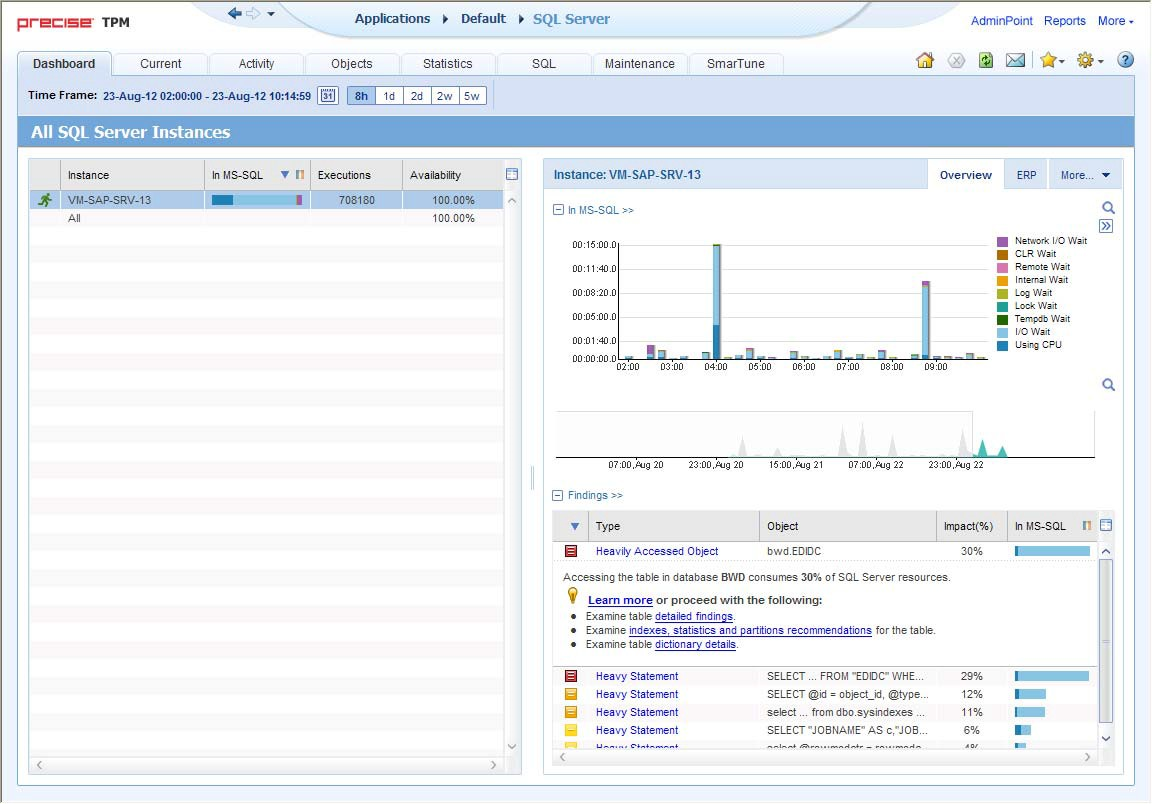
Figure 1 How a typical tab is structured
| Anchor | ||||
|---|---|---|---|---|
|
The Precise bar enables you to keep track of where you have been and provides various controls. The following table describes the function of each of the toolbar buttons.
...
| Icon | Name | Description |
|---|---|---|
 | Back | During a work session, keeps track of where you have navigated to. The Back and History buttons enable you to navigate between previously visited views. The Back control displays your previous view. |
 | Forward | Enables you to navigate to the next view. This button is only enabled if you clicked Back or if you chose a history option. |
 | AdminPoint | Opens Precise AdminPoint. |
 | Home | Navigates to the highest level entity, usually the instance or Tier (all instances). The time frame settings remain the same. |
 | Stop | Stops a request for information from the server. |
 | Refresh | Updates the data currently displayed. |
 | Favorites | Enables you to add or remove favorites in your Favorites list. |
 | Send | Opens a new email message in your email program with the link to the current application in context. |
 | Settings | Opens the General Settings and Time Frame Settings dialog boxes. |
 | Help | Opens the online help in context. |
| Anchor | ||||
|---|---|---|---|---|
|
The Main area displays general information on the selected entity. The structure of this area depends on the selected entity and tab.
...
In some tabs, you can filter the contents of the view by clicking the Filter button. See Filtering data.
| Anchor | ||||
|---|---|---|---|---|
|
The Association area lists entities that have similar attributes and that are related to the selected entity named in the Tab heading. Besides the Tab bar, the Association area is the main navigation tool. It enables you to drill down from one entity to related entities (usually of a different type).
...
The Association control, accessed by the arrow icon, allows you to associate with different entities. The last option, More..., opens a dialog box that lets you carry out additional operations, such as to view additional associations, change the sort order, or control the number of returned rows.
...
| Anchor | ||||
|---|---|---|---|---|
|
The term '"in-context' " means that you can display additional information on a selected item by drilling down to another tab or view. The filter settings you defined (for example, the selected time frame you chose) and the entity you selected are carried over to the other view or tab, to allow you to continue analyzing your subject from a different perspective. This concept takes on slightly different meanings depending upon where you are attempting to drill down in context from.
...
- Number of items that will be displayed for each association. From the list, select the maximum number of items that will be displayed in a table. The default is 50 items. You can control the number of items returned for a specific association by using the More... option option in the Association controls. This way, you can display up to 500 items.
- Maximum number of characters to display in a text ToolTip. When you move your cursor over text columns in a table listing Statements or PL/SQLs, a ToolTip appears, displaying more text than can normally fit into a table cell. This field controls the maximum number of characters that can be displayed. The default is 500 characters.
- How often the information in the Current tab is refreshed. If you select the Auto-refresh Current tab every check box, the Current tab automatically refreshes at the specified interval. By default, the tab is not refreshed automatically. If you select this option, the default refresh interval is every five minutes.
...
In the Tuner tab you can change the Login name and Password used when launching Microsoft® Microsoft SQL Server Query Analyzer and the Recommend Indexes processes.
...
- Click the calendar icon. In the dialog box that is displayed perform one of the following:
- To define a time frame independent from the current time, select the ‘Time Range’ option and Time Range, and then select the Start and End dates and times.
- To define a time frame up to the current time, select the ‘Last’ option Last, and then enter the desired time frame.
- To use one of the three previously used time frames, select the ‘Recently used’ option and from the drop-down menu Recently used, and then select the desired time frame.
- To use a previously saved time frame, select Use a previously saved time frame and from the drop-down menu , and then select the desired time frame.
- To save your settings for future access, select Save these definitions for future use as:, and then enter a name in the corresponding field.
- Click OK.
...
You can send an email message to one or more recipients from the Precise toolbar. The default subject for the message will be is, "Link to a Precise application."
...
For more information on configuring permissions and roles, see the Precise Administration Guide.
| Anchor | ||||
|---|---|---|---|---|
|
...
This URL provides secure access to the StartPoint using authorized roles. From here, you can launch all Precise products. It gives you a quick overview of the status of your applications and access to the AdminPoint, where you can perform various management tasks (.
For more information, see the Precise Administration Guide for details).
| Info |
|---|
You must have local administrator privileges on the server where the StartPoint is running. |
...
- Type the address of the StartPoint user interface into the Address bar of your browser and click Enter. The Precise login page opens. The login page provides secure access to Precise and to your specific product.
- Specify your authorized role name and password. By default, both role name and password are admin. For For more information about role names, see the Precise Administration Guide.
- Click Login. The StartPoint page opens. This is the Precise home page.
- On the Product Selection bar, from the drop-down list, select the product you want to open.
...