Page History
...
The Interpoint for Siebel extension of Precise for SQL Server and Precise for Oracle can only receive notifications of user events if specific objects are included in the Siebel Repository File (SRF). Before you can use Interpoint for Siebel, you need to modify the SRF file. This document describes how to add the required objects to the file.
| Anchor | ||||
|---|---|---|---|---|
|
...
- In Siebel Tools, from the File menu, select New Object. The New Object Wizard opens.
- On the General tab, select BusComp.
- Click OK.
- In the New Business Component dialog box, do the following:
- In the Enter a name for the new Business Component text box, type VTS_SPID.
- From the Select the Project this Business Component will be part of list, select Precise Interpoint.
- From the Select the Table this Business Component will operate on list, select CX_VTSSPID.
- Click Next.
- In the Single Value Fields dialog box, from the Select a column in the Base table list, select ROW_ID. A default Field name automatically appears in the Enter a name for the Field text box.
- Click Add to move the selected row to the table; then click Finish to create the business component.
...
- In Siebel Tools, in the Objects Explorer, on the Types tab, select Business Object.
- In the Business Objects panel, from the Edit menu, select New Record. A new record is added to the table in the Business Objects panel.
- In the Name column, type: VTS_SPID.
- In the Project column, assign the new record to the VERITAS Interpoint project.
- On the Types tab in the Object Explorer, select Business Object > Business Object Component.
- From the Edit menu, select New Record. A new record is added to the table in the Business Object Components panel.
- In the BusComp column, type: VTS_SPID.
- From the Tools menu, select Compile Project.
...
| Anchor | ||||
|---|---|---|---|---|
|
| Info |
|---|
This procedure applies to includes some steps for versions up to version 8.0, and other steps for version 8.0 and higher. For steps where there are differences between versions, the difference has been clearly specified. |
- From the File menu, choose New Object. The New Object Wizard opens.
- On the General tab, select Table.
- Click OK. The General dialog box opens.
Figure 1 General Dialog Box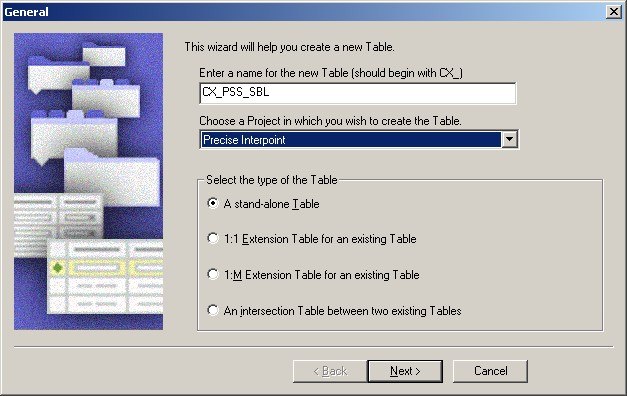
- In the Enter a name for the new Table field, type CX_PSS_SBL.
- From the Choose a Project in which you wish to create the Table drop-down list, select Precise Interpoint.
- Under Select the type of the Table, select A stand-alone Table.
- Click Next.
- Click Finish to close the dialog box.
- For versions prior to version 8.0, in the Tables workspace, click Apply. For version 8.0 and higher, in the Tables workspace, click Apply/DDL. In the displayed dialog box, click Apply.
- The Apply Schema dialog box is displayed.
Figure 2 Apply Schema dialog box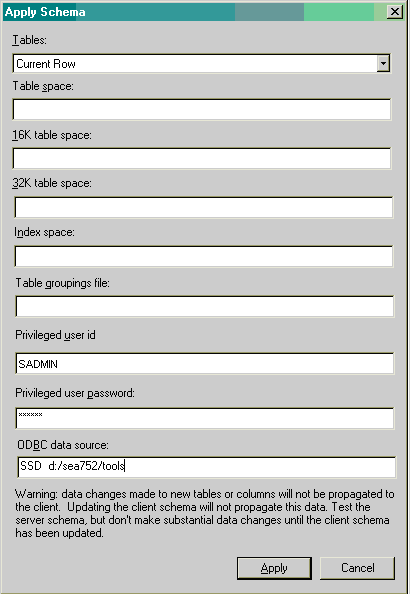
- If needed, type a valid privileged user ID and privileged user password into the relevant text boxes.
- Click Apply. The dialog box closes and the table is created.
- In the Tables panel, click Activate to activate the new table.
- In Siebel Tools, on the Types tab in the Object Explorer, select Table. The Tables panel opens.
- Select table CX_PSS_SBL.
- On the Types tab in the Object Explorer, Expand Tables and select Column. The Columns panel opens.
- From the Edit menu, choose New Record. A new record is added to the table in the Columns panel.
Add two new columns to the table as follows:
Table 3 Table with new columnsName User Name Physical Type Length CLIENT_INFOClient Info Varchar 64 ACTIONAction Varchar 32 - For versions prior to version 8.0, in the Tables workspace, click Apply. For version 8.0 and higher, in the Tables workspace, click Apply/DDL. In the displayed dialog box, click Apply. The Apply Schema dialog box is displayed (see Figure 1- 2).
- If needed, type a valid privileged user ID and privileged user password into the relevant text boxes.
- Click Apply. The dialog box closes and the records are created.
- In the Tables panel, click Activate to activate the table with the new columns.
Figure 3 Siebel Repository - Column List Dialog Box
...
- In Siebel Tools, on the Types tab in the Object Explorer, select Business Object. The Business Objects panel opens.
- From the Edit menu, choose New Record. A new record is added to the table in the Business Objects panel.
- In the Name column, type PRECISE_SBL.
- In the Project column, assign the new record to the Precise Interpoint project.
- On the Types tab in the Object Explorer, select Business Object > Business Object Component.
Figure 6 Siebel Repository - Business Object Component List Dialog Box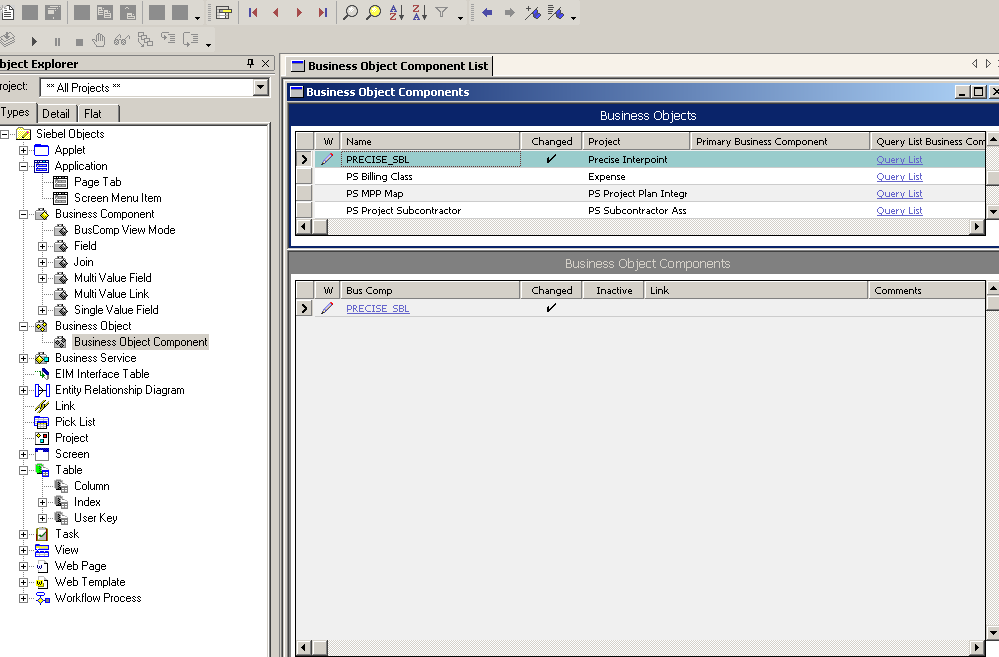
- From the Edit menu, choose New Record. A new record is added to the table in the Business Object Components Panel.
- In the Bus Comp column, type PRECISE_SBL.
- From the Tools menu, choose Compile Project.
...