Dimensions are often sourced from one table in the base application. In many cases, some codes require description lookups to complete the de-normalization of the dimensional data.
The process for building a dimension is the same for most other tables and begins with the drag and drop of the Load table that contains the bulk of the dimensional information.
Drag and Drop
- Create a dimension target by double-clicking on the Dimension group in the left pane.
- The middle pane displays a list of all existing dimensions. When this list is displayed in the middle pane, the pane is identified as a target for new dimension tables.
- Browse to the Data Warehouse via the Browse > Data Warehouse menu option.
- Drag the Load table, which contains the bulk of the dimensional columns, into the middle pane.
- Drop the table anywhere in the pane.
- The new object window appears and classifies the new object as a Dimension and provides a default name based on the Load table name. Accept this name or enter another name and click OK to proceed.
Dimension Type
A dialog appears as shown below. There are four choices for the default generation of the Dimension table and its update procedure. 
- The first choice is a Normal dimension where a dimensional record is updated and changed whenever any of the nonbusiness key information changes.
- The second choice is a Slowly Changing dimension where new dimension records are created when certain identified columns change.
For custom database targets, you can set the initial default values for the DSS columns that are used in the procedure generation for slowly changing dimensions. Refer to DSS Columns for Custom Targets for details.
- The third choice is a Previous values dimension, which enables the storing of the last values of selected fields in secondary columns.
- The fourth choice is a Date Ranged dimension, which supports source systems that provide start and end dates.
With any dimension, we identify a Business Key that uniquely identifies the dimension records.
For example in the case of the product dimension, the product code is deemed to be the business key. The code uniquely identifies each product within the dimension. The product may also have a name or description and various other attributes that distinguish it (e.g. size, shape, color, etc.).
A common question when handling dimensions is what to do when the name or description changes:
- Do we want to track our fact table records based only on the product code? or
- Do we also want to track records based on different descriptions?
An example:
Code | Description | product_group | sub_group |
|---|---|---|---|
1235 | 15oz can of brussels sprouts | canned goods | sprouts |
This product has been sold for many years and we consequently have a very good history of sales and the product's performance in the market. The company does a '20% extra for free' promotion for 3 months during which time it increases the size of the can to 18oz. The description is also changed to be '15 + 3oz can of brussel sprouts'. At the end of the promotion, the product is reverted to its original size and the description changed back to its original name.
The question is, do we want to track the sales of the product when it had a different description (slowly changing), or should the description of the product simply change to reflect its current name (normal). For this scenario, a previous value dimension would not provide much advantage, so it is not discussed.
The decision is not a simple one, and the advantages and disadvantages of each choice are discussed below.
Slowly Changing
- Allows the most comprehensive analysis capabilities when just using the product dimension.
- Complicates the analysis. It does not allow a continuous analysis of the product called '15oz can of brussel sprouts' when the description is used. This analysis is however still available through the code which has not changed.
- Adds considerable additional processing requirements to the building of the fact tables that utilize this dimension.
- May track data quality improvements rather than real business change.
Normal
- Does not allow specific analysis of the product during its size change. Note, however, that this analysis will probably be available through the combination of a 'promotion' dimension.
- Provides a continuous analysis history for the product called '15oz can of brussel sprouts'. An analysis via description and code will produce the same results.
- Simplifies analysis from an end user's perspective.
As mentioned above, the choice is never a simple one. Even among experienced data warehouse practitioners, there will be a variety of opinions. The decision must be based on the business requirements. In many cases keeping the analysis simple is the best choice, at least in the early stages of a data warehouse development. Slowly changing dimensions do have a place, but there is nearly always an alternate method that provides equal or better results. In the example above, a promotion dimension coupled with the product dimension could provide the same analysis results while still keeping product-only analysis simple and easy to understand.
Previous Values Dimension Type
If you selected a 'Previous values' dimension type, the following questions will be asked. If one of the other two types were chosen then proceed directly to Dimension Properties.
The following dialog appears: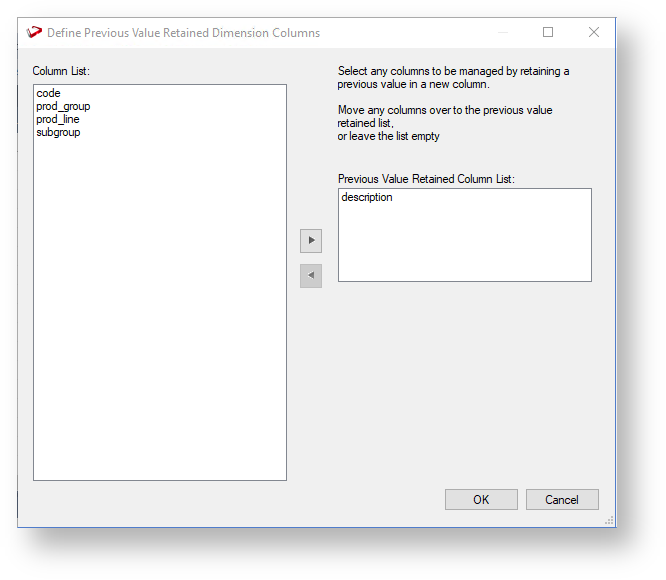
It requests the definition of each column that will be managed by storing the previous value in a separate additional column. Note that the business key cannot be used in this manner, as a change to the business key will result in a new record.
Select the columns to be managed and click OK.
The following dialog appears for each column that has been selected.
Either accept the name of the additional column or enter a new name.
Dimension Properties
Once the dimension type is chosen, the Properties screen appears. Change the storage options if required. If prototyping and the dimension are simple (i.e. one source table) then it is possible to create, load, and update the dimension in a couple of steps. If you wish to do this select the (Build Procedure...) option from the Update Procedure drop-down, and answer Create and Load to the next question.
Create and Load
The following window appears after the Properties screen and asks if you want to create the dimension table in the database and execute the update procedure.
If you are satisfied with the columns that will be used and do not wish to add additional columns you can click the Create and Load button.
In this case, it would be normal practice to select the (Build Procedure...) option from the 'Update Procedure' drop-down box in the previous Properties window.
If no procedure has been selected then select the Create button as no update will happen in any event.
If Create or Create and Load is selected and a new procedure creation is chosen, proceed directly to the Generating the Dimension Update Procedure section.
If you have additional columns to add or columns to delete, click Close and proceed as follows below.
It is possible to create and load the table via the Scheduler by selecting this option from the drop-down list on the Create and Load button: 
Deleting and Changing columns
The columns defined for the dimension are displayed in the middle pane.
It is possible to delete any unwanted columns by highlighting a column name or a group of names and choosing the Delete key.
The name of a column can also be changed by selecting the column and using the right-click menu to edit its properties. Any new name must conform to the database naming standards. Good practice is to use alphanumerics and the underscore character.
Refer to the Column Properties for a more detailed description of the various fields.
When prototyping, and in the initial stages of an analysis area build it is best not to remove columns, nor to change their names to any great extent. This type of activity is best left until after end users have used the data and provided feedback.
Adding additional columns
With the columns of the dimension table displayed in the middle pane, this pane is considered a drop target for additional columns.
It is a simple matter therefore to select columns from other tables and to drag these columns into the middle pane. 
The source table shows where each column was dragged from.
In the example above, the description column is acquired from the load_product, load_prod_group, and load_prod_subgroup tables. To create the dimension table, these columns must be assigned unique names. For this example, the last two columns have been renamed to group_description and subgroup_description.
Several columns do not have a source table. These columns have been added by WhereScape RED and are added depending on earlier choices.
A description of these columns follows:
Column Name | Description |
|---|---|
dim_product_key | The unique identifier (artificial key) for the dimension. This key is used in the joins to the fact table. |
dss_start_date | Used for slowly changing dimensions. This column provides a date and time stamp when the dimension record came into existence. It is used to ascertain which dimension record should be used when multiple are available. |
dss_end_date | Used for slowly changing dimensions. This column provides a date time stamp when the dimension record ceased to be the current record. It is used to ascertain which dimension record should be used when multiple are available. |
dss_current_flag | Used for slowly changing dimensions. This flag identifies the current record where multiple versions exist. |
dss_source_system_key | Added to support dimensions that cannot be fully conformed and the inclusion of subsequent source systems. See the ancillary settings section for more details. |
dss_version | Used for slowly changing dimensions. This column contains the version number of a dimension record. Numbered from 1 upwards with the highest number being the latest or current version. It forms part of the unique constraint for the business key of a slowly changing dimension. |
dss_update_time | Indicates when the record was last updated in the data warehouse. |
dss_create_time | Indicates when the record was first created in the data warehouse |
Manually adding previous value columns
If a Previous Value type of dimension is chosen, or, if the dimension is converted to this type, it is possible to manually add any required columns that were not defined as part of the create. The steps are:
- Add a new column by dragging in the column that is to have a previous value stored.
- Change the name to a unique name. Typically by adding the prefix 'prev_' to the column name.
- Change the source table, to be that of the dimension we are building.
- Set the Key Type to 4.
- Having performed these actions WhereScape RED will detect the column and build the appropriate code during the procedure generation phase.
Creating the table
Once the dimension has been defined in the metadata we need to physically create the table in the database.
- To do this, right-click on the dimension name and choose Create (ReCreate) from the pop-up menu.
- The Results pane shows the results of the creation. It displays a message to the effect that the dimension table was created.
- If the table was not created then ascertain and fix the problem. A common problem is a 'Duplicate column' where a column has the same name in two of the source tables.
- The best way to find such a column is to double-click on the list heading Col name; which will sort the column names into alphabetical order. Another double-click on the heading will sort the columns back into their create order.
SQL Server makes use of an identity attribute on the artificial key column.
The next section covers the Generating the Dimension Update Procedure.