There are two ways to install the RED Azkaban Scheduler servers on Windows, this section covers using the recommended approach of running the RedSchedulerInstaller.exe, this wizard guides you through all the steps required to get up and running. For installation via the command line the same approach for RED Scheduler Installation on Linux can be followed.
Windows Prerequisites
- RED application installed
- RED metadata repository exists with ODBC DSN created.
Azkaban PostgreSQL database to install the Azkaban 'white' schema and metadata tables (can be installed to the RED metadata database). You can also create a database with the installation wizard.
- A Windows User for the services to run under, with:
- user rights to 'Log On As A Service'
- write permissions on the Azkaban installation location (and work directory if not default user temp)
Windows Installation
To install the WhereScape Azkaban Scheduler on a Windows machine you must first install RED then run RedSchedulerInstaller.exe from the RED installation directory.
Go to the path where RED is installed and run RedSchedulerInstaller.exe.
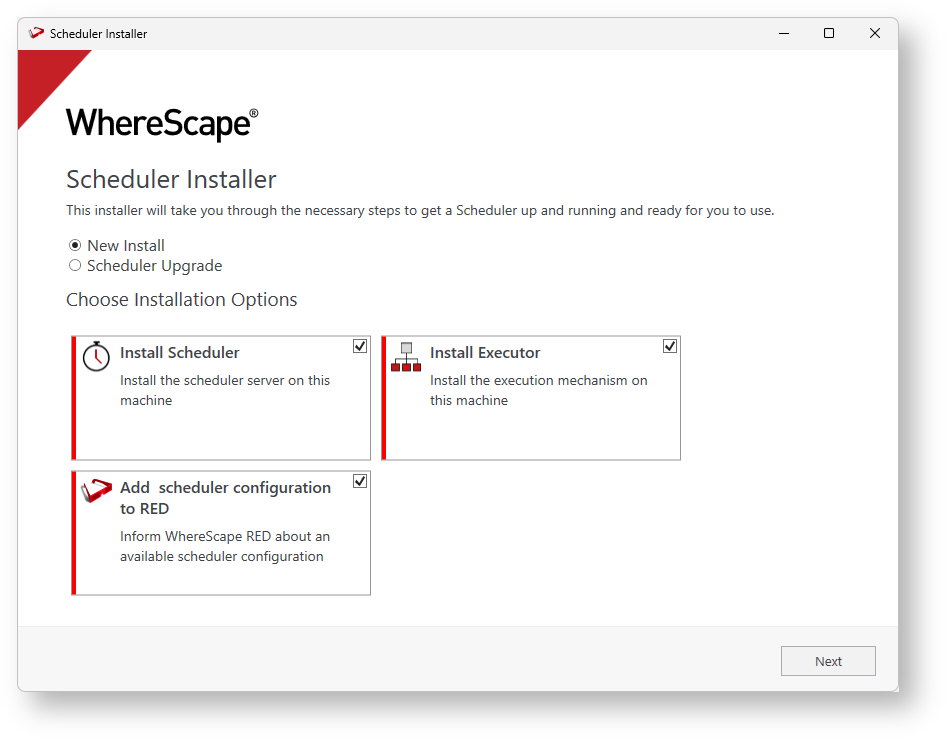
On the Scheduler Installation screen, select New Install and check all the installation options: Install Scheduler, Install Executor, and Add Scheduler Configuration to RED, then click Next.
Only one Scheduler can be installed per RED metadata repository. If you already installed a scheduler and only want to install another Executor, then deselect the other options.
If you want to upgrade the Scheduler, refer to Upgrading Azkaban.
In the Install Location screen, select the Installation Location. It is recommended to create a folder under the C: disk to install Azkaban. Click Next.
Azkaban Install Location
The install location must be writeable for the Service User which the service will run under so should not be installed in a directory under Windows Users. Typically, you would create a folder called Azkaban in your 'C:\Program Files\WhereScape' directory, but it can be installed anywhere on the machine that the service has write access to.

- In the Scheduler Metadata screen, provide the information of the database that will contain the scheduler metadata. You can use a database you created specifically for Azkaban (Follow the same steps you follow to create the PostgreSQL Database), or you can create one during installation.

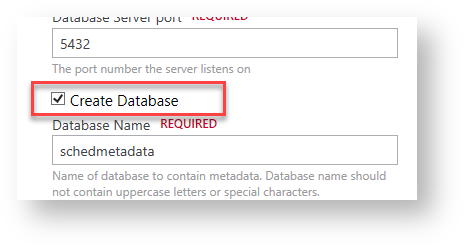
Select the Create Database option and provide the required information:
Database Host Name: Enter the database server name or IP.
Database Server port: Enter the port number the server listens to.
Database Name: Enter a name for the scheduler metadata database the installer will create.
User Name: Enter the user that will login to the scheduler database. If the user doesn't exist, the installer will create it with the adequate permissions
Password: Enter the password for the user that connects to the scheduler database.
Retype Password: Retype the previous password to confirm it.
Super User Name: Enter name of the user that can create/modify databases on the server
Superuser Password: Enter the password for the user that will create the scheduler database.Click Validate to confirm that all the entered information is correct. Click Next.
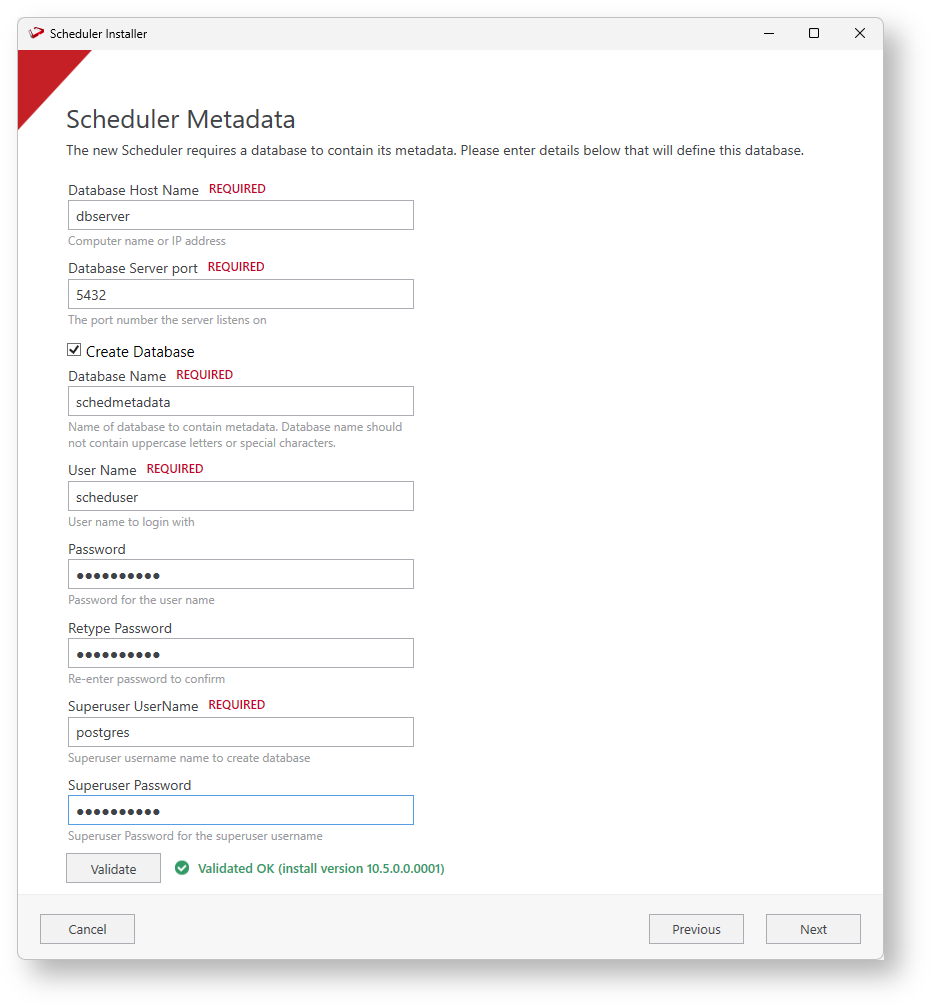
Server Port
PostgreSQL Database Server Port is 5432 in default installations, but your database port may be different.
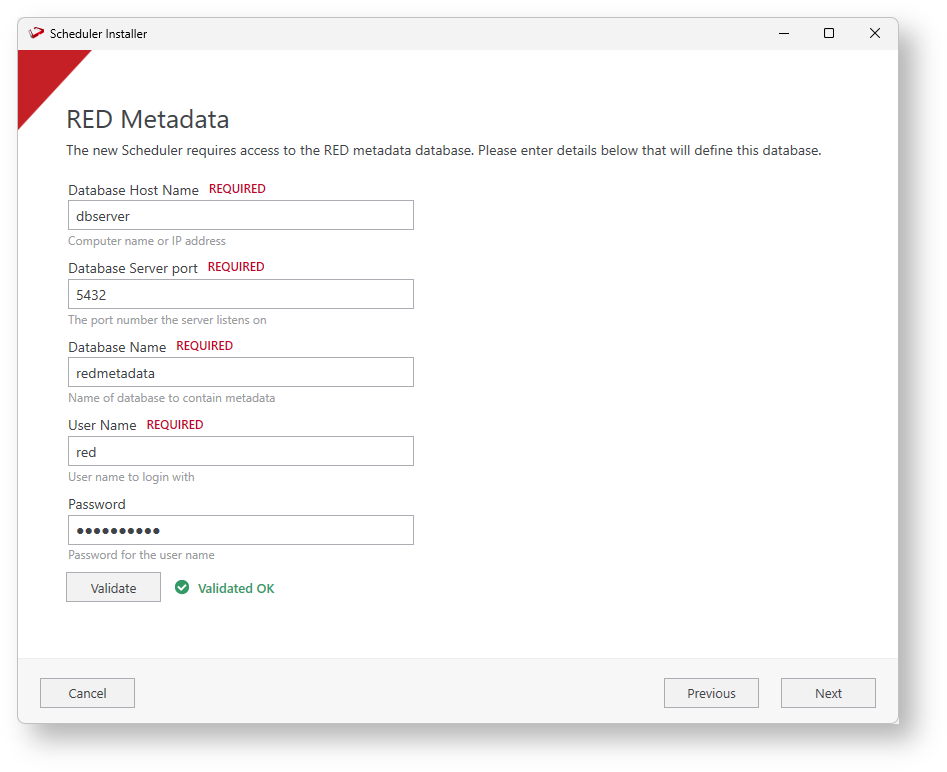
- Enter the RED Metadata database information. Enter the Database Name, the User Name, and the Password. Click Validate to confirm all the information is correct and click Next.
- Enter the Scheduler Metadata installation/upgrade or leave blank to use the previously entered user for Azkaban and click Next. These credentials are for an administrative database user with permission to perform DDL operations (If required).
Note
If you used the Create Database option, this screen will not show during installation.

The Web Server Configuration screen allows specifying the settings for the Web Server, make any changes necessary, populate all "required" fields and be sure that the option Install as Windows Service is selected before you move on.
You can uncheck Install as a Windows Service when upgrading or when you want to manage startup of the Web Server manually.Choosing a Port
The following netstat command can be run in Windows to find ports currently in use on the machine, both Azkaban Web Server and each Executor Server will require a free port to be assigned otherwise they will fail to start. If a service fails to start and the log indicates the port is already in use, you can correct the port assignment in the azkaban.local.properties file directly.
netstat -an | findstr LISTENING
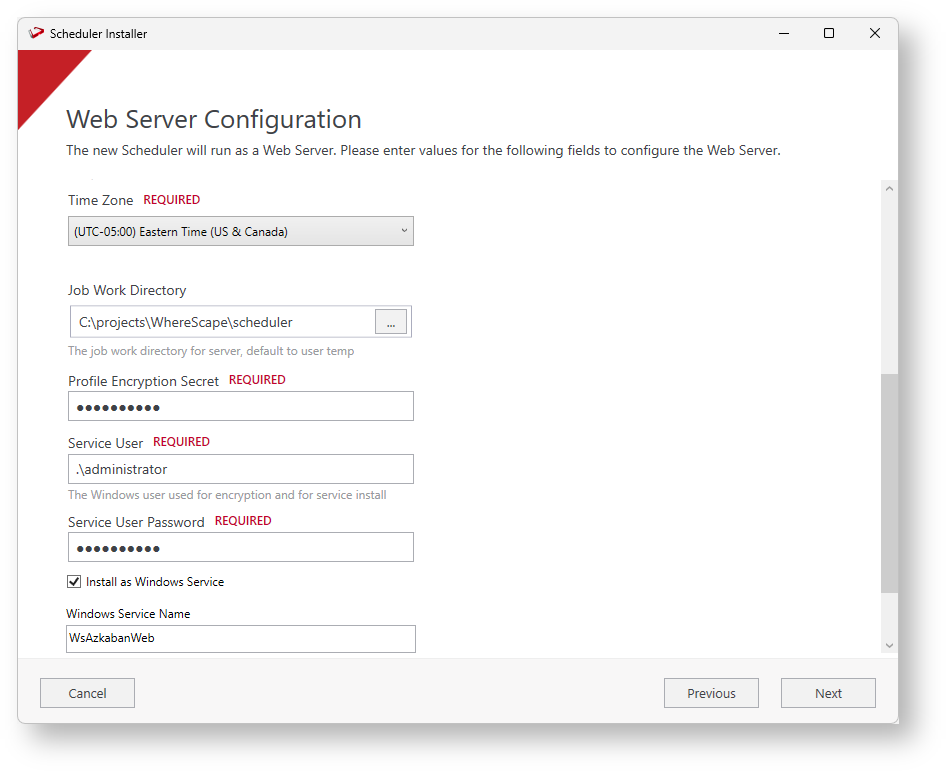
Profile Encryption Secret and Windows User
The 'Profile Encryption Secret' will be used by RED Scheduler Jobs to decrypt the connection credentials at run-time, therefore you must remember and use this same password when generating the encrypted Scheduler Profile records for your connections. See Scheduler Profile Maintenance for more information.
The 'Service User' is a windows user with the 'Log On As A Service' right. This username has to be fully qualified, for local users it can be something like '.\UserName'. For domain installations, this can be "WhereScape\UserName" or "UserName@Wherescape,com". The Azkaban service runs under this user. During installation the azkaban.local.properties file will be created for each Azkaban server with Windows user-based DPAPI encrypted password values and therefore only this same Service User will be able to decrypt those passwords at run-time.
The 'Job Work Directory' is a location for any RED job related temporary files to be created. When left empty it will default to the Service User's temp directory at run-time. If you specify a value here it is important to make sure it will be writeable for the Server User, so typically you would not use a folder under the Windows Users directory.
In the Executor Configuration, click Add an Executor Tag…, enter the host name or IP address, and click OK. Click Next to continue with the installation.

Under the Email Configuration, enter the values you need to configure the email notifications, for more details refer to Configuring email. Click Next.

A window pops up to select the Data Source Name from the drop-down menu which is the RED Metadata database that you created previously, its credentials, Validate the data, and click Login.

The Add Scheduler Configuration to WhereScape RED window shows the information on how the new Scheduler will be accessed. Click Next.
RED Scheduler Configuration
It is important to note that the credentials for the Azkaban Dashboard User and API User are not applied to RED since these now reside only in the RED Profile file. Therefore after installing the Azkaban Web Server you will need to log in to RED and set these values in you Scheduler Configuration and then right click on 'Connections' node in the object tree to 'Save Profile' and 'include passwords'.
The default credentials used in this screen are: wsdashboarduser, wsdashboardpass and wsapiuser, wsapipass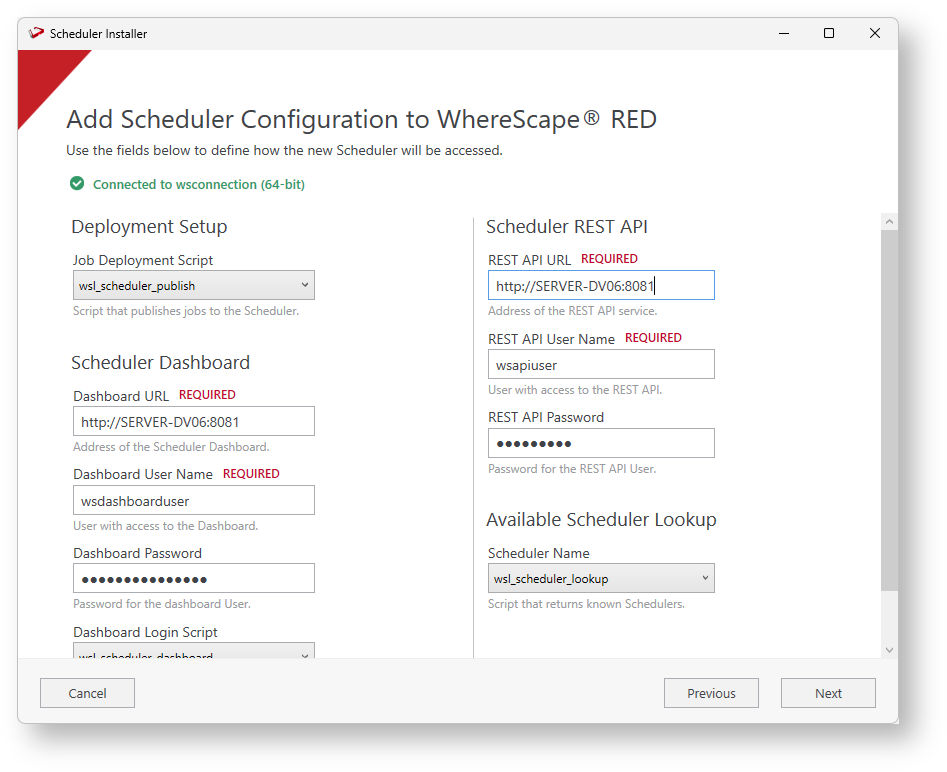
In the Summary window, review all the information about your installation and click Install.
When the installation is complete, click Finish to close the confirmation window.
Starting and stopping the Azkaban Servers
Windows
Each Azkaban Server service starts after installation and is set to auto-start at Windows startup.
Open Services.msc in Windows to find your Azkaban services to Start/Stop/Restart them manually or change the login user.
Troubleshooting
If either of your services fail to install
This issue is usually due to user rights to 'Log On As A Service' are not granted for the user you tried to install the service as.
In most cases you can simply go to Services.msc in Windows to find your Azkaban services and go to Properties of that service and renter the password for the service user, which will prompt Windows to detect the lack of rights issue and set the required rights for the user. In some systems only an Administrator user will be able to assign these rights so it is best to either have an admin do this or have the user created with the required rights by and admin prior to installation.
Another reason this could happen is if the services already exist, such as in an upgrade scenario. For upgrades it is best to either remove the service manually prior to upgrading or uncheck the 'Install as a Service' option during the install. In many cases the application upgrade will have been successful so you would just need to start up the service again.
It is possible the username for running the Azkaban service is not fully qualified, verify that the username looks like '.\UserName' for local users, for domain users something like "WhereScape\UserName" or "UserName@Wherescape,com".
The Scheduler Installer fails to impersonate the Service User for DPAPI encryption
The Scheduler Installer uses the Service User credentials provided to encrypt passwords in the Azkaban properties files. This is done by impersonating the user to perform the DPAPI encryption.
DPAPI encryption requires that the user running the encryption has been initialized on the local machine, this is normally done by logging in once with that user or running some administrative commands to initialize the account on the local machine.
If for some reason your install user can not impersonate the service user or you can not get a user with the right access rights to run as a service then you can install the service manually and have it start with the Local System account using the less secure machine-wide encryption. To do this, first follow the Azkaban Upgrade Path to install the application files without entering a Service User.
Then you can manually create the services using the below command lines (replace paths and names as required for your environment) in an elevated (Run as Administrator) Windows cmd prompt:
sc create "WsAzkabanWeb wsdevrepo" binPath= "\"C:\Program Files\WhereScape\RED\WslSchedulerService.exe\" --type=\"Web\"    --scheduler-dir=\"C:\WhereScape\Schedulers\wsdevrepo\" --start-service=true --service-name=\"WsAzkabanWeb wsdevrepo\"" DisplayName= "WhereScape Azkaban Web    wsdevrepo"
sc create "WsAzkabanExec wsdevrepo" binPath= "\"C:\Program Files\WhereScape\RED\WslSchedulerService.exe\" --type=\"Exec\"    --scheduler-dir=\"C:\WhereScape\Schedulers\wsdevrepo\" --start-service=true --service-name=\"WsAzkabanExec wsdevrepo\"" DisplayName= "WhereScape Azkaban Exec    wsdevrepo"
binPath
The binPath for the Azkaban Service is made up of the following components:
WslSchedulerService.exe + service arguments
--type = (either Web or Exec)
--scheduler-dir = (path of the root folder containing the Azkaban install, sub folder is determined by the previous --type arg)
--start-service = (true to start the service indicated by --service-name arg, false to run in a standalone console)
--service-name = (the windows service name to start as, should be the same as the first arg of 'sc create' command)
How to remove services
If you find you have created services with the wrong parameters and they won't start, or if you just want to remove a service so you can run through the Scheduler Installer from scratch, then you can run the following command in and elevated Windows cmd prompt, replacing service name with the actual service you want to delete:
sc delete "<service name>"