When the user runs the WhereScape GIT Enablement Pack, this will start the process of connecting to GIT and building the WhereScape 3D and RED repositories.
This should be done at the following times:
- When connecting to a new GIT repository.
- When connecting to an existing GIT repository for the first time (on a Developer machine).
- When refreshing a Personal Access Token to an existing GIT repository.
- When rebuilding a corrupted Developer machine's GIT repository.
When the process is launched, it will prompt the user for the following information:
- Select the repository types: Select the product(s) you want to utilize from the check buttons, choosing RED, 3D or both.
- Environment Type: Developer Machine or Deployment Machine to be selected from the dropdown menu
- Environment Tag: One letter can be entered here to provide a description for what the environment is used for, For example ‘d’ for development, or ‘t’ for testing. This will be included in the Repository name.
- On Pull Action: Drop Schema or Drop Database to be selected from the dropdown menu.
- GIT URL
- GIT Organization: The organization name used within GIT.
- GIT Repository: The GIT Repository name to connect to.
- Username: The user's Username to be used on the build.
- Personal Access Token: The user's Personal Access Token.
- Local GIT Repository: The location of the GIT repository created locally on the machine/virtual machine will be displayed (read-only).
- Is this an initial Build? Select if this process starts an Initial Build.
- RED Repository Server and Port: Add the RED PostgreSQL Server and port.
- RED Repository Database Name: The repository database name will be calculated based on the information provided – this is read-only. This can have a max character length of 63 characters. If you would like to change the way this is configured, please consult section 'Changing the Repository Database Name'.
- RED Repository Username and Password: Add the RED Username and Password.
- RED Generate Files: Use the check buttons to select whether you would like to generate DDL, DML and/or JSON files.
- RED Repository Backup: If Initial Build is set to ‘Yes’ the user will have the opportunity to select a backup file to use as a copy for their repository.
Important
The backup files will need to be in SQL, BAK or a Repository files format.
These files must be created using pg_dump, and the PostgreSQL version used for the backup must match the version of the target repository. 3D Repository Server: Add the 3D PostgreSQL Server and port.
3D Repository Database Name: The repository database name will be calculated based on the information provided – this is read-only. This can have a max character length of 63 characters. If you would like to change the way this is configured, please consult section 'Changing the Repository Database Name'.
3D Repository Username and Password: Add the 3D Username and Password.
- If Initial Build is set to ‘Yes’ the user will have the opportunity to select a backup file to use as a copy for your repository.
Important
The backup files will need to be in SQL, BAK or a Repository files format.
These files must be created using pg_dump, and the PostgreSQL version used for the backup must match the version of the target repository.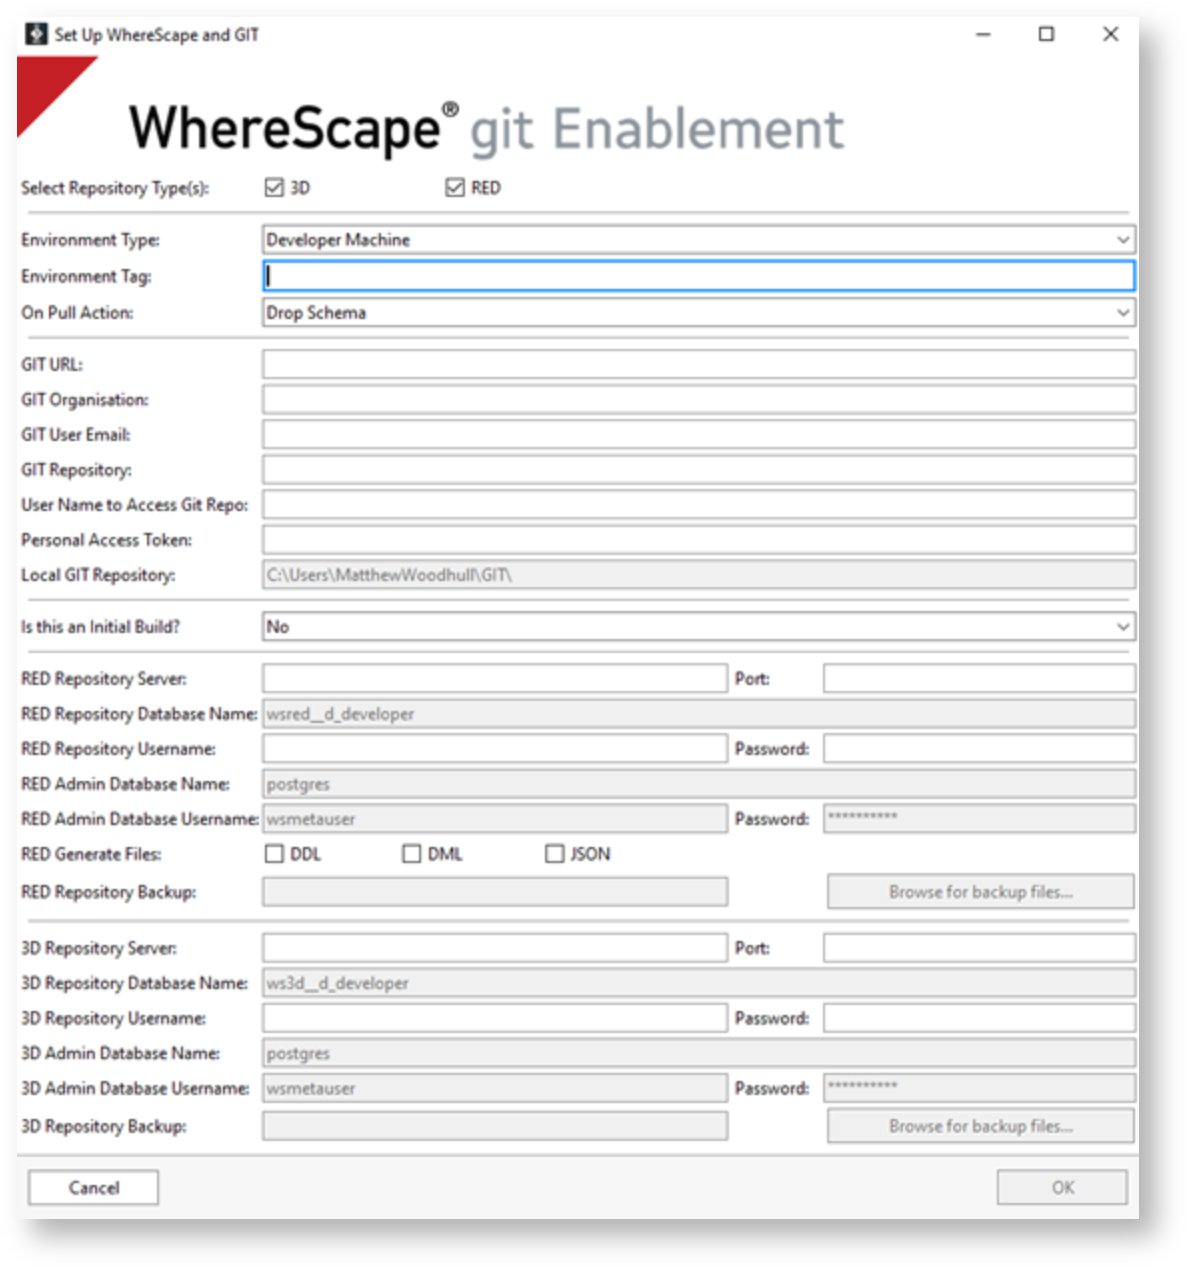
Once the form is created click on 'OK'. If there are any issues with connecting to the GIT repository, the user will receive an error message.
The local GIT directory will now be created.
- The user credentials for WhereScape RED and 3D repositories are created:
- These are stored locally at this location: `%USERPROFILE%\WhereScape\GIT`.
- This file stores the user's credentials and configuration details which are required for the workflows to run correctly.
Important
Each GIT Repository will have its own profile file. If it is deleted or modified incorrectly, the workflows will stop working.
The user will be prompted to select a branch from the remote GIT repository.

This action refreshes the local GIT repository with updates from the specified remote branch.
WhereScape 3D and/or RED is rebuilt using the files within the local GIT repository.
If the user requires to connect to a new or different GIT repository, these steps should be repeated using the new settings.
A GIT repository must exist before this process can start.
Important
A log file will be created and stored within the specified directory each time this process is executed. If there are any issues during this operation, the log file will be presented to the user for review. The log file can also be consulted to investigate steps taken as part of any interaction with the GIT Enablement Pack.
Warning
If this process is repeated for an existing GIT repository that has already been set up on the Developer machine, any changes not committed to GIT will be lost.
Changing the Repository Database Name
When completing the WhereScape GIT Enablement Pack form, the RED and 3D Repository Database names are read-only and are created based on the user information provided elsewhere on the form. However, this can be changed via the config file if required.
- The config is held in a JSON file named 'config.json' at the following location:
%USERPROFILE%\WhereScape\GIT - The repository database names are calculated within their resepective RED or 3D sections under the 'Repository Database name prefix and suffix' keys. These values can be amended to change the way that the repository database names are created when completing the WhereScape GIT Enablement Pack from.


WhereScape 3D