The following instructions guide you through the installation of SQL Diagnostic Manager in a Windows Server 2003 based clustered environment.
Things to consider before you install SQL Diagnostic Manager in a clustered environment
- Create a separate cluster resource group to host SQLDM services. A separate group allows the SQLDM services to fail without causing other resources in the group to failover
- Before you create this separate cluster resource group, gather a dedicated IP, NetBIOS name, and a dedicated disk for the cluster resource group
- SQLdm Collection, SQLdm Management, SQLdm Predictive Analytics, and SQLdm Rest services can run as generic services on your newly-created cluster resource group
Install SQL Diagnostic Manager on a node
SQL Diagnostic Manager must be installed on each node within the cluster and configure the services as its described in the following page, Install SQL Diagnostic Manager on a node.
Configure the Cluster Resource Group
Cluster Resource Group settings must be modified to allow SQL Diagnostic Manager to recognize the cluster nodes.
To configure the Cluster Resource Group:
- In the Cluster Administrator tool, create the Cluster Resource Group:
- Select File > New > Group and give the group and description
- Add the nodes and click Finish
- In the Cluster Administrator tool, add a disk to the Cluster Resource Group:
- Right-click the group you just created, select New > Resource and give it a name and description
- For the Resource Type, select Physical Disk
- Select the SQLdm group
- Click Next until you get to the last window and click Finish
- In the Cluster Administrator tool, add an IP address for the Cluster Resource Group:
- Right-click the group and select New > Resource and give it a name and description
- Select the Resource type IP Address
- Enter the IP address that you acquired for your new Cluster Resource Group
- Click Finish
- In the Cluster Administrator tool, add the Network Name resource to the Cluster Resource Group:
- Right-click the group and New > Resource and give it a name
- Select the Resource type Network Name
- Add the dependency for the IP address resource
- Specify the name and click Finish
- Select a Disk that is in a Cluster Resource Group and create a folder on that disk used to hold local data for the services
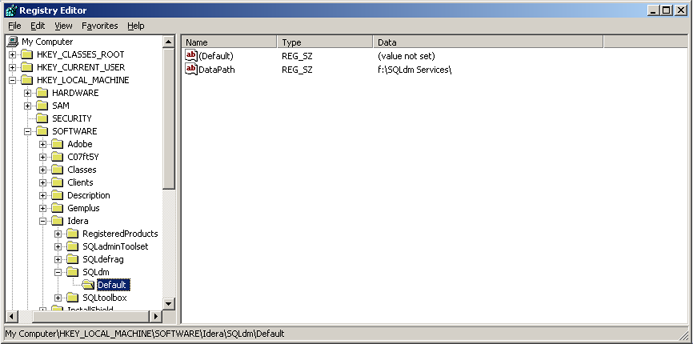
- On the primary node, use Registry Editor to create a new key named Default under HKEY_LOCAL_MACHINE\SOFTWARE\Idera\SQLdm\
- Create a new String Value named DataPath.
- Select a Cluster Resource Group in which you want to define the SQLdm resources
- Create an IP Address resource for the SQLDM Services. If there is already an existing Network Name in the Cluster Resource Group, then you can skip this step
- Create an Network Name resource that maps to the IP Address
- Create the Network Name resource and add the IP Address as a dependency
- Create a Generic Service resource for the SQLdm Management Service
- Add the Disk for the shared data as a dependency
- Add the Network Name as a dependency
- Specify SQLdmManagementService$Default as the name of the service to start
- After the service is added, right-click it and select Properties
- Select the Parameters tab and check the Use network name for computer name box
- Select the Registry Replication tab and add SOFTWARE\Idera\SQLdm\Default
- Click OK
- Create a Generic Service resource for the SQLDM Collection Service
- Add the Disk for the shared data as a dependency
- Add the Network Name as a dependency
- Specify SQLdmCollectionService$Default as the name of the service to start
- After the service is added, right-click it and select Properties
- Select the Parameters tab and check the Use network name for computer name box
- Select the Registry Replication tab and add SOFTWARE\Idera\SQLdm\Default
- Click OK
- Create a Generic Service resource for the SQLdm Predictive Analytics Service
- Add the Disk for the shared data as a dependency
- Add the Network Name as a dependency
- Specify SQLdmPredictiveAnalyticsService$Default as the name of the service to start
- After the service is added, right-click it and select Properties
- Select the Parameters tab and check the Use network name for computer name box
- Select the Registry Replication tab and add SOFTWARE\Idera\SQLdm\Default
- Click OK
- Create a Generic Service resource for the SQLdm Rest Service
- Add the Disk for the shared data as a dependency
- Add the Network Name as a dependency
- Specify SQLdmRestService$Default as the name of the service to start
- After the service is added, right-click it and select Properties
- Select the Parameters tab and check the Use network name for computer name box
- Select the Registry Replication tab and add SOFTWARE\Idera\SQLdm\Default
- Click OK
- In Windows Services, bring the SQLDM Management service resource online
- In Windows Services, bring the SQLDM Collection service resource online
- In Windows Services, bring the SQLDM Predictive Analytics service resource online
- In Windows Services, bring the SQLDM Rest service resource online
Complete the Cluster Configuration in SQL Diagnostic Manager
- Use the Management Service Configuration wizard to force the services to re-register
- Start the SQLDM Desktop Client and select SQLDM Repository. If the SQLDM Repository is clustered make sure to use the virtual server name for the SQL Server hosting the SQLDM Repository
- Verify that your configuration displays correctly in the SQLDM Desktop Client