Page History
...
- Log on with an administrator account to the computer on which you want to install SQLdm.
- Run Setup.exe in the root of the SQLdm installation kit on the first cluster node.
- Click SQL diagnostic manager on the Quick Start window.
- On the Welcome window of the setup program, click Next .
- Review and accept the license agreement by clicking I accept the terms in the license agreement , and then click Next .
- Accept the default installation folder, or click Change to specify a different folder, and click Next .
- Select the Typical setup type and click Next .
- Select the SQL Server instance and enter a database name.
- Enter the service account information and click Next .
- Click Install .
- In Windows Services, stop the SQLdm Management service and set the Startup type to Manual .
- In Windows Services, stop the SQLdm Collection service and set the Startup type to Manual .
- In Windows Services, stop the SQLdm Predictive Analytics service and set the Startup type to Manual .
| Note |
|---|
You cannot perform the installations concurrently, as the installers collide when checking the repository. You must perform the installations sequentially. |
...
- In the Cluster Administrator tool, create the Cluster Resource Group:
- Select File > New > Group and give the group and description.
- Add the nodes and click Finish .
- In the Cluster Administrator tool, add a disk to the Cluster Resource Group:
- Right-click the group you just created, select New > Resource and give it a name and description.
- For the Resource Type, select Physical Disk .
- Select the SQLdm group.
- Click Next until you get to the last window and click Finish .
- In the Cluster Administrator tool, add an IP address for the Cluster Resource Group:
- Right-click the group and select New > Resource and give it a name and description.
- Select the Resource type IP Address .
- Enter the IP address that you acquired for your new Cluster Resource Group.
- Click Finish .
- In the Cluster Administrator tool, add the Network Name resource to the Cluster Resource Group:
- Right-click the group and New > Resource and give it a name.
- Select the Resource type Network Name .
- Add the dependency for the IP address resource.
- Specify the name and click Finish .
- Select a Disk that is in a Cluster Resource Group and create a directory on that disk used to hold local data for the services.
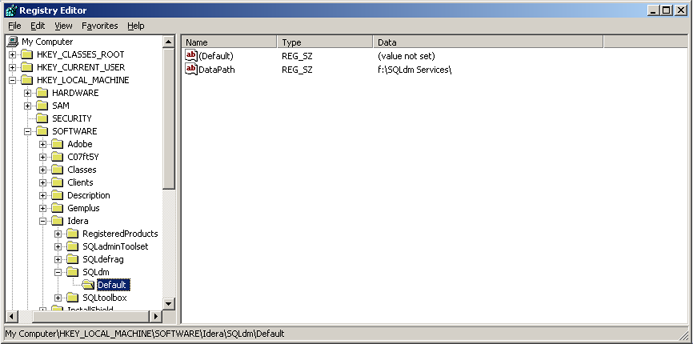
- On the primary node, create the default registry key and add the full data path value under HKEY_LOCAL_MACHINE\SOFTWARE\Idera\SQLdm\Default.
- Create the DataPath value.
- Select a Cluster Resource Group in which you want to define the SQLdm resources.
- Create an IP Address resource for the SQLdm Services. If there is already an existing Network Name in the Cluster Resource Group, then you can skip this step.
- Create an Network Name resource that maps to the IP Address
- Create the Network Name resource and add the IP Address as a dependency
- Create a Generic Service resource for the SQLdm Management Service.
- Add the Disk for the shared data as a dependency
- Add the Network Name as a dependency
- Specify SQLdmManagementService$Default as the name of the service to start
- After the service is added, right-click it and select Properties .
- Select the Parameters tab and check the Use network name for computer name box
- Select the Registry Replication tab and add SOFTWARE\Idera\SQLdm\Default
- Click OK
- Create a Generic Service resource for the SQLdm Collection Service.
- Add the Disk for the shared data as a dependency
- Add the Network Name as a dependency
- Specify SQLdmCollectionService$Default as the name of the service to start
- After the service is added, right-click it and select Properties .
- Select the Parameters tab and check the Use network name for computer name box
- Select the Registry Replication tab and add SOFTWARE\Idera\SQLdm\Default
- Click OK
- Create a Generic Service resource for the SQLdm Predictive Analytics Service.
- Add the Disk for the shared data as a dependency
- Add the Network Name as a dependency
- Specify SQLdmPredictiveAnalyticsService$Default as the name of the service to start
- After the service is added, right-click it and select Properties .
- Select the Parameters tab and check the Use network name for computer name box
- Select the Registry Replication tab and add SOFTWARE\Idera\SQLdm\Default
- Click OK
- In Windows Services, bring the SQLdm Management service resource online.
- In Windows Services, bring the SQLdm Collection service resource online.
- In Windows Services, bring the SQLdm Predictive Analytics service resource online.
...