You can create a data comparison job to compare the data of two registered data sources, specify configuration adjustments and refine mapping parameters. After running the job, DB Change Manager can generate SQL scripts which you can run to synchronize any discrepancies. You can run the scripts to update data sources immediately, or store the scripts for later use.
DB Change Manager displays data comparison job results at row level, and it can automatically update mismatches or add missing rows at the table level.
The following tasks step you through creating and running a data comparison job:
- Describe and Save the Job
- Specify the Source and Target Data Sources
- Specify Execution, Mapping, Comparison, and Resolution Options
- Understand the Data Source Mapping Process
- Customize Database Mapping
- Inspect the Databases
- Optionally Reconfigure the Data Source Mapping
- Optionally request email, logs, or system tray notifications (see Setting job notifications)
- Run the Data Comparison Job
- Review Comparison Results
- Optionally generate a job report (see Creating a job report)
After comparing the data, you can synchronize it to match; see Synchronizing Data Repositories.
Create a Data Comparison Job
You create, modify, and run a Data Comparison job in the Data Comparison Job editor. For more details about the editor, see Data Comparison Job Editor in the User Interface Reference.
To create a new data comparison job
Select File > New > Data Comparison Job and the Data Comparison Job editor opens.
To open an existing data comparison job
- Select File > Open Job.
- Select a data comparison job from the list.
- Click OK.
The Data Comparison Job editor opens.
Describe and Save the Job
The Job Name and Description pane contains more than just the Name field. It shows where the job is stored in Project Explorer. When you click the Details button, you can see the project’s directory path.
If the job will be used to monitor compliance against company standards or policies, you can add it to the Compliance Explorer list. This list lets you quickly see all the jobs that have recently passed or failed the compliance criteria you set.
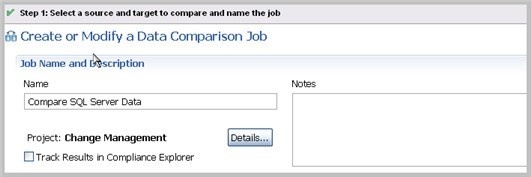
To describe and save a job
- Type a new name for the job in the Name field. Enter a meaningful name that will quickly and uniquely identify the job in other views and dialogs.
- Add relevant information in the Notes field.
- Click Track Results in Compliance Explorer if you want the job to be listed in the Compliance Explorer. Compliance is used most commonly for configuration comparisons.
- Click File > Save or File > Save All, or highlight the editor window and press Ctrl+S.
Specify the Source and Target Data Sources
The Data Comparison Source and Data Comparison Target boxes identify what data sources are compared when the job runs. When a data source is added to a job, its name, database type, and host are displayed. The Databases drop down menu lets you select from a list of the databases on the source.
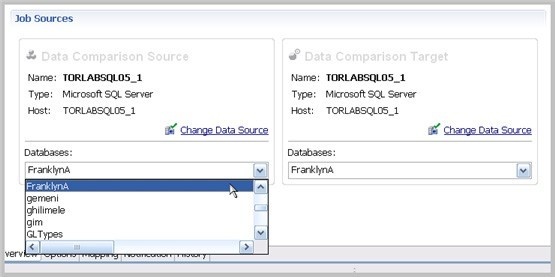
To add a data source to a job
Click and drag a data source from Data Source Explorer to the Data Comparison Source or Data Comparison Target box, or click Select Data Source in the appropriate box and choose a data source from the dialog.
You can change a data source selection by clicking Change Data Source from the appropriate box, or by dragging a different data source to the box from Data Source Explorer.
- Select the databases, or tables and views (depending on the type of database), from the Databases pulldown menu.
- After you name the job and specify the data sources, click Options.