This section includes the following topics:
- About Precise in failover applications
- Installing live standby configurations (active/passive)
- Installing parallel partitions configurations
- Generating Precise startup and shutdown scripts
- Configuring Precise services for Precise for SQL Server failovers
About Precise in failover applications
Installing the Precise product suite in a failover application tends to be more complex than installing in a regular application. It is highly recommended that you consult with Precise Customer Support prior to such an installation.
Installing live standby configurations (active/passive)
In a live standby (or active/passive) configuration, an application runs on a primary server, or node. A dedicated secondary, or "backup," server exists to take over if the primary server fails. The backup server is passive, meaning that it is not performing any other function.
The datafiles, IP addresses, and other resources of the application may be active on only one node at a time. When the software detects that a resource has failed, it relocates the failed resource to the standby server.
Two of these resources affect the Precise installation:
- File system. Both servers must have access to at least one shared file system. This file system can be either (a) accessible from all servers at all times, or (b) accessible only from active node. In case of (b), all post-installation tasks described later must be postponed until the shared file system is accessible from the standby node.
- IP addresses and host names. Clients must know the application by a logical name, which is relocated - with the application - to the active server. Otherwise, all clients will have to be updated on each server failover.
This logical name transparency can be achieved as follows:- The active server is dynamically configured on each failover with the cluster IP address. This is also called Virtual IP Address.
- An intermediate hardware or software unit that gets client IP packets and routes them to the active servers. In this case, the logical cluster name, which is the cluster IP address and host name, is hidden from the physical server in the cluster.
Preparing servers for Precise in active/passive configurations
To install Precise components in active/passive configurations, you first have to prepare the involved servers. As a prerequisite, the Precise installation must reside on a shared file system and be accessible from the active server.
When preparing a UNIX server, verify that a dedicated Precise UNIX user is created on both physical servers, with the correct Oracle UNIX user group. Preferably, both UNIX users should have the same password.
Post-installation tasks are mandatory.
To prepare servers for Precise in active/passive configurations
- In the Precise Installer, in the New Server dialog box, use the logical server name only. Do not use the physical server name anywhere.
- For a UNIX server, verify that a Precise installation folder is specified on a shared file system, such as /shared/i3.
- Add the logical server once, regardless of the physical server at the time of installation.
Post-preparation tasks for servers in active/passive configurations
You need to perform additional tasks after you prepared the servers in Precise Agent Installer.
Edit the <precise_root>/infra/host/hostname.txt file and add the names of all servers in the configuration as new lines. For example:
SUN5_physical1
SUN5_physical2
SUN5_virtual
To perform post-preparation tasks on Windows only
- Log in to the active server and open the Services window.
- Change the Startup type of all Precise services to Manual.
- Activate the passive server; then log in to it and run the following commands to create the Precise Listener service:
cd precise installation directory
infra\bin\psin_listener_java.exe -o install
infra\bin\psin_sentry.exe -o install
Post-installation tasks for the SQL Server Tier Collector in active/passive configurations
Installing the SQL Server Tier Collector in active/passive configurations requires post-installation tasks.
To perform post-installation tasks for SQL Server
- Run the following command:
products\sql-server\install\pssq_install - Press Enter and then type the value of the instance name as it appears in the
products\sql-serverfolder. - If Precise for Storage is installed for an SQL Server database:
- Run the following command:
products\sql-server\install\pssq_symmetrix_install - Press Enter and then type
SYMMETRIX.
- Run the following command:
- Change the Startup type of each created service to Manual.
Post-installation tasks for the Sybase Tier Collector in active/passive configurations
Installing the Sybase Tier Collector in active/passive configurations requires post-installation tasks.
To perform post-installation tasks for Sybase
- Run the following command:
products\sybase\install\pssy_install - Press Enter and then type the value of the instance name as it appears in the
products\sybasefolder. - Change the Startup type of each created service to Manual.
Post-installation tasks for the Microsoft .NET Tier Collector in active/passive configurations
Installing the Microsoft .NET Tier Collector in active/passive configurations requires post-installation tasks.
To perform post-installation tasks for Microsoft .NET
- Install at least one .NET instance on the active server via the Precise Installer.
- On the passive server, perform the following actions:
- Run the
products\dotnet\install\psdn_col_service_install.batcommand. - Run the
products\dotnot\install\psdn_injector.execommand. - Run the
regsvr32 /s products\dotnot\bin\i4np.dllcommand. - Run the
products\dotnet\install\psdn_gac_all.batcommand.
- Run the
- After performing these steps, you can continue to install more .NET instances on either server.
Post-installation tasks for Insight Savvies for OS and Network in active/passive configurations
Installing the Insight Savvies for OS and Network in active/passive configurations requires post-installation tasks.
To perform post-installation tasks for Insight Savvies for OS and Network
- Log in to the passive server.
- Change to the
<Precise_root>/products/insightfolder. - On Windows only, change to the
<Precise_root>/products/insight/hostfolder and run the following command:echo "<Precise_root>"|products\insight\install\i3_general.exe -install
Do not type blanks between<Precise_root>and the | character. - Only if Insight Savvy for Network is installed:
- Install the network driver on the passive physical server, as follows:
Windows- Log in to the passive server.
- Change to the following folder:
\products\insight\host\install - Run the
reinstall_network_cards.batscript.
- Log in to the passive server as root user.
- Run the
network_rot.shscript from the following folder:.\products\insight\host\install
- Install the network driver on the passive physical server, as follows:
- Only if Insight Savvy for Network is installed:
- Include the IP address of the physical servers in the FocalPoint registry file on the server where Precise FocalPoint is installed, as follows:
- Open the following file:
<Precise_root>\products\i3fp\registry\products\insight\hosts\logical server name.xml - Copy the existing physical server section to the
<ips>section and change the IP address to the IP of the physical server.
For example, for a cluster whose active server IP address is 10.1.1.1 and whose passive server IP address is 10.1.1.2, this section would look as follows:
<ips>
<child_1>
<ip>10.1.1.1</ip>
</child_1>
<child_2>
<ip>10.1.1.2</ip>
</child_2>
</ips> - Sync the registry changes by running the following command on the FocalPoint where you've updated the registry files:
- Windows
infra\bin\psin_cli.bat -action update-main-registry -i3-user <user>-i3-clear-password <password> -registry-path
/registry/products/insight/hosts/<server> - UNIX
./infra/bin/psin_cli.sh -action update-main-registry -i3-user <user>
-i3-clear-password <password> -registry-path
/registry/products/insight/hosts/<server>
- Windows
- Open the following file:
- Include the IP address of the physical servers in the FocalPoint registry file on the server where Precise FocalPoint is installed, as follows:
Post-installation tasks for Tuxedo Tier agents in active/passive configurations
Installing Tuxedo Tier agents in active/passive configurations requires manual post-installation tasks.
When trying to find the Tuxedo shared memory address to attach during initialization, the Insight Savvy for Tuxedo uses the physical server name. If the logical server name is used during the installation, this may cause connection issues. To prevent connection issues, you need to configure the shared memory address in the registry file by adding the <tux_shmkey> parameter. This parameter takes on the hexadecimal value of the shared memory address as defined in the Tuxedo configuration file. For example:
*RESOURCES
IPCKEY 100100
In this example, 100100 is the decimal string for the hexadecimal value 0x18704. The following is a complete Tuxedo configuration example from the Precise registry:
<simple>
<tux_dir>/vip/Tuxedo71/sun4</tux_dir>
<tux_version>71</tux_version>
<tux_config>/vip/Tuxedo71/sun4/samples/atmi/simpapp/
tuxconfig</tux_config>
<tux_uid>7101</tux_uid>
<tux_shmkey>0x18704</tux_shmkey>
<network>
<ports>
<child_1>
<port>0</port>
</child_1>
</ports>
</network>
</simple>
To perform post-installation tasks for Tuxedo Tier agents
- Log in to the passive server and change to the
<Precise_root>/products/insightfolder. - Configure the shared memory address in the registry file to prevent connection issues, as follows:
- To prevent connection issues, configure the shared memory address in the registry file, as follows:
- Open the
<Precise_root>\products\i3fp\registry\instances\tuxedo\logical server name\instance name.xmlfile. - Under
<instance_name>, add the line:<tux_shmkey>0xXXXXXX</tux_shmkey> - Sync the registry changes by running the following command on the FocalPoint where you've updated the registry files:
- Windows
infra\bin\psin_cli.bat -action update-main-registry -i3-user <user>
-i3-clear-password <password> -registry-path
/registry/instances/tuxedo/<server>/<instance> - UNIX
./infra/bin/psin_cli.sh -action update-main-registry -i3-user <user>
-i3-clear-password <password> -registry-path
/registry/instances/tuxedo/<server>/<instance>
- Windows
- Open the
- On Windows only, change to the
<Precise_root>/products/insight/hostfolder and run the following command:echo<Precise_root> "<precise_root>"|..\install\i3_general.exe -install
Do not type blanks between<precise_root>and the | character.
- To prevent connection issues, configure the shared memory address in the registry file, as follows:
Installing the Oracle Tier agents in active/passive configurations
Installing Oracle Tier agents in active/passive configurations requires the following preconditions:
- The monitored Oracle database is installed on both servers with the same instance ID.
- Both databases share the same Oracle data via a shared file system and shared disks.
- Oracle instances and servers are accessible using the logical name of the cluster.
- Because only one database is active at a time, the Precise for Oracle agents monitor only the active instance at any given moment.
Pre-installation and installation tasks are not required, but post-installation tasks are mandatory if the Insight Savvy for Oracle is installed.
Post-installation tasks for Oracle Tier agents in active/passive configurations
If you have installed the Insight Savvy for Oracle, you need to perform manual post-installation tasks.
To perform post-installation tasks for Oracle Tier agents
- Log in to the passive server and change to the <precise_root>/products/insight folder.
- On Windows only, change to the
<Precise_root>/products/insight/hostfolder and run the following command:echo "<Precise_root>"|...\install\i3_general.exe -install
Do not type blanks between<Precise_root>and the | character.
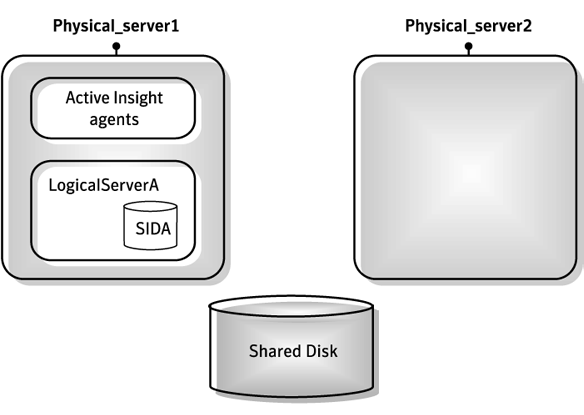
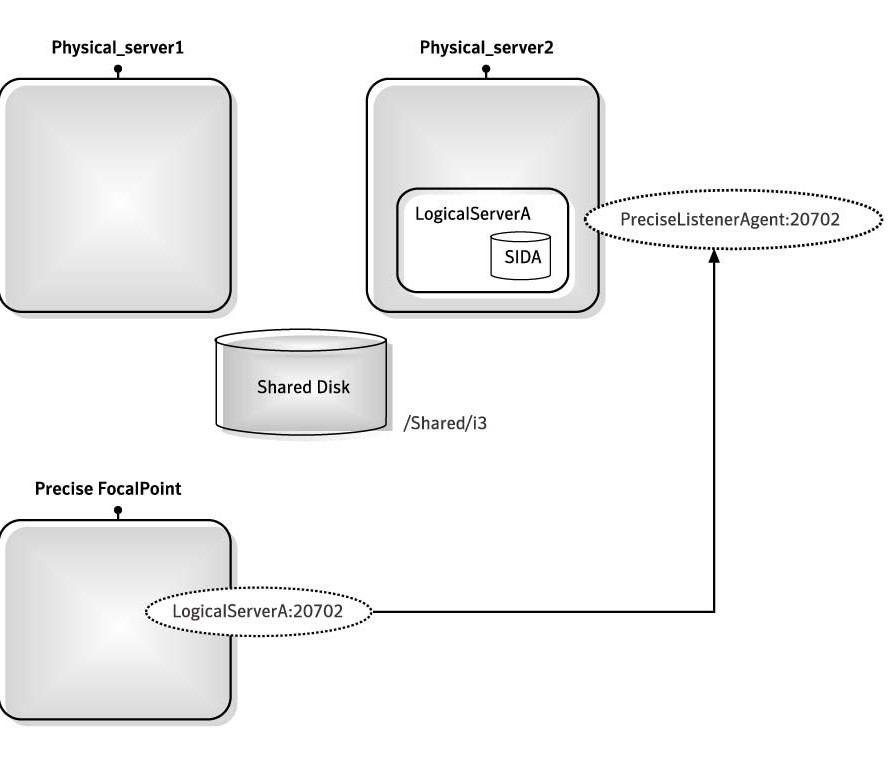
What happens in a failover situation (active/passive)
When the monitored application fails over to the standby server, all Precise agents must fail over, too. It is recommended that you add Precise shutdown and startup scripts to your automatic failover procedure. For more information, see Generating Precise startup and shutdown scripts.
AdminPoint shows the status for Precise agents that run on the active server. Precise agents on the standby server are not represented.
The following figure illustrates the live standby configuration before a failover.
Figure 1 Live standby configuration before a failover
The following figure illustrates the live standby configuration after a failover.
Figure 2 Live standby configuration after a failover
Failover tasks in active/passive configurations
If you added the Precise shutdown and startup scripts to your automatic failover procedure, you do not need to perform any tasks when a failover occurs. Otherwise, you need to perform the following task.
To perform failover tasks in active/passive configurations
- Log in to the servers that failed (if still alive) and stop all Precise agents.
Start all Precise agents on the now active server.
Upon failover, you must stop all services before starting them on the active server. Verify that you stop the sentry service first.
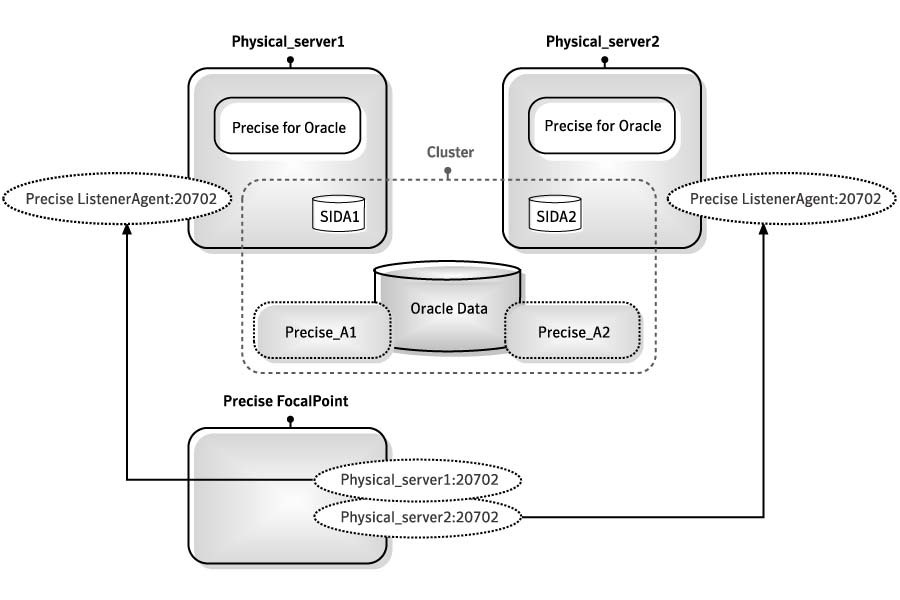
Installing parallel partitions configurations
In a parallel partitions cluster (such as Oracle RAC/OPS), an application can run concurrently on more than one server. The different instances either do not share anything or are designed for parallel access of shared resources.
As with other cluster configurations, clients connect to the application by a logical name, and load balancing software or hardware distributes the workload to the multiple servers.
In this configuration, Precise refers to each server - and each instance on this server - by its physical name. That is, each server is defined as a Precise server machine, and each monitored instance on each server is defined separately in Precise Agent Installer.
Figure 3 Parallel partitions configuration in an Oracle application
Preparing servers for Precise in parallel partitions configurations
To install Precise components in parallel partitions configurations, you first have to prepare the involved servers. Before you prepare the servers, verify that you can connect from the Precise FocalPoint server to the physical server by using its physical name and IP address.
To prepare servers for Precise in active/active configurations, in Precise Installer, in the New Server dialog box, use the physical server name.
Installing the Oracle Tier agents in parallel partitions configurations
Before installing Oracle Tier agents in parallel partitions configurations, verify that you can perform SQL connect from the physical server and from the PMDB FocalPoint server to each database node by using the physical name and the node name.
Generating Precise startup and shutdown scripts
You can add Precise startup and shutdown scripts to your automatic failover procedure by running a command:
- Windows
cd <Precise installation folder>
infra\bin\psin_infra.exe -handle-agents (stop|start) - UNIX
cd <Precise installation folder>
nohup ./infra/bin/psin_infra -handle-agents (stop|start) &
Configuring Precise services for Precise for SQL Server failovers
When installing Precise for SQL Server in a cluster application, you can choose between the following cluster configurations:
- Precise for SQL Servers as part of the cluster
In this configuration, Precise for SQL Server is installed as one of the cluster applications. The cluster software is responsible for starting and stopping the processes in case of a failover situation so that the data gathered will remain available.
This configuration is suitable for active/passive applications. Precise for SQL Server as a standalone application
In this configuration, Precise for SQL Server is installed locally on each node of the cluster. In a failover situation, the data gathered will not be available.Only the Precise Collector on the active node will sample the instance. Other nodes will remain in recovery mode, until failover occurs.
Precise for SQL Server on remote servers (using the virtual instance name of the cluster)
Precise for SQL Server is installed on a third server and sampling through the network. The product is not aware that this is a cluster application.
In a failover situation, the data gathered will be available.This configuration is only suitable for the cluster active/passive configuration.
The following procedures explain how to set up Precise for SQL Server as part of a cluster (option 1). In this option, you need to configure the following Precise services in Microsoft Cluster Manager so that they start automatically whenever a failover situation occurs:
- Precise for SQL Server Collector service (including an additional service if Precise for Storage is installed)
- Precise Listener service
Verify that you have already installed these services on each of the nodes in the cluster. See Installing live standby configurations (active/passive).
To add the Precise for SQL Server Collector service
- Add a new resource called SQL Server to the SQL Server group.
- In the New Resource dialog box, in the Name and Description text box, type:
Precise for SQL Server Collector <instance name> - From the drop-down lists, select the values as follows:
- Resource type. Generic service
- Group. SQL server <cluster_name>
- In the Possible Owners dialog box, move all nodes on which Precise can run to the Possible owners table.
- In the Modify Dependencies dialog box, move the resources Network Name and Physical Disk to the Resource dependencies table. These are the resources that the Precise for SQL Server Collector depends on.
- In the Generic Service Parameters dialog box, in the Service name text box, type:
PssMSSql{instance-name}80 <Listener_unique_ID>
This is the name of the Precise for SQL Server Collector service. You can see the name by opening the Services window in the Control Panel, right-clicking the service, and selecting Properties from the pop-up menu. - Click Next.
- In the Registry Replication dialog box, click Finish.
- In the Precise for SQL Server Collector Properties dialog box, on the Advanced tab, in the Restart area, clear the Affect the group check box.
To add the Precise SQL Server Storage Collector service (only if Precise for Storage is installed)
- Add a new resource called SQL Server to the SQL Server group.
- In the New Resource dialog box, in the Name and Description text boxes, type:
Precise SQL Server Storage Collector <instance name> - From the Resource type list, select Generic Service.
- From the Group list, select SQL Server <cluster_name>.
- In the Possible Owners dialog box, move all nodes on which Precise for SQL Server can run to the Possible owners table.
- In the Modify Dependencies dialog box, move the resource SQL Server to the Resource dependencies table. This is the resource that the Storage Collector depends on.
- In the Generic Service Parameters dialog box, in the Service name text box, type:
PssMSSqlStorage{instance name}80 <Listener_unique_ID>
This is the name of the Precise for SQL Server Storage Collector service. You can see the name by opening the Services window in the Control Panel, right-clicking the service, and selecting Properties from the pop-up menu. - In the Precise for SQL Server Storage Collector Properties dialog box, on the Advanced tab, in the Restart area, clear the Affect the group check box.
To add the Precise Listener service
- Add a new resource called SQL Server to the SQL Server group.
- In the New Resource dialog box, in the Name and Description text boxes, type:
Precise Listener - From the Resource type list, select Generic Service.
- From the Group list, select SQL Server <cluster_name>.
- In the Possible Owners dialog box, move all nodes on which Precise for SQL Server can run to the Possible owners table.
- In the Modify Dependencies dialog box, move the resources Network Name and Physical Disk to the Resource dependencies table. These are the resources that the Precise Listener agent depends on.
- In the Generic Service Parameters dialog box, in the Service name text box, type:
psin_listener_v8.7
This is the name of the Precise Listener service. You can see the name by opening the Services window in the Control Panel, right-clicking the service, and selecting Properties from the pop-up menu. - In the Precise Listener Properties dialog box, on the Advanced tab, in the Restart area, clear the Affect the group check box.