This section includes the following topics:
- Installation types
- Application architecture and Precise for Web configuration
- Pre-installation tasks
- Installing a Web Tier instance
- Installing a Web cluster
- Post-installation action items
If you intend to use an SAP scenario in which you monitor access via Web, then you need to perform the installation of the Precise for Web Tier too! However for some of the most common SAP scenarios, including SAP GUI Windows client access to SAP ERP and Precise for BW ETL process chain scenarios, the installation of the Precise for Web Tier is not needed.
Installation types
Before beginning the installation process, review the instances you want to install and choose the most applicable type of installation per your needs.
Web instances can be installed in either of the following ways:
- Standalone Installation. Standalone installation enables you to install a single instance and define the instance name and configuration. This instance is not connected to or affected by any other instance configuration. After completing the pre-installation tasks, see Installing a Web Tier instance.
- Cluster Installation (for WebLogic and WebSphere only). Cluster installation defines the configuration parameters for a group of instances in a central location. When installing a Web cluster, an action item is generated to include a filter within the application. All Web servers that will deploy the application will be installed automatically as instances in the cluster.
Each instance in the cluster is given a name that includes both the user defined cluster name and an automatically generated unique identifier.
It is recommended to install a cluster when the following conditions apply:
- The application is deployed on more than one JVM, using the same source.
- The source application WAR file can be configured to use Web agents before it is redeployed to all JVMs.
- There is no need for specific, user-defined instance names.
After completing the pre-installation tasks, see Installing a Web cluster.
Application architecture and Precise for Web configuration
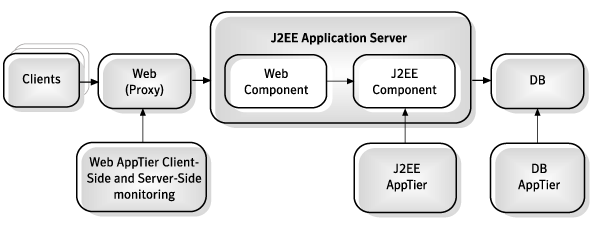
When using Apache 2.0 and higher, or IIS, as a proxy to J2EE application servers, it is recommended to install client-side and server-side on the proxy tier and not on the J2EE application server. If you need to install Precise for Web on the J2EE application server, only install the server-side and not client-side collection on the J2EE tier.
Figure 1 Web client-side and server-side monitoring when using Apache 2.0 and higher, or IIS, as a proxy
When using Apache 1.3 or iPlanet as a proxy to J2EE application servers, it is recommended to install both server-side and client-side collection on J2EE application servers.
Figure 2 Web client-side and server-side monitoring when using Apache 1.3 or iPlanet as a proxy
Pre-installation tasks
Most of the screens for this installation require you to input details regarding your information systems. Before performing this installation, compile a list of all required user inputs based on the procedures below.
Pre-installation tasks for the Web Tier
Before you install a Web Tier, you need to grant special file and folder permissions (including all subdirectories) to the UNIX or Windows user that you intend to use during the installation.
The permissions in the general collection table on UNIX are not needed for the ongoing operation, only for installation. Auto-detected values will be shown. If this user does not have these permissions during installation you do not see these auto-detected values and you will have to supply them manually.
The Operating System user that runs the Web Server or Web Application should have full control privileges for the <precise_root> folder.
The following table lists the permissions that are required for general collection on UNIX.
Table 1 Permissions for the general collection on UNIX
| Web Server | File or Folder | Required Permission |
|---|---|---|
| iPlanet | site name/config | RX (X for all subdirectories) |
| iPlanet | site name/config/server.xml | R |
| Apache | configuration directories (typically: apache root/config) and subdirectories | RX (X for all subdirectories) |
| Apache | configuration files (typically: httpd.conf) | RX |
| WebLogic | Server installation folder ( WL root ) | RX (X for all subdirectories) |
| WebLogic | WL root/site name | RX (X for all subdirectories) |
| WebLogic | WL root/site name/config.xml | R |
| WebSphere | WL root/properties/version/platform.websphere and WS root/properties/version/WAS.product | R |
| WebSphere | Node folder and all subdirectories such as, .../cells/cell1/nodes/node1 | RX |
| WebSphere | Node serverindex.xml and server.xml files such as .../cells/cell1/nodes/node1/serverindex.xml and .../cells/cell1/nodes/node1/servers/server1/server.xml | R |
| Oracle Applications Server | OC root/inventory/ContentsXML/configtools.xml | R |
| Tomcat | Configuration folder (typically: tomcat root/config) and all subdirectories | RX |
Tomcat | server.xml file (typically: tomcat root/conf) | R |
| Sun ONE | Configuration folder (typically: sunone root/domains/domain1/config) and all its subdirectories | RX |
| Sun ONE | domain.xml file (typically: sunone root/domains/domain1/config) | R |
| Oracle Applications Server OPMN | Configuration folder (typically: oracle as root/opmn/conf) and all subdirectories | RX |
| Oracle Applications Server Apache | Configuration folder (typically: oracle as root/Apache/conf) and all subdirectories | RX |
| Oracle Applications Server OPMN | Configuration files (typically: oracle as root/opmn/conf/opmn.xml) and all subdirectories | R |
| Oracle Applications Server Apache | Configuration files (typically: oracle as root/Apache/conf/*.conf) and all subdirectories | R |
The following table lists the permissions that are required for the general collection on Windows.
Table 2 Permissions for the general collection on Windows
| Web Server | File or Folder | Required Permissions |
|---|---|---|
| iPlanet | site name/config | Read + List Folder Contents |
| iPlanet | site name/config/server.xml | Read |
| Apache | Configuration directories (typically: apache root\conf) | List Folder Contents |
| Apache | Configuration files (typically: httpd.conf) | Read |
| WebLogic | Server installation folder | List Folder Contents |
| WebLogic | WL root\site name | List Folder Contents |
| WebLogic | WL root\site name\config.xml | Read |
| WebSphere | Node folder and all subdirectories such as, ...\cells\cell1\nodes\node1 | List Folder Contents |
| WebSphere | Node serverindex.xml and server.xml files such as ...\cells\cell1\nodes\node1\serverindex.xml and ...\cells\cell1\nodes\node1\servers\server1\server.xml | Read |
| Tomcat | Configuration folder (typically: tomcat root\conf) and all subdirectories | List Folder Contents |
| Tomcat | server.xml file (typically: tomcat root\conf) | Read |
| Sun ONE | Configuration folder (typically: sunone root\domains\domain1\config) and all subdirectories | List Folder Contents |
| Sun ONE | domain.xml file (typically: sunone root\domains\domain1\config) and all subdirectories | Read |
| Oracle Applications Server OPMN | Configuration folder (typically: oracle as root\opmn\conf) and all subdirectories | List Folder Contents |
Oracle Applications Server Apache | Configuration folder (typically: oracle as root\Apache\conf) and all subdirectories | List Folder Contents |
| Oracle Applications Server OPMN | Configuration files (typically: oracle as root\opmn\conf\opmn.xml) and all subdirectories | Read |
Oracle Applications Server Apache | Configuration files (typically: oracle as root\Apache\conf\*.conf) and all subdirectories | Read |
Pre-installation tasks for IIS
To install a Web instance on IIS7.x, the IIS6 Metabase Compatibility service and ISAPI filters must be installed.
To enable IIS6 Metabase Compatibility and ISAPI filters on Windows 2008
- Go to Start > Control Panel > Programs > Programs and Features.
- On the left Side Bar, select Turn Windows features on or off.
- Go to Roles Web Server (IIS), click Add Role Services, and then select the following:
- IIS6 Metabase Compatibility under IIS 6 Management Compatibility.
- ISAPI filters under Application Development.
- ISAPI Extension, if you want to collect post-parameters
- Click Next, and then follow then instructions on the screen.
To enable IIS6 Metabase Compatibility on Windows 7
- Go to Start > Control Panel > Programs > Programs and Features.
- On the left Side Bar, select Turn Windows features on or off.
- Wait for the Windows Features dialog box to open and fill, and then expand Internet Information Services.
- Select IIS 6 Metabase Compatibility service under IIS 6 Management Compatibility.
- Click OK.
Pre-installation tasks for WebLogic, WebSphere, Tomcat, and Sun One (J2EE stack)
At the end of the installation, you must provide the path to the application file you wish to monitor (.EAR, .WAR, or web.xml file of the application).
For more information, consult with your Web Administrator.
Installing a Web Tier instance
This section describes the procedures needed to install a Web Tier instance. Before installing the instance verify that the type of installation best suits your needs. You have the option of adding a new instance, as well as adding a new application. For information on editing or removing an existing instance, see Editing or removing tier instances or clusters.
Adding a Web Tier instance
On the AdminPoint Instances screen, you can add a new Tier instance.
Before adding a Tier instance, create a list of all required inputs based on the screen information below.
To add a Tier instance
- From StartPoint, click the AdminPoint tab.
- Click the Setup tab.
- From the menu, select Instances & Clusters.
- Click the All instances tree item.
- At the bottom of the Display Instances and Clusters screen, click Add Instance. An Add New Instance dialog box appears.
- Select the required technology from the list.
- Select the application from the list. If the desired application is not on the list, use the following steps:
- Click Add.
- In Application Name, type in the new application name.
- In Application System, select the system application from the list.
Click OK.
To install an instance in an application, you must have ADMINISTRATE.INSTALL permission for the application in which you want to install the instance. If you only have permission for a specific technology, you will only be able to install in an application that is either empty, or is comprised of only the same technology.
- Select a Tier from the list.
Click OK to view the next screen.
Always refresh AdminPoint after adding an instance.
Defining Web property settings
To define the Web Tier property settings, you must first select which Web server type you want to monitor, as well as its location.
To select the Web server type and its location
- Select one of the following Web server types from the menu:
- IIS (Microsoft)
- Apache
- iPlanet (Sun)
- WebLogic (Oracle)
- WebSphere (IBM)
- Tomcat (Apache)
- Sun One
- Oracle AS
- SAP WAS J2EE
Other J2EE
The options Apache, SAP WAS J2EE, Sun iPlanet, Oracle Application Server, Sun ONE, and other J2EE Web servers are supported, but currently without Web server statistics. Client-side instrumentation is not supported by Sun iPlanet and Apache 1.3.
From the menu, select the server where the Web server instance is located. Click Add to enter the name of a server not on the list. For more information, see see Adding a new server.
This is the name or IP address of the server where you want to install the Web Tier Collector with a specific operating system. The server name or IP address appears in the list only if you previously defined it as a Precise server. If using Microsoft IIS, you cannot install on a UNIX platform.
- Click Next.
The next installation screen is dependent upon which Web server type is selected. Click the relevant link below to view the installation procedure for the selected Web server:
- Defining a Microsoft IIS Tier instance
- Defining one of the following instances: Apache, iPlanet, Sun ONE, SAP WAS J2EE, Other J2EE, or Tomcat
- Defining an Oracle 10g Application Server instance
Defining a Microsoft IIS Tier instance
To define a Microsoft IIS Tier instance
Select one of the available Microsoft IIS versions from the menu.
If the IIS version or Web site name (next step) is not auto-detected, enter it manually.
- Select the Detected Web site name from the menu.
- Select the Application type (Web or Siebel) from the menu.
- Select the Application version from the menu. This textbox is unavailable when Web is chosen.
- Enter the Instance name. Use a free-text identifier to distinguish between multiple monitored Web sites.
Optional. Check Allow internet information service restart. If you leave this box empty, post-installation actions are required.
- Click Next.
Defining one of the following instances: Apache, iPlanet, Sun ONE, SAP WAS J2EE, Other J2EE, or Tomcat
A Web site configuration file is mandatory for Sun iPlanet and Apache servers, but is optional for other servers. During installation, the Web site configuration file is editable. If it is not inserted, you must enter Web server listening ports manually on the next screen (Domain Information).
To define one of the above instances
- Select the Web site from the menu.
The fields for a WebLogic, WebSphere, and Apache Web server are auto-detected and populated when you select one of the auto-discovered Web sites in the Detected Web sites list.
The following information appears:Apache. The full path of the configuration file.
The auto-detection mechanism is limited in different ways, depending on whether Apache is on a Windows or UNIX server. On Windows, the detection is based on the services list. Therefore, Apache will not be detected if it is not defined as a service. On UNIX, the detection is based on running processes. The Web server version is not detected if the Precise user does not have execute permission on the Apache executable (HTTPD).
- Enter the Web site configuration file. To browse for the appropriate folder and file, click the browse (...) button.
This input is required for Apache and Sun iPlanet. For all other web servers, it is recommended to manually enter the value to optimize the installation process. If however, the value is unavailable, the field can be left blank.
The following values are auto-detected:- Apache. The full path and name of the main configuration file. For example:
C:\WebServers\Apache\Apache13\conf\httpd.conf
For Apache that serves Oracle applications:
/rac_shared/env/appl/apps/tech_st/10.1.3/Apache/Apache/conf/httpd.conf
or
/rac_shared/env/inst/apps/VIS_pool-linux-rac-1/ora/10.1.3/Apache/Apache/conf/htt pd.conf) - Sun One or Sun iPlanet. The full path to the server.xml file of a specific server on a specific node in a specific cell. For example: c:\WebServers\Sun\WebServer6.1\https-admserv\config\server.xml.
Tomcat. The full path to the server.xml file. For example: c:\WebServers\Tomcat\conf\server.xml.
If the auto-detected value is incorrect, you can change it manually.
- Apache. The full path and name of the main configuration file. For example:
- Select the Web server version from the menu.
The Tier installer normally auto-detects and displays the Web server version in this field. If the Web server version is not auto-detected, or incorrect, enter the inputs manually.
Select one of the following Web server version options from the list:- Apache: 1.3.x, 2.0.x, or 2.2.x
- Sun One: 6.1
- Apache Tomcat 5.x, 6.x
- Sun iPlanet 6.0
- Select the appropriate Web Server bits from the menu.
This input is required only when using Apache or Sun iPlanet. For other Web servers, this input field is grayed-out. Normally the Tier installer will auto-detect and display the Web server bits in this field.
If the Web server bit number is not auto-detected, or incorrect, enter the bit number manually. Select one of the following Web server bit numbers from the list:- 32
- 64
- Select the application type from the menu.
This is the application served by this Web server site. This information enables better configuration of the Web Tier Collectors. The following options are available:- Web (default)
- Siebel
- PeopleSoft
- Oracle Applications
- Select the application version from the menu.
This is the version of the application server chosen in the previous field. Select an application server version:- Siebel x.x
- PeopleSoft x.x
- Enter the instance name. Use a free-text identifier to distinguish between multiple, monitored Web sites.
- Click Next.
Defining one of the following instances: WebSphere or WebLogic
A Web site configuration file is optional for WebSphere and WebLogic. During installation, the Web site configuration file is editable. If it’s not inserted, you will have to enter Web server listening ports manually on the next screen (Domain Information).
To define one of the above instances
- Select the Web site from the menu.
The fields for a WebLogic and WebSphere will be auto-detected and populated when you select one of the auto-discovered Web sites in the Detected Web sites list.
The following information is shown:- WebLogic. The server name (if it exists) or full path of the configuration file.
WebSphere. The server name attribute from the server.xml file, or the full path of the configuration file.
However, instances that are installed as Windows services are not detected even when they are running. On UNIX, in most configurations of HP, Linux, Sun, and AIX prior to version 5.3 patch 5, the Web servers may be partially detected or not detected at all.
- Enter the Web site configuration file. To browse for the appropriate folder and file, click the browse (...) button.
For non-cluster installations, it is recommended to manually enter the value to optimize the installation process. If however, the value is unavailable, the field can be left blank. For cluster installations, this is ignored.
The following values are auto-detected:- WebLogic. The full path and name of the config.xml file (for example:
c:\WebServers\bea\weblogic81\samples\domains\medrec\config.xml). WebSphere. The full path to the server.xml file of a specific server on a specific node in a specific cell (for example: c:\WebServers\IBM\WebSphere\AppServer\profiles\AppSrv01\config\cells\I4W-VM-SRV3Node01Cell\nodes\I4W-VM-SRV3Node01\servers\server1\server.xml).
If the auto-detected value is incorrect, you can change it manually.
- WebLogic. The full path and name of the config.xml file (for example:
- Select the Web server version from the menu.
Normally the Tier installer will auto-detect and display the Web server version in this field. If the Web server version is not auto-detected, or incorrect, enter the inputs manually. Select one of the following Web server version options from the list:- WebLogic
- WebSphere
- Select the application type from the menu.
This is the application served by this Web server site. This information enables better configuration of the Web Tier Collectors. The following options are available:- Web (default)
- PeopleSoft
- Enter the instance name. Use a free-text identifier to distinguish between multiple, monitored Web sites.
- Click Next.
Defining an Oracle 10g Application Server instance
To define an Oracle 10g Application server instance
- Select the application server from the menu.
The textboxes for the Oracle 10g Application Server auto-detect and populate when you select one of the auto-discovered Web sites in the Detected Web sites list. You can manually change the auto-detected values. The auto-detection mechanism has the following limitations:- The Web server version is not returned if you are lacking read permissions on the inventory/ContentsXML/configtools.xml file in the Application server folder.
- On Solaris and AIX prior to version 5.3 patch 5, the Oracle 10g Application Server may be partially or not detected.
- Instances that are currently not running are not detected. On Windows, instances that are installed as services are not detected even if they are running.
Select the Oracle Application server configuration file. To browse for the appropriate folder and file, click the browse (...) button.
The configuration file should be named opmn.xml. Example for a configuration file path:
/i4t/i3/websun1_webservers/OracleAS/10.1.3/opmn/opmn.xml.
Normally the Tier installer auto-detects and displays the Oracle Application server configuration file and the Apache Web server configuration file (step 3) in their fields. If the server configuration files are not auto-detected, or incorrect, enter the inputs manually.
- If there is an Integrated Apache web server running before the Oracle AS, select its configuration file. To browse for the appropriate folder and file, click the browse (...) button.
For example, the configuration file of apache in an Oracle Applications 12 installation:
/rac_shared/env/appl/apps/tech_st/10.1.3/Apache/Apache/conf/httpd.conf
or
/rac_shared/env/inst/apps/VIS_pool-linux-rac-1/ora/10.1.3/Apache/Apache/conf/httpd.conf Select the Oracle Application server version, from the menu.
Normally, the Oracle Application server version will be auto-detected. If it is not auto-detected, manually enter the server version.
- Select the application type from the menu.
- Select the application version from the menu. The following options are available:
- Web (default)
- PeopleSoft
- Oracle Applications
- Enter the instance name. Use a free-text identifier to distinguish between multiple, monitored web sites.
- Click Next.
Entering Domain information
Precise for Web monitors Web instance performance and availability. The domains screen displays a list of all detected Web domains. If the domains are not detected automatically, manually enter them.
Only in Apache, the SSL ports are detected as regular ports, so you should pay attention and set the SSL check box accordingly.
The detected Web domains can be added manually.
To manually obtain the Listener agent ports for a server
- Run the netstat command to see a list of all open connections on the server machine.
- On a UNIX server, use the lsof utility located in the <precise_root>/products/insight/host/bin folder on the monitored server.
To use the utility to obtain a list of all TCP/IP ports used by a service, run the following command:
lsof -P|grep LISTEN|grep listener process name
To access a list of lsof utility options, run the following command:
lsof -h
The lsof utility is only available if the Insight Savvy for Network is installed. If you want to run this utility before completing the Savvy installation, log in as the root user and locate the bin/lsof.<operation-system-version> file in the Insight installation folder.
If there is more than one ip:port combination shown, only real IP addresses should be fully specified.
To enter a Web Tier domain
- Mark one of the listed domains.
- Mark the SSL box if the domain is secured (HTTPS).
If the desired domain is not on the list, or requires editing, follow steps a-f:- Click Add or Edit.
Choose All IPs or Specific IP.
If every IP address that the server listens on is a real IP address, then they should all be specified. If the different names are actually virtual hosts, then only one should be specified. If the only difference is in the ports (same IP address with several ports), then only one of them should be specified.
- If Specific IP is selected, enter the specific IP name.
- Enter the port number for this domain.
- Enter the Host Header name for this domain, if it exists.
- Check SSL if the domain is secured (HTTPS).
- Click Add, and then click Next.
About the AdminPoint Tier installation preview screen
The preview screen signifies that the AdminPoint Tier installer has gathered enough information to begin the installation phase.
The preview screen displays the following details before installation begins:
- Server name or IP address
- The name of the monitored server
- What actions will be performed in their respective order
- Installation folder (location)
- Required disk space
- Currently available disk space
At this screen, you can still change any of the settings displayed. Click Back to change any of the displayed settings, click Next to continue installation, or click Cancel to stop the installation process.
About the AdminPoint Tier installation progress screen
This screen appears when the AdminPoint Tier installer is actually performing installation. Installation may take several minutes.
The progress screen displays the progress of actual installation on selected servers.
About adding servers
The Add Servers screen enables you to add servers to a cluster. This can be done by moving servers to the table on the right. The new cluster server may get an indication that action items are pending and after the executing them, a list of cluster instances related to this cluster will be shown instead. Click Next to continue installation.
About the AdminPoint Tier installation complete screen
This screen appears when the AdminPoint Tier Installer has completed installation of all Tier instances.
If there are no action items, click Finish (it will be the only option available) to complete the instance installation. If there are action items, click Next (it will be the only option available).
About the AdminPoint Tier Action Items screen
After a Tier instance is installed, you must perform post-installation tasks as may be required. Only after completing any post-installation tasks required can you start using the Tier instances you have just installed.
Perform any tasks displayed on this screen. Click Execute for Precise to perform the action items. Click Mark as done if you have performed the action items yourself. See Post-installation action items for more information.
Installing a Web cluster
This section describes the procedures that are needed to install a Web cluster. A Web cluster is defined as a set of WebLogic or WebSphere JVMs that share the same configuration and are started from a shared location. Installing a Web cluster has two parts. The first one, described below, consists of creating a repository for the cluster configuration based on the definition of any of the cluster's JVM and performing the action items on the shared location. Once the action items are performed and JVMs are restarted, the second part of the installation takes place and each JVM instance is installed automatically and Precise starts to monitor it.
For information on editing or removing an existing instance, see Editing or removing tier instances or clusters.
Adding a Web cluster
Before adding a cluster, create a list of all required inputs based on the screen information below.
Installing a cluster is only supported for WebSphere and WebLogic web servers.
To add a cluster
- From StartPoint, click the AdminPoint tab.
- Click the Setup tab.
- From the menu, select Instances & Clusters.
- Click the All clusters tree item.
- At the bottom of the Display Instances and Clusters screen, click Add Cluster. The Add New Cluster dialog box appears.
- Select the Web technology from the list.
- Select the application from the list.
If the desired application is not on the list, use the following steps:- Click Add.
- In Application Name, type in the new application name.
- In Application System, select the system application from the list.
Click OK.
To install a cluster in an application, you must have explicit ADMINISTRATE.INSTALL permissions for the application in which you want to install the cluster. If you only have permission for a specific technology, you will only be able to install in an application that is either empty, or is comprised of only the same technology.
- Select a Tier from the list.
Click OK to view the next screen.
Always refresh AdminPoint after adding an instance.
Defining Web property settings
To define the Web cluster property settings, you must provide the cluster name, select which Web server type you want to monitor, as well as its location.
To define the Web cluster
Enter a cluster name. Use a free-text identifier to provide a unique name to be shared by all instances in the cluster. In addition, a unique identifier will automatically be added to each instance.
The unique name is the application server name.
- Select one of the following Web server types from the menu:
- WebLogic
- WebSphere
Select the server where any of the web instances running the cluster application is located, from the menu. Click Add to enter the name of a server not on the list. For more information, see Adding a new server.
This is the name or IP address of the server where you want to install the Web Tier Collector with a specific operating system. The server name or IP address appears in the list only if you previously defined it as a Precise server.
The Web site field auto-detects and populates. Once you select one of the auto-discovered Web sites in the Detected Web sites list, the required fields are automatically filled. If the fields are incorrect, they can be modified manually.The auto-detection mechanism is limited in different ways, depending on whether WebLogic or WebSphere is on a Windows or UNIX server. On Windows, the detection is based on running processes. Therefore, the Web server will not be detected if it is not running. However, Web servers that are installed as Windows services will not be detected whether they are running or not. On UNIX, in most configurations of HP, Linux, Sun, and AIX prior to version 5.3 patch 5, the Web servers may be partially detected or not detected at all.
Select the Web server version from the menu.
Normally the installer will auto-detect and display the Web server version in this field. If the Web server version is not auto-detected, or incorrect, enter the inputs manually. Select one of the following Web server version options from the list:WebLogic
WebSphere
Select the application type from the menu.
This is the application served by this Web server site. This information enables better configuration of the Web Tier Collectors. The following options are available:Web (default)
PeopleSoft
If PeopleSoft is selected, enter the relevant Application version between version.
Click Next.
About the AdminPoint cluster installation preview screen
The preview screen signifies that the AdminPoint cluster installer has gathered enough information to begin the installation phase.
The preview screen displays the following details before installation begins:
- Server name or IP address
- The name of the monitored server
- What actions will be performed in their respective order
- Installation folder (location)
- Required disk space
- Currently available disk space
At this screen, you can still change any of the settings displayed. Click Back to change any of the displayed settings, click Next to continue installation, or click Cancel to stop the installation process.
At this point, the cluster definitions are saved and an agent is only installed on the specified server. For servers that will be added after this point, the agent will be installed only once the instance is started.
About the AdminPoint cluster installation progress screen
This screen appears when the AdminPoint cluster installer is actually performing installation. Installation may take several minutes.
The progress screen visually displays the progress of actual installation on selected servers.
About the AdminPoint Tier Action Items screen
Perform all tasks displayed on this screen. Once all the post-installation action items have been applied on the application and the application has been deployed to the cluster Web servers, these servers will automatically be installed in the Precise application. Click Execute for Precise to perform the action items. Click Mark as done if you have performed the action items yourself. See Post-installation action items for more information.
About the AdminPoint cluster installation complete screen
This screen appears when the AdminPoint cluster installer has completed installation of the cluster. Click Finish (it will be the only option available) to complete the cluster installation.
Post-installation action items
When the Web Tier Collectors have been installed, post-installation action items may be required. There might be additional action items not listed below, that are required in each installation. Upon finishing your installation, verify that all action items have been completed by checking the list generated on the Action Items screen.
Post-installation tasks for WebLogic, WebSphere, Tomcat, and Sun One (J2EE stack)
To monitor the application(s), you need to register the Precise for Web agent(s) as Web application filters. This section describes how to add Precise for Web technology to the Web application(s) Web descriptor files.
If you have installed a cluster, this is the only documented post-installation action item. Verify that no additional action items are needed by checking the list Action Items screen.
- To automatically modify the web.xml file(s) of the monitored application(s), you are required to login as the user that has permissions to change the application files and run a script that adds the Precise for Web agents to your application.
As an input to that script you need to provide the location of the .EAR, .WAR, or web.xml file(s) of the application(s).
Note that if you change a locally deployed application, then any application redeployment may override this action item, so you will need to do it again. If you do not want to do this after every redeployment, you have 2 options:
- (Best practice) To add this script to your application redeployment script, so it will be done automatically.
Change the central application file (if the application is clustered and there is a central location as opposed to a local location). This way the Precise filters will stay in the application in each redeployment.
If you do so, you will need to redeploy the application instead of performing a mere JVM restart.
If you are installing Precise for Web on a cluster (WebLogic or WebSphere) the option to change the central application file is the only option.
- Examples of application locations:
- The WebLogic 10.3 console shows the .EAR file location under “deployments”. Then click on your application name to see the path.
- The WebSphere 6.1 console displays the names of .EAR files, but not their location. The typical location of and .EAR file is:
<install-dir>\profiles\[profile-name]\config\cells\[cell-name]\applications\PlantsByWebSphere.ear\PlantsByWebSphere.ear - For Tomcat 5.x & 6.x: <tomcat-dir>\webapps\<app-name>\web-inf\web.xml
- For Sun One 6.x: <sunone-dir>\WebServer6.1\<domain-name>\webappsWeb.xml appears inside each application.
Modifying the Web descriptor file on a Web application with multiple instances
When installing a Web application with multiple instances, running the psww_web_desc_modify command will create multiple EAR files, with each EAR file containing a different instanceId and i3root value, corresponding to the instances in the Web application.
To avoid creating multiple EAR files
- Run the web desc modifier without the -instanceId and -i3root parameters.
- Add the following parameters to the JVM command line:
- -DPssInstanceID=<instance_ID>
- -DPssI3Root=<precise_root>
Adding Precise for Web filter(s) to the Web server classpath
To monitor the application, the Precise for Web agent(s) jar(s) must be loaded. Consult with your Web Administrator on where the right location is to do so. Examples:
- WebLogic 9.2. <bea-root>\weblogic91\samples\domains\medrec\startWebLogic.cmd WebSphere 6.1 changes the server.xml file located for example in F:\webservers_linux\poollin3\ibm\websphere61\profiles\AppSrv01\config\cells\poollin3Node01Cell\nodes\poollin3Node01\servers\server1\server.xml
Tomcat 5.x & 6.x. <tomcat-dir> \bin\setclasspath.bat(sh)or click the Tomcat executable, and in the Apage Tomcat Properties dialog box go to the Java tab. There you can see the Java classpath.
You will also need to add the servlet-api.jar file manually to the classpath. It can be found at: e.g. <tomcat- dir>\common\lib\servlet-api.jar.
- Sun One 6.x uses the management console to change the classpath or you can edit the <sun-one-install-dir>\<server-name>\config\server.xml file and follow the instruction in the action item.
Enabling statistics collection on WebSphere 6.1 - 6.x and 7.x
To enable statistics collection on WebSphere
- Open WebSphere admin console (URL: ibm/console/login.do).
- In the Integrated Solutions Console, click the Monitoring and Tuning tab.
- From the drop-down menu, click on Performance Monitoring Infrastructure (PMI).
- On the right pane, select the server upon which you want to enable statistics (for example, server1.)
- In the next screen, click the Runtime tab.
- On the Runtime tab, select either:
- Basic
- Extended
- All
Custom
If you select Custom, verify that the CommittedCount counter under Transaction Manager is enabled.
Adding the session cookie name of the monitored application
To verify that browser-side and server-side data is properly correlated, specify the name of the session cookie that is used by the application in the settings.xml file. Session cookie names can be JSESSIONID, _sn, SID, etc. Contact your application administrator to find the name of the cookie.
To add the session cookie name
- In the “Registry Path” field in the Registry Editor (AdminPoint > Settings > Registry Editor), enter the following path and click Go: registry/instances/www/<server_name>/<instance_name>/settings.
- In the Xml Editor tab, search for the <filter-session-cookie> tag.
- Add the applicable cookie name between the tag, for example:
<filter-session-cookie>_sn</filter-session-cookie> Click Save.
The cookie session name for J2EE (JSESSIONID) is the default value for the <filter-session-cookie> tag.
Adding post-parameters collection for IIS
To add post-parameters collection for IIS, see the following sections:
- Inserting wildcard mapping for Precise post-parameters collection extension
- Add the Precise post-parameters collection extension to the trusted list
- Updating the collect-post-parameters tag
Inserting wildcard mapping for Precise post-parameters collection extension
By inserting wildcard application mapping, you can instruct IIS to allow ISAPI applications known as interceptors to intercept and examine every request before the requested page is sent to its mapped application. The effect is an application mapping that handles every file name extension.
You must be a member of the Administrators group on the local computer to perform the following procedure or procedures. As a security best practice, log in to your computer by using an account that is not in the Administrators group, and then use the runas command to run IIS Manager as an administrator. At a command prompt, type run as /User:Administrative_AccountName"mmc systemroot\system32\inetsrv\iis.msc".
To add a wildcard application mapping to a Web server or Web site
- In IIS Manager, expand the local computer, expand the Web Sites folder, expand the "Default-Web-Site", right-click the virtual directory that you want to collect post parameters on, and then click Properties.
- Click Add Wildcard Script Map.
- In the Executable box, enter the full path or browse to the native handler (.dll or .exe file) that processes the request: <precise_root>\products\www\instances\<instance_id>\bin\IISFilter.dll
- In the Name box, enter a name for the handler mapping.
- Click OK.
- Click Yes, to add the extension with an Allowed entry to the ISAPI and CGI Restrictions list. Repeat this for each virtual directory you want to collect post parameters in.
Add the Precise post-parameters collection extension to the trusted list
To add the Precise post-parameters collection extension to the trusted list
- In IIS Manager, expand the local computer; expand the Web Services Extensions, Click Add a new Web service extension.
- Put "Precise post parameters" as extension name.
- Click Add. In the "Path to file" field type the path to the DLL:
<precise_root>\products\www\instances\<instance_id>\bin\IISFilter.dll - Click OK.
- Mark the “Set extension status to Allowed” check box.
- Click OK.
Updating the collect-post-parameters tag
To update the collect-post-parameters tag
- In the “Registry Path” field in the Registry Editor (AdminPoint > Settings > Registry Editor), enter the following path and click Go: registry/instances/www/<server_name>/<instance_name>/settings.
- In the Xml Editor tab, change the value of the <collect-post-parameters> tag to “true”.
- Click Save.
Adding post-parameters collection for IIS
To add post-parameters collection for IIS, see the following sections:
- Inserting wildcard mapping for Precise post-parameters collection extension
- Updating the collect-post-parameters tag
Inserting wildcard mapping for Precise post-parameters collection extension
By inserting wildcard application mapping, you can instruct IIS to allow ISAPI applications known as interceptors to intercept and examine every request before the requested page is sent to its mapped application. The effect is an application mapping that handles every file name extension.
You must be a member of the Administrators group on the local computer to perform the following procedure or procedures. As a security best practice, log in to your computer by using an account that is not in the Administrators group, and then use the runas command to run IIS Manager as an administrator. At a command prompt, type run as /User:Administrative_AccountName"mmc systemroot\system32\inetsrv\iis.msc".
It is highly recommended to install the Microsoft hotfix mentioned in KB 2505146 (http://support.microsoft.com/kb/2505146) as this solves a Microsoft IIS7 issue. Should you not apply the hotfix and continue to perform the following steps, your application will stop working.
To add wildcard application mapping to a Web server or Web site, go to the <precise_root> directory and run the following script:
products\www\install\psww_insert_isapi_handlers.bat <precise_root> <instance_id> <site_name> add-handler PreciseWebHandler <filter_path>
where:
filter_path The path to the instance bin folder concatenated with "IISFilter", without the _32.dll or _64.dll extension.
For example: c:\precise\products\www\instances\2643\bin\IISFilter
For example: products\www\install\psww_insert_isapi_handlers.bat "E:\Precise Installation" 2442 Petshop add-handler PreciseWebHandler "E:\Precise Installation\products\www\instances\2442\bin\IISFilter"
Updating the collect-post-parameters tag
To update the collect-post-parameters tag
- In the “Registry Path” field in the Registry Editor (AdminPoint > Settings > Registry Editor), enter the following path and click Go:
registry/instances/www/<server_name>/<instance_name>/settings/server-side. - In the Xml Editor tab, change the value of the <collect-post-parameters> tag to “true”.
- Click Save.
Adding post-parameters collection for all other supported Web servers
To add post-parameters collection for all other supported Web servers, see the following section:
This feature is not supported for Apache 1.3.
Updating the collect-post-parameters tag
To update the collect-post-parameters tag
- In the "Registry Path" field in the Registry Editor (AdminPoint > Settings > Registry Editor), enter the following path and click Go:
registry/instances/www/<server_name>/<instance_name>/settings/server-side. - In the Xml Editor tab, change the value of the <collect-post-parameters> tag to "true."
- Click Save.
Removing post-parameters collection for IIS
To remove wildcard application mapping from a Web server or Web site
- Go to the <precise_root> directory and run the following script:
products\www\install\psww_insert_isapi_handlers.bat <precise_root> <instance_id> <site_name> remove-handler PreciseWebHandler <filter_path>
where:- filter_path The path to the instance bin folder concatenated with "IISFilter", without the _32.dll or _64.dll extension.
For example: c:\precise\products\www\instances\2643\bin\IISFilter
For example: products\www\install\psww_insert_isapi_handlers.bat "E:\Precise Installation" 2442 Petshop remove-handler PreciseWebHandler "E:\Precise Installation\products\www\instances\2442\bin\IISFilter"
IDERA | Products | Purchase | Support | Community | Resources | About Us | Legal