This section includes the following topics:
About the application structure
The Precise Business Dashboard application structure is based on the following hierarchy:
- Application Group. Group of applications.
- Application. Group of biz. transactions.
- Biz. Transaction. Group of technical transactions. Each biz. transaction contains either a page title, page URL or URL.
- Technical Transaction. Transactions monitored by Precise. A transaction is either a page title or a page URL.
- Key Transaction for SLA. Transactions configured to be calculated towards the SLA value displayed in Business Dashboard.
- Key Transaction for Volume. Transactions configured to be calculated towards the Volume value displayed in Business Dashboard.
Sample application structure hierarchy
The following diagram illustrates a sample application structure hierarchy.
Figure 1 Sample application structure hierarchy
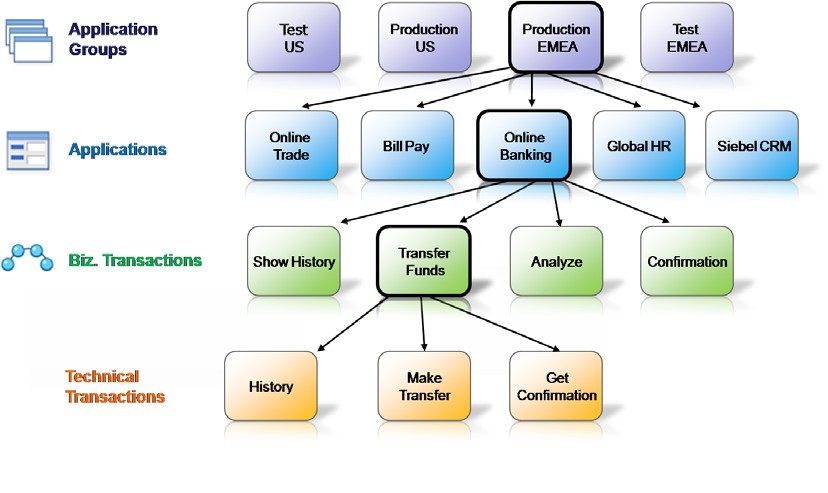
This sample application structure includes four application groups:
- Test US
- Production US
- Production EMEA
- Test EMEA
Application group “Production EMEA” contains the following five applications:
- Online Trade
- Bill Pay
- Online Banking
- Global HR
- Siebel CRM
The “Online Banking” application contains the following four biz. transactions:
- Show History
- Transfer Funds
- Analyze
- Confirmation
The “Transfer Funds” biz. transaction contains the following three technical transactions.
- Check Status
- Make Transfer
- Get Confirmation
Viewing your application structure in the Business Dashboard screen
The Application Structure Overview pane in Business Dashboard displays the monitored application groups and applications in the Application Structure Overview pane, and the biz. transactions are displayed in the Application Status pane. Therefore, the sample application structure, shown in Sample application structure hierarchy, is displayed in the Business Dashboard screen as shown in the following figure.
Figure 2 Sample application structure in the Business Dashboard screen

Viewing your application structure in the TPM Configuration screen
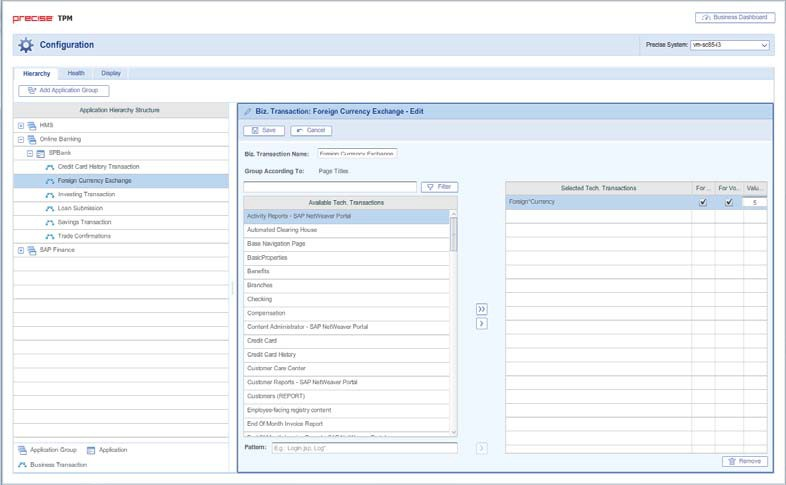
The Application Structure Hierarchy pane in the Configuration screen displays the monitored application groups, applications and biz. transactions, and the technical transactions are displayed in the right pane. Therefore, the sample application structure, shown in Sample application structure hierarchy, is displayed in the Configuration screen as shown in the following figure.
Figure 3 Sample application structure in the Configuration screen
Configuring your application structure
To effectively and efficiently monitor your application, before configuring your application structure see About the application structure.
Configure your Application Structure with the following procedures:
- Scenario # 1 - Adding a new application group
- Scenario # 2 - Editing an application group
- Scenario # 3 - Deleting an application group
- Scenario # 4 - Adding a new biz. transaction
- Scenario # 5 - Editing biz. transactions
- Scenario # 6 - Configuring key transactions
- Scenario # 7- Configuring the transaction Value ($)
- Scenario # 8- Deleting a biz. transaction
- Scenario # 9 - Customizing the Health status
- Scenario # 10 - Enabling/Disabling Auto Refresh
Scenario # 1 - Adding a new application group
In the Hierarchy tab in the Configuration screen, you can create a new application group to be displayed in the Business Dashboard.
To add a new application group
- From the Business Dashboard screen, click Configuration to open the Configuration screen and the Hierarchy tab (default).
- Click Add Application Group. The Application Group window opens on the right pane showing available and selected applications.
- In the Application Group Name field, enter a unique name.
- In the Description field, enter a text description to identify the application group.
- If you want this application group to be defined as critical, check mark the Critical box.
- In the Available Applications list, click a name and click the Add (right arrow) to add it to the Selected Applications list. Another option is to select more than one group of names, drag and drop them to the Selected Applications list on the right.
- To filter and reduce the number of Available Applications displayed in the left list, type a name into the Filter field and click Filter.
- In the Selected Applications list, select a name and click the left arrow to return it to the Available Applications list. Another option is to select more than one group of names, drag and drop them to the Available Applications list on the left.
- Click Save to save the new configuration. The new application group will appear on the left in the Application Hierarchy Structure pane. If the group was marked as critical, it will appear in the View menu under Critical Application Groups.
Scenario # 2 - Editing an application group
In the Hierarchy tab in the Configuration screen, you can edit an application group.
To edit an application group
- From the Business Dashboard screen, click Configuration to open the Configuration screen and the Hierarchy tab (default).
- Select an application group from the left pane. There are two options to enter the Edit mode:
- Click the arrow beside the application group name (left pane) and left-click Edit. The Application Group window opens on the right pane showing available and selected applications.
- Or on the right pane, click Edit.
- In the Application Group Name field, if desired, update the name of the application group.
- In the Description field, enter a text description (no more than two lines) to identify the application group.
- If you want this application group to be defined as critical, check mark the Critical box.
- In the Available Applications list, click a name and click the Add (right arrow) to add it to the Selected Applications list. Another option is to select more than one group of names, drag and drop them to the Selected Applications list on the right.
- To filter and reduce the number of Available Applications displayed in the left list, type a name into the Filter field and click Filter.
- In the Selected Applications list, click a name and click the left arrow to return it to the Available Applications list. Another option is to select more than one group of names, drag and drop them to the Available Applications list on the left.
- Click Save to save the new configuration. The edited application group will now appear on the left in the Application Hierarchy Structure pane. If the group was marked as critical, it will appear in the View menu under Critical Application Groups.
Scenario # 3 - Deleting an application group
In the Hierarchy tab in the Configuration screen, you can delete an application group.
To delete an application group
- From the Business Dashboard screen, click Configuration to open the Configuration screen and the Hierarchy tab (default).
- Select an application group from the left pane.
- Click the arrow beside the application group name (left pane) and left-click Delete.
- Or on the right pane, click Delete.
Scenario # 4 - Adding a new biz. transaction
In the Hierarchy tab in the Configuration screen, you can add new biz. (business) transactions.
To add a new biz. transaction
- From the Business Dashboard screen, click Configuration to open the Configuration screen and the Hierarchy tab (default).
- Select an application from the left pane. The Application window opens on the right pane showing selected biz. transactions.
- On the right pane, click Add Business Transaction. The Biz. Transaction window opens on the right pane showing available and selected biz. transactions.
- In the Biz. Transaction Name field, enter a unique name.
- In the Available Transactions list, click a name and click Add (right arrow) to add it to a Selected Biz. Transactions list on the right. Another option is to select more than one transaction, drag and drop them to the Selected Transactions list on the right.
- To filter and reduce the number of Available Transactions displayed in the left list, type a name into the Filter field and click Filter.
- In the Selected Transactions list, click a name and click Remove (left arrow) to return it to Available Transactions list. Another option is to select more than one group of names, drag and drop them to the Available Transactions list on the right.
- In the Pattern field, enter a pattern option.
- Click Save to save the configuration settings.
Scenario # 5 - Editing biz. transactions
In the Hierarchy tab in the Configuration screen, you can edit biz. (business) transactions.
To edit biz. transactions
- From the Business Dashboard screen, click Configuration to open the Configuration screen and the Hierarchy tab (default).
- Select a biz. transaction from the left pane. The selected transaction information is displayed on the right pane.
- Click the arrow beside the biz. transaction name (left pane) and left-click Edit. The biz. transaction window opens on the right pane showing available and selected transactions.
- Or on the right pane, click Edit.
- In the Biz. Transaction Name field, enter a unique name.
- In the Available Transactions list, click a name and click Add (right arrow) to add it to the Selected Transactions list. Another option is to select more than one group of names, drag and drop them to the Selected Biz. Transactions list on the right.
- To filter and reduce the number of Available Transactions displayed in the left list, type a name into the Filter field and click Filter.
- In the Selected Biz. Transactions list, click a name and click Remove (left arrow) to return it to Available Biz. Transactions list. Another option is to select more than one group of names, drag and drop them to the Available Biz. Transactions list on the left.
- Click Save to save the configuration settings.
Scenario # 6 - Configuring key transactions
In the Hierarchy tab in the Configuration screen, you can define which transactions will be key transactions for SLA and/or Volume, calculated towards the SLA and /or Volume values displayed in Business Dashboard.
To configure which metrics a transaction will be calculated for
- From the Business Dashboard screen, click Configuration to open the Configuration screen and the Hierarchy tab (default).
- Select a biz. transaction from the left pane. The selected transaction information is displayed on the right pane.
- Click the arrow beside the biz. transaction name (left pane) and left-click Edit. The Biz. Transaction window opens on the right pane showing available and selected transactions.
- Or on the right pane, click Edit.
- In the Selected Tech. Transactions list, for each selected technical transaction, check mark the “For SLA” and “For Volume” boxes, according to the metrics you want the selected technical transaction to be calculated for.
- In the Selected Tech. Transactions list, enter the dollar value threshold the technical transaction must meet to be calculated in the Value ($) field displayed in Business Dashboard.
- Click Save to save the configuration settings.
Scenario # 7- Configuring the transaction Value ($)
In the Hierarchy tab in the Configuration screen, you can define the Value ($) for a single execution of a transaction.
To configure which metrics a transaction will be calculated for
- From the Business Dashboard screen, click Configuration to open the Configuration screen and the Hierarchy tab (default).
- Select a biz. transaction from the left pane. The selected transaction information is displayed on the right pane.
- Click the arrow beside the biz. transaction name (left pane) and left-click Edit. The Biz. Transaction window opens on the right pane showing available and selected transactions.
- In the Selected Tech. Transactions list, enter the dollar value for a single execution of the transaction.
- Click Save to save the configuration settings.
Scenario # 8- Deleting a biz. transaction
In the Hierarchy tab in the Configuration screen, you can delete a biz. (business) transaction.
To delete a biz. transaction
- From the Business Dashboard screen, click Configuration to open the Configuration screen and the Hierarchy tab (default).
- Select a biz. transaction from the left pane.
- Click the arrow beside the biz. transaction name (left pane) and left-click Delete, or click the Delete button.
Scenario # 9 - Customizing the Health status
In the Health tab in the Configuration screen, you can customize the criteria used to calculate the Health status for an application group(s) via the Configuration screen Health tab.
To customize the criteria used to calculate the Health status
- On the Configuration screen, click the Health tab. The Configuration screen Health view opens.
Under Health Indicators, click into one of the boxes and enter a whole number value for either of the health indicators (SLA [%] or Availability [%]). (The whole number will become the percent value for SLA and Availability).
When changing a value for either of the two indicators, the other automatically changes accordingly to total a combined sum of 100% for the two indicators.
- Under Health Thresholds, you have two options to designate Application Health:
- Click and drag each arrow (up or down) from the bar graph to designate its Health (Good, At Risk, Poor). To click and drag, continue with Step 4 in this procedure.
- Type a whole number value for each (Good, At Risk, Poor). To type in a whole number for each, see the procedure “To designate Application Heath Poor, At Risk, and Good values” below.
- Click and drag the graph arrow (upper or lower arrows) up or down to determine the whole number percent value for each Application Health range (Good, At Risk, Poor).
- Under Application Group Health, click a circle to set the desired Application Group Health. The two options are:
- Application Group health is that of the worst application in the application group.
- Calculate Application Group health using the percentile distribution.
- Click Save to save the Health configuration settings.
You can manually type in the Application Health value for Good, At Risk, and Poor. To designate Application Health Poor, At Risk, and Good values
- Under Application Health, you can first click and type in a whole number value for the Good value. This will define the percentage range for Good.
- Click the At Risk Health box and type in a whole number value. This will define the percentage value for At Risk.
- Continue with Step 5 in the procedure “To customize Health status” above.
Scenario # 10 - Enabling/Disabling Auto Refresh
Using the Business Dashboard or Configuration screen, you can both manually refresh the information displayed on the Business Dashboard screen and configure Business Dashboard to automatically refresh the information every five minutes.
To manually refresh the Business Dashboard screen for the selected time frame
- Click Refresh on the Business Dashboard toolbar
To configure Business Dashboard to automatically refresh the information for the selected time frame every five minutes
- On the Business Dashboard toolbar, click Auto Refresh is Off. The icon will then say Auto Refresh is On.
OR
- In the Display tab in the Configuration screen, check mark the “Auto Refresh” box.