Typical upgrade steps
For each Azkaban Web and Executor Server instance:
Stop the Windows services and/or Linux processes for each Web and Exec server.
Perform backups of the following:
Your Azkaban metadata repository
azkaban.local.propertiesfor each Web and Exec serverAny other configuration files if you have customized them
Run the installer targeting the existing Azkaban install locations:
- Step 1 - upgrade the Azkaban metadata
- Step 2 - upgrade the Azkaban Web Server
- Step 3 - upgrade each Azkaban Executor
Merge any customizations back in from your earlier backups.
Start the Azkaban Web and Executor services and/or Linux processes.
- Upgrade or merge changes to the Scheduler Integration Scripts as required.
- Create scheduler authentication profiles as required. See Scheduler Profile Maintenance for details.
Backup of your Azkaban Properties and Configuration files
When you choose to upgrade either the Scheduler or the Executor, the installer will make a copy of any properties and configuration files that could have custom settings. These copies are stored on a folder called 'Backup-<timestamp>' in the ‘WEB_SERVER’ and ‘EXEC_SERVER’ folders. The backup includes these files:
- azkaban.local.properties
- azkaban-users.xml
- log4j.properties
- Response.xml
- users.xml
You can also manually backup these files for each Web Server and Executor Server being upgraded.
The backup of the
azkaban.local.properties
file will be useful to open while you run the installer so you can apply the correct settings to the installer fields.
Upgrade on Windows
On the RED installation folder, run
RedSchedulerInstaller.exeto start the upgrade process, follow the interactive installer wizard. Please note theRedSchedulerInstaller.exemust be run using the same user that the Azkaban services are run under.Tip
Hold down Shift and right click on RedSchedulerInstaller.exe and select “run as different user” then enter the Azkaban service user credentials if you are currently logged in as another user.
Note
For scripted upgrades, the Linux upgrade method described later can also be used on Windows.
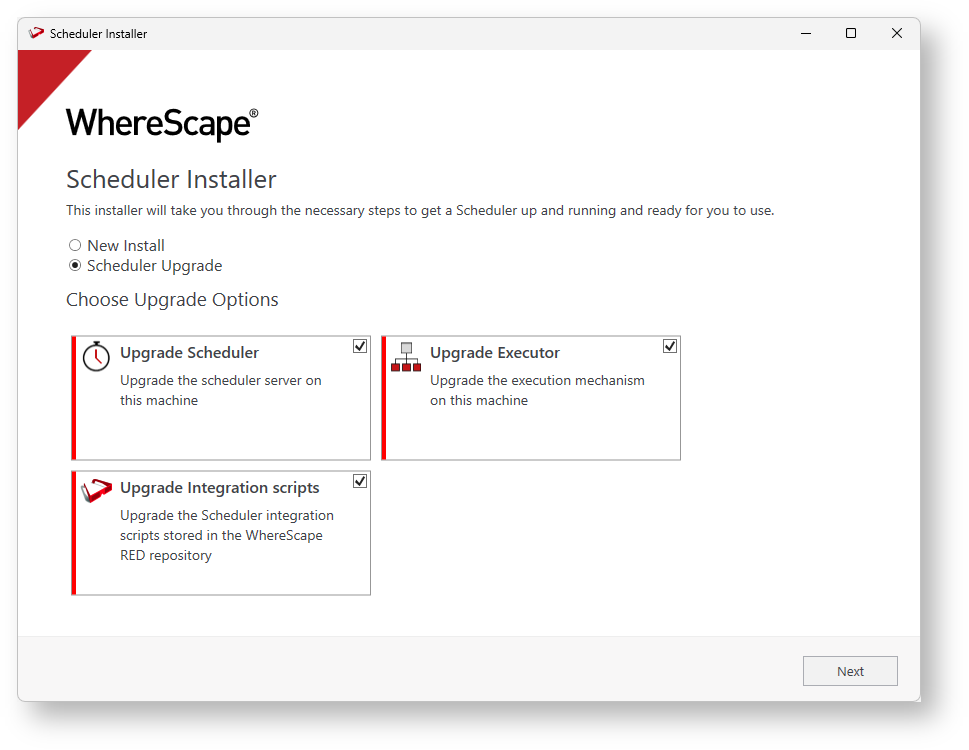
- To upgrade the Azkaban metadata and Web Server on this machine, select Scheduler Upgrade and check the components you want to upgrade.
- Select the location of the scheduler you want to upgrade.

- If you are upgrading from a version lower than RED 10.2, you will be required to specify the profile encryption secret and Windows service credentials.
- The Upgrade wizard will collect all the required connection information from
azkaban.local.propertiesand will show it on the summary window.
- To proceed through the rest of the installation wizard click Install.
- Post install you need to manually merge any customizations to the
azkaban.local.propertiesand users file as required before starting up your services again.
Command-line Upgrades for Linux or Windows
Like RED, Azkaban is comprised of two distinct parts, the application and the metadata. Some releases may only require one or the other to be upgraded so please refer to the important upgrade messages in the release notes to determine the upgrade requirements.
Azkaban Upgrade Steps
Upgrade the Azkaban Metadata
Upgrade the Azkaban Web Server
Upgrade one or more Azkaban Executor Servers
- Merge any Customizations
- Startup the Services or Processes
Before you begin
It is recommended you perform backups of the following so that any customizations can be merged back in after the upgrade:
Your Azkaban metadata repository
azkaban.local.propertiesfor each Web and Exec serverAny other configuration files if you have customized them
1. Upgrade the Azkaban Metadata
Ensure the Web Server service or process is stopped.
Perform the Azkaban metadata install by executing the below commands in your command shell in Linux or Windows.
- Stop the Web Server service or process
- Set the environment variables for your Azkaban metadata user and pwd:
AZ_DB_USER=myuserAZ_DB_PWD=mypwd - Then, run the azkaban-installer.jar with the ‘upgrade-schema’ command:
java.exe -jar"azkaban-installer.jar"upgrade-schema --database=AZ_REPO --host=PG_HOST --port=5432--schema=white --username-var=AZ_DB_USER --password-var=AZ_DB_PWD
2. Upgrade the Azkaban Web Server
Ensure the Web Server service or process is stopped.
Tip
The original response file for each Web and Executor server should still exist in each server's install directory, this can be reused to reapply the same settings as before. If reusing this response file it is important to compare this with the latest version as occasionally new fields are added to the response file for new features, a change in response file fields should be signaled by the important upgrade messages in the release notes.
If you have removed or deleted this file then a new one will need to be reconstructed. See the Azkaban Installation section for answer file examples.
- For Linux: Copy the scheduler .jar file from <RED_install_dir>\Azkaban\azkaban-installer.jar to the host machine and run the following command (with Java 11 JRE):
java -jar azkaban-installer.jar --log-file=./install.log install-server --response-file=web_server_response_file.xml - For Windows: Open a command prompt and run the following command, replacing the directory location placeholders:
<RED_install_dir>\jre\bin\java -jar <RED_install_dir>\Azkaban\azkaban-installer.jar --log-file=c:\temp\install.log install-server --response-file=<WEB_install_dir>\web_server_response_file.xml
3. Upgrade one or more Azkaban Executor Servers
Ensure the Executor Server service or process is stopped.
- For Linux: Copy the scheduler .jar file from <RED_install_dir>\Azkaban\azkaban-installer.jar to the host machine and run the following command (with Java 11 JRE):
java -jar azkaban-installer.jar --log-file=./install.log install-server --response-file=executor_server_response_file.xml - For Windows: Open a command prompt and run the following command, replacing the directory location placeholders:
<RED_install_dir>\jre\bin\java -jar <RED_install_dir>\Azkaban\azkaban-installer.jar --log-file=c:\temp\install.log install-server --response-file=<EXEC_install_dir>\executor_server_response_file.xml
4. Merge any Customizations
Post-install you need to manually merge any customizations to the azkaban.local.properties and users file as required before starting up your services again.
5. Startup the Services or Processes
For Windows: Open Services in Windows and restart each Web and Executor service
- For Linux: Run the startup script in the Azkaban install location within the bin directory.
Upgrade the Scheduler Integration Scripts
Some releases add improvements to the shipped Azkaban integration scripts, any such changes will be signaled in the release notes.
Due to specific environmental customizations users may have made to these scripts they are not upgraded automatically, instead you need to extract them from the installation folder and review and merge the changes to your existing scripts as required.
The shipped scheduler integration scripts are described below:
wsl_scheduler_publish- publishes job metadata to Azkabanwsl_scheduler_lookup- retrieves the tags of all active Azkaban Executorswsl_scheduler_dashboard- opens the Azkaban Web Server dashboardwsl_scheduler_profile_maintenance- script for maintaining the scheduler profile
To upgrade any of these scripts follow this process:
- In RED, open the Azkaban integration script in the script editor such as
wsl_scheduler_publishunder your Host Script objects. - In notepad open the matching script located in the RED installation directory under
<RED install directory>\Administrator\Scripts\ - Copy the contents of the updated script into the RED script editor to overwrite the existing script and save.
Note
- It is a good idea to version the script before the manual upgrade process, right click on the script in RED and select Version Control->New Version
- If you have made any customizations to your
wsl_scheduler_publishscript these will need to be merged manually with the updated script changes. - Any changes to the Azkaban integration scripts will only take effect for new jobs or when editing an existing job causing a re-publish to Azkaban.
Upgrade Troubleshooting
Upgraded RED and now Azkaban doesn't start?
If you installed RED to a different location than when the Azkaban services were created, then you'll need to update the ImagePath key in the registry for each Azkaban service.
For example:
Registry location:
Computer\HKEY_LOCAL_MACHINE\SYSTEM\ControlSet001\Services\WsAzkabanExec_red1001_dbKey:
ImagePathValue: "
C:\Program Files\WhereScape\RED\10001-230606-005456\WslSchedulerService.exe" --type="Exec" --scheduler-dir="C:\temp\azkaban\red1001_db" --start-service=true --service-name="WsAzkabanExec_red1001_db"