Page History
...
Post-installation tasks for Tuxedo tier agents in active/passive configurations
Installing Tuxedo Tier agents in active/passive configurations requires manual post-installation tasks.
When trying to find the Tuxedo shared memory address to attach during initialization, the Insight Savvy for Tuxedo uses the physical server name. If the logical server name is used during the installation, this may cause connection issues. To prevent connection issues, you need to configure the shared memory address in the registry file by adding the <tux_shmkey> parameter. This parameter takes on the hexadecimal value of the shared memory address as defined in the Tuxedo configuration file. For example:
*RESOURCES IPCKEY 100100
In this example, 100100 is the decimal string for the hexadecimal value 0x18704. The following is a complete Tuxedo configuration example from the Precise registry:<simple>
<tux_dir>/vip/Tuxedo71/sun4</tux_dir>
<tux_version>71</tux_version>
<tux_config>/vip/Tuxedo71/sun4/samples/atmi/simpapp/tuxconfig</tux_config>
<tux_uid>7101</tux_uid>
<tux_shmkey>0x18704</tux_shmkey>
<network>
<ports>
<child_1>
<port>0</port>
</child_1>
</ports>
</network>
</simple>
To perform post-installation tasks for Tuxedo Tier agents
- Log in to the passive server and change to the
<precise_root>/products/insightfolder. - Configure the shared memory address in the registry file to prevent connection issues, as follows:
- To prevent connection issues, configure the shared memory address in the registry file, as follows:
Open the <precise_root>\products\i3fp\registry\instances\tuxedo\logical server name\instance name.xml file.
Under <instance name>, add the line: <tux_shmkey>0xXXXXXX</tux_shmkey>
Sync the registry changes by running the following command on the FocalPoint where you've updated the registry files:
UNIX
./infra/bin/psin_cli.sh -action update-main-registry -i3-user <user>
-i3-clear-password <password> -registry-path
/registry/instances/tuxedo/<server>/<instance>
Windows
infra\bin\psin_cli.bat -action update-main-registry -i3-user <user>
-i3-clear-password <password> -registry-path
/registry/instances/tuxedo/<server>/<instance>
On Windows only, change to the <precise_root>/products/insight/host folder and run the following command:
echo "<precise_root>"|..\install\i3_general.exe -install
Do not type blanks between <precise_root >and the | character.
Installing the Oracle Tier agents in active/passive configurations
Installing Oracle Tier agents in active/passive configurations requires the following preconditions:
The monitored Oracle database is installed on both servers with the same instance ID.
Both databases share the same Oracle data via a shared file system and shared disks.
Oracle instances and servers are accessible using the logical name of the cluster.
Because only one database is active at a time, the Precise for Oracle agents monitor only the active instance at any given moment.
Pre-installation and installation tasks are not required, but post-installation tasks are mandatory if the Insight Savvy for Oracle is installed.
Post-installation tasks for Oracle Tier agents in active/passive configurations
If you have installed the Insight Savvy for Oracle, you need to perform manual post-installation tasks.
To perform post-installation tasks for Oracle Tier agents
Log in to the passive server and change to the <precise_root>/products/insight folder.
On Windows only, change to the <precise_root>/products/insight/host folder and run the following command:
echo "<precise_root>"|..\install\i3_general.exe -install
Do not type blanks between <precise_root> and the | character.
What happens in a failover situation (active/passive)
When the monitored application fails over to the standby server, all Precise agents must fail over, too. It is recommended that you add Precise shutdown and startup scripts to your automatic failover procedure.
See Generating Precise startup and shutdown scripts on page Error! Bookmark not defined..
NOTE
AdminPoint shows the status for Precise agents that run on the active server. Precise agents on the standby server are not represented.
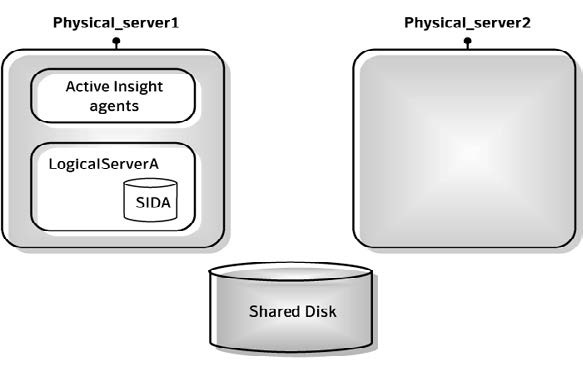
The following figure illustrates the live standby configuration before a failover.
Figure B-1 Live standby configuration before a failover
- To prevent connection issues, configure the shared memory address in the registry file, as follows:
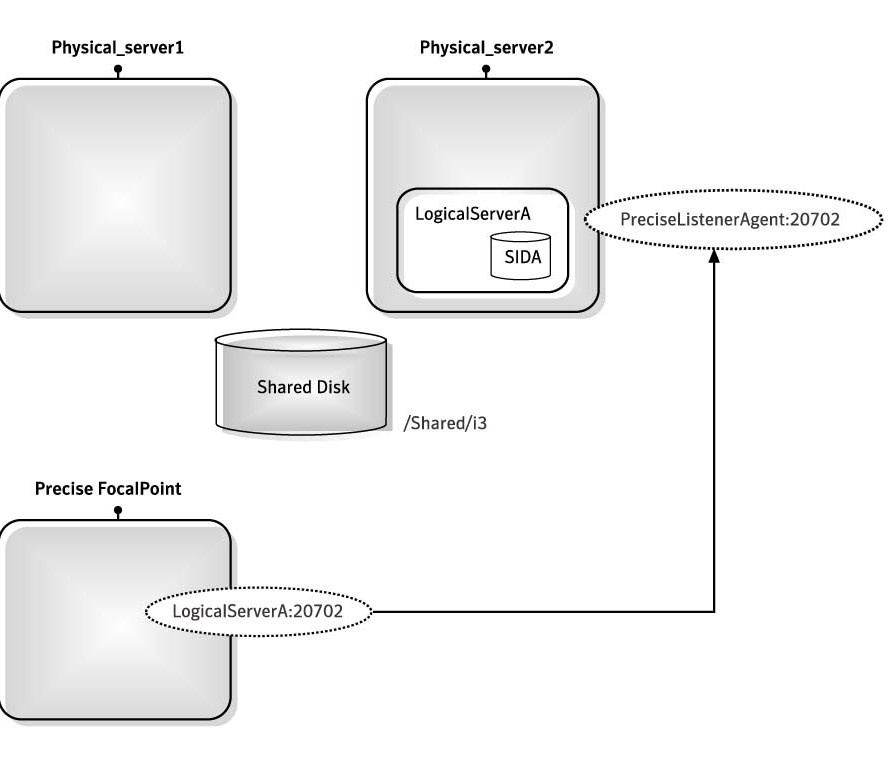
The following figure illustrates the live standby configuration after a failover.
Figure B-2 Live standby configuration after a failover
Failover tasks in active/passive configurations
If you added the Precise shutdown and startup scripts to your automatic failover procedure, you do not need to perform any tasks when a failover occurs. Otherwise, you need to perform the following task.
To perform failover tasks in active/passive configurations
Log in to the servers that failed (if still alive) and stop all Precise agents.
Start all Precise agents on the now active server.
NOTE
Upon failover, you must stop all services before starting them on the active server. Verify that you stop the sentry service first.