Page History
The Add Server window of the Configuration wizard Specify Connection Credentials window allows you to specify configure the SQL Server instance credentials you want to use to register with IDERA SQL Compliance Manager. Once you register an instance, you can begin auditing database activity on that server.
Select the SQL Server instance you want to register, and then click Next.
Available fields
SQL Server
Allows you to specify the name of the target SQL Server instance, using the format SQLServerName\InstanceName. You can also browse for available SQL Server instances in your domain.
Description
Allows you to specify a description for this instance. The Management Console uses this description when you view SQL Server properties or report on audit data. Consider including information about the databases hosted on this instance, or the organization to which this instance belongs.
...
connect to the target server and register it. These credentials will only be used during the server registration.
Specify Connection Credentials
The following options are available for the connection:
Windows Authentication
Allows you to set a domain\username format with Windows Username and Password credentials. This option is set as default for the connection credentials.

SQL Server Authentication
Allows you to register your SQL Server Agent credentials for the connection of the registered SQL Server.

| Info |
|---|
If you want to apply the Windows Authenticationoption, the SQL Server Authentication fields gray out and are unusable. The same happens when selecting the SQL Server Authentication option. |
Amazon RDS for SQL Server
Specify Connection Credentials
Suppose you selected the Amazon RDS for SQL Server option in the Server Type when adding a server. In that case, the Windows Authentication is replaced with the AWS Directory Service for Microsoft Active Directory credentials for the authentication.

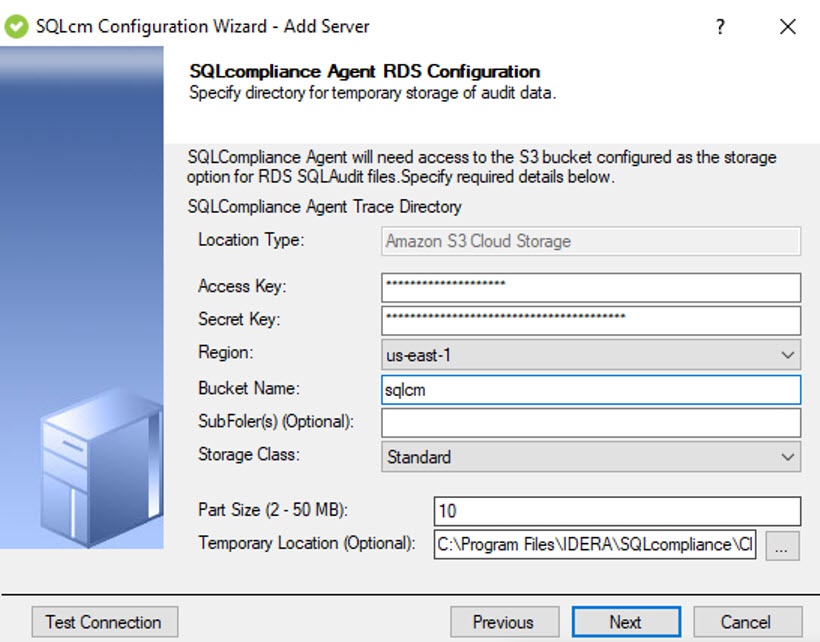
SQLcompliance Agent RDS Configuration
Enter the Acces and Secret keys to grant the SQLcompliance Agent access to the S3 Bucket. Next, select a region, type in your Bucket name, and select your desired Storage Class.
Available Fields
Location Type
This field displays the location type.
Access Key
Enter your Access key.
Secret Key
Enter your Secret Key.
Region
Select your region.
| Info | ||
|---|---|---|
| ||
RDS does not support the Middle East (Bahrain) region. |
Bucket Name
Choose a name for your Bucket. Valid access to the S3 Bucket services is needed.
SubFolders (Optional)
Choose names for any optional subfolders.
Storage Class
Select the Storage class type.
Part Size
Choose the part size you desire; the part size must be between 2 and 50 MB.
Temporary Location (Option)
Choose a temporary location path.
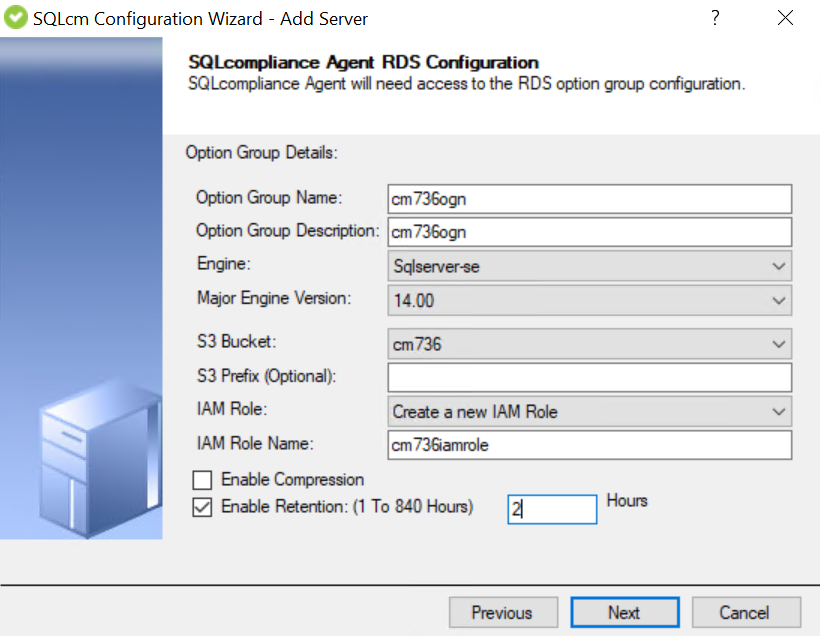
Agent RDS Configuration - Option Group
Once connected, add the Option Group details by completing the SQLcompliance Agent RDS Configuration settings.
Available Fields
Option Group Name
Choose a unique name for your Option Group within your AWS account. The name can contain only letters, digits, and hyphens.
Option Group Description
Type a brief description of the Option Group.
Engine
Choose your desired DB Engine.
Major Engine Version
Choose the major version of the DB engine of your preference.
S3 Bucket
Select your S3 Bucket from the dropdown list.
S3 Prefix (Optional)
Optionally choose a prefix for your S3 bucket.
IAM Role
Select your IAM role from the dropdown list or create a new IAM Role.
Users can choose an existing or create a new IAM Role and map it to the option group and RDS instance registered.
| Note | ||
|---|---|---|
| ||
In case of any incompatibilities on AWS, remain on the screen, select the newly created IAM Role, and map it to the option group and registered RDS instance. |
IAM Role Name
Choose a unique name for the new IAM Role.
| Info | ||
|---|---|---|
| ||
Newly created IAM roles can be utilized across different SQL server versions. |
Enable Compression
Select this checkbox to enable compression.
Enable Retention
Select this checkbox to enable retention.
Retention Window
Input the number of hours for the retention window. The minimum is 1 hour, and the maximum is 840 hours.