Page History
...
Pre -Installation
...
Before installing IDERA SQL Compliance ManagerBefore installing IDERA SQL Compliance Manager, consider the following best - practices:
- Ensure you review the hardware, software, permissions, and port requirements.
- Decide whether you should install the Collection Server on a dedicated SQL Server instance.
- A SQL Server instance to host the IDERA SQL CM and the IDERA Dashboard repository databases.
- Have valid Service Account credentials for the IDERA Services.
- If you plan to audit instances running SQL Server 2005 or later, install the Collection Server on a computer hosting the highest version of SQL Server running in your environment. For example, to accept event data from audited instances running SQL Server 2012, the Repository databases must reside on a SQL Server 2012 or higher instance.
By default, SQL Compliance Manager installs with a trial license. For more information about trial licenses or upgrading your license, see Licensing.
| Info |
|---|
...
| IDERA SQL Compliance Manager |
...
Select whether you want the SQL Compliance Manager application to be available to all users who log on to this computer, and then click Next.
...
| versions 4.5 and older. For installations of SQL Compliance Manager 5.0 and newer, including the IDERA Dashboard, see How to install SQL Compliance Manager and the IDERA Dashboard. |
Fresh Installation
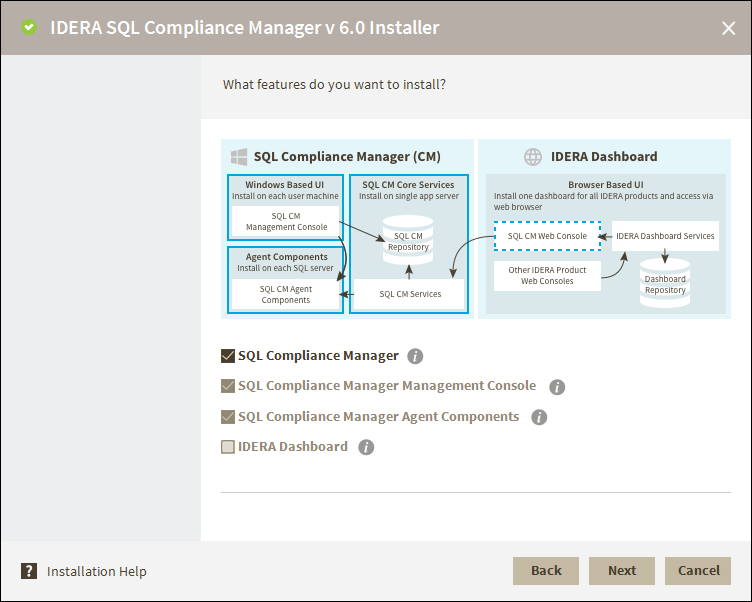
Install Features
- Select the Fresh Installation option.
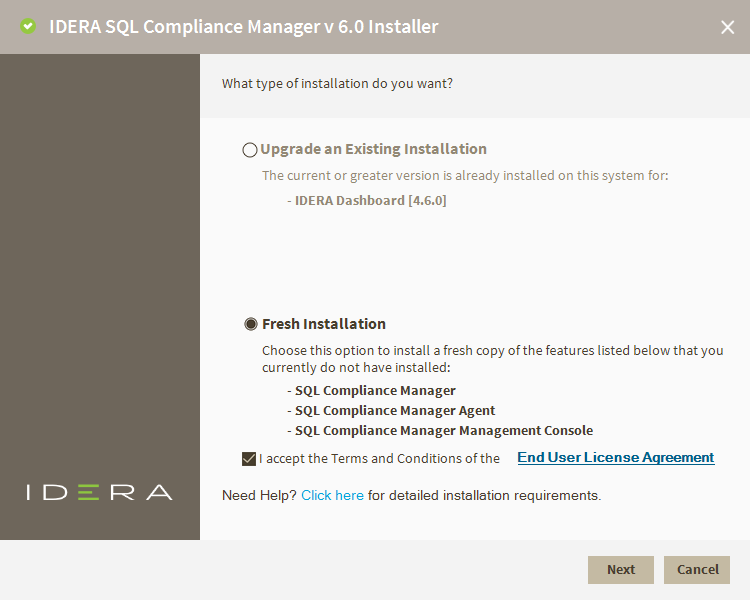
- Accept the terms and conditions of the EULA and click Next.
- Click the link to open the EULA dialog to review it in detail.
- Select the features you want to install and click Next.
- SQL Compliance Manager - Installs the collection service, the management console, and the agent components.
- SQL Compliance Manager Management Console - installs the application only.
- SQL Compliance Manager Agent Components - installs the agent service and its required components only.
- IDERA Dashboard - installs the IDERA Dashboard that can be accessed via web console to access SQL CM.
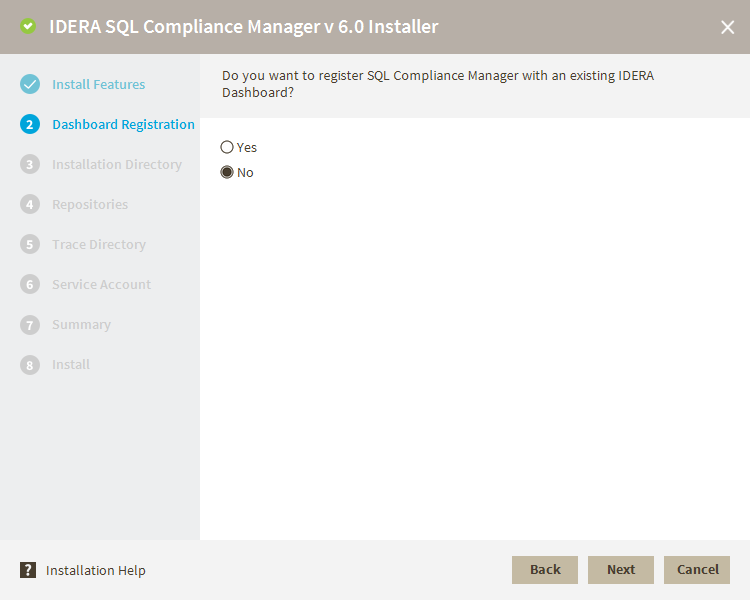
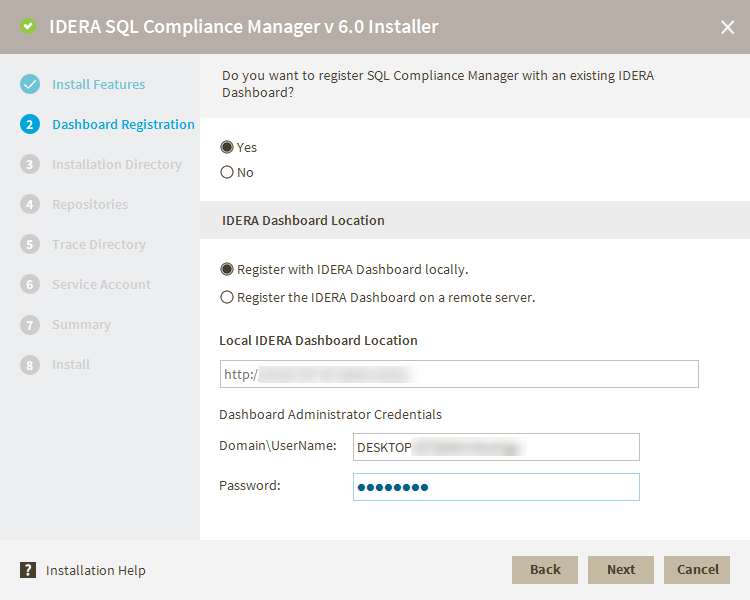
Dashboard Registration
Select if you want to register SQL CM with an existing IDERA Dashboard.
Register the IDERA Dashboard locally - type in the Dashboard Location where you want to install the IDERA Dashboard and type in your Administrator Credentials.
- Choose whether you want to register SQL CM to an existing IDERA Dashboard. If you choose Yes, follow the steps below. If you choose No, click Next.
- Select whether to register SQL CM with the IDERA Dashboard locally or on a remote server.
- In the text field type in the Remote IDERA Dashboard Location addressed. If you selected to register locally, the address fills in automatically.
- Fill in the text fields with your UserName and Password and click Next.
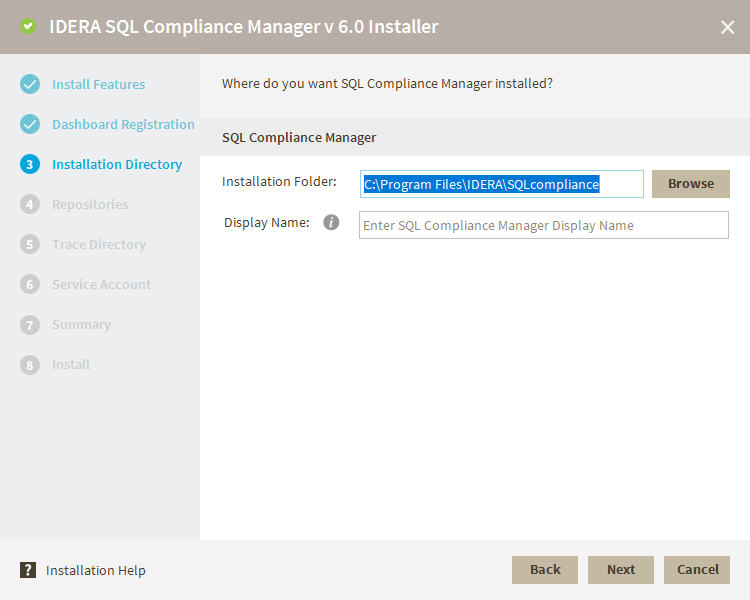
Installation Directory
- Type in or browse the installation folder where you want to install SQL CM.
- Type in a Display Name to be shown on the IDERA dashboard for the current installation.
Repositories
If you want to enable a Clustered Environment. Select the checkbox and choose between an Active Node or a Passive Node to create your repositories.
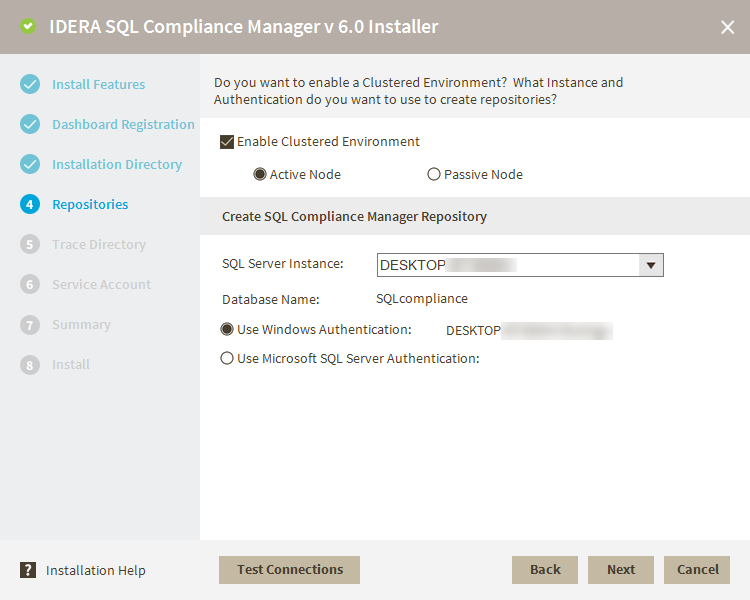
Create SQL Compliance Manager Repository
Select your SQL Server Instance from the drop-down menu.
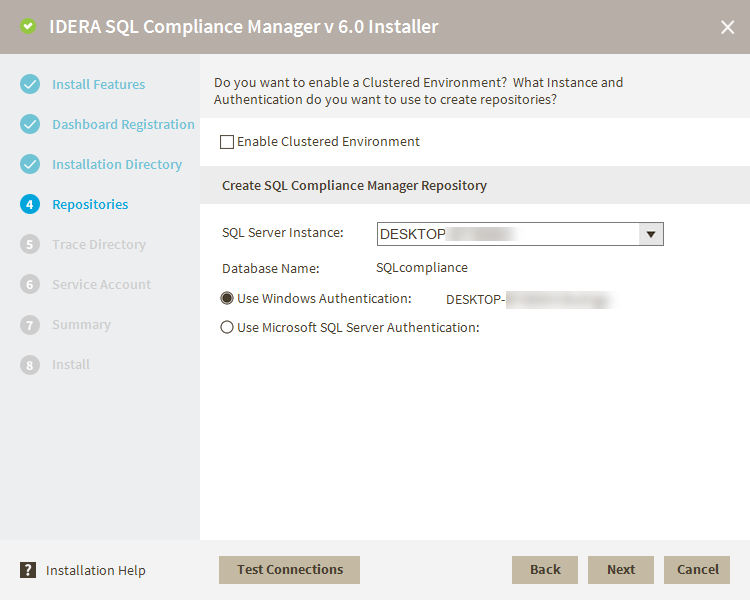
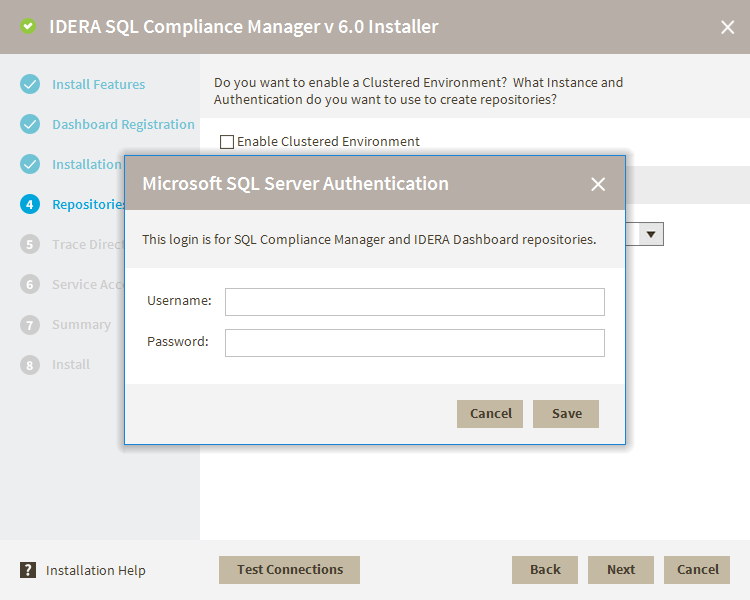
Select the authentication method. When selecting Use Microsoft SQL Server Authentication, a screen prompts you to add the Username and Password.
Trace Directory
Select where you want to store the audit information obtained with the SQLCompliance Agents before it processes the information and sends into the Repositories.

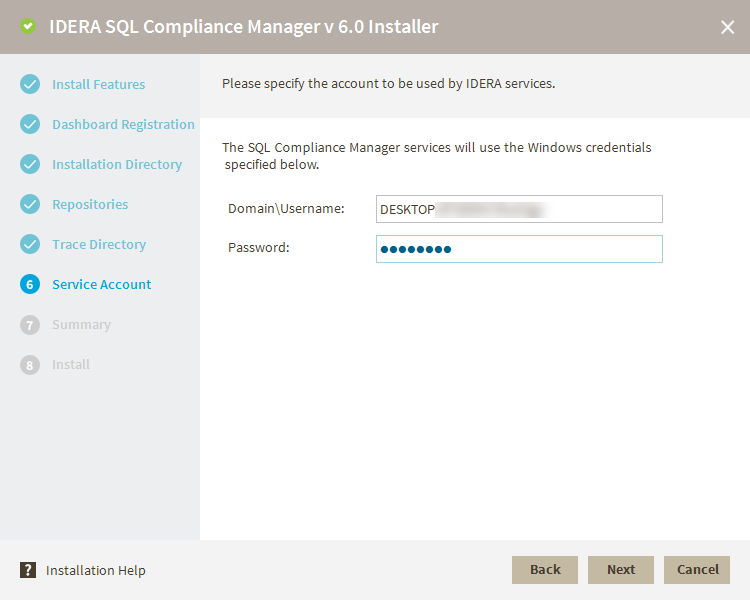
Service Account
Specify the account used for IDERA Services.
Summary
Review the stated parameters before the installation.
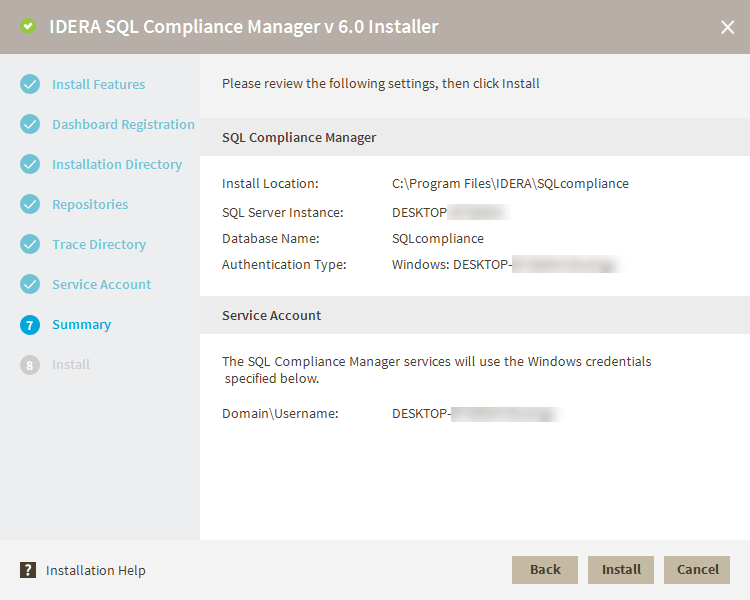
Press the Install button to start the installation
Select the appropriate setup type, and then click Next.
...
- Collection Server and Repository with SQL Compliance Manager Agent
- Collection Server and Repository
- Management Console with SQL Compliance Manager Agent
- Management Console only
- SQL Compliance Manager Agent only
The setup program installs the Repository when you install the Collection Server.
To install all SQL Compliance Manager components at the same time, use the Typical setup type.
...
- Specify the location where you want the Collection Server to store audit data received from the SQL Compliance Manager Agent, and then click Next. The specified folder is the trace file directory on the Collection Server.
- Specify the Windows user account that you want the Collection service and SQL Compliance Manager Agent to run as to access the Repository, and then click Next.
- Click Browse to select the SQL Server instance on which you want to install the Repository. The setup program creates the Repository databases on the specified instance.
- Specify the authentication the setup program should use to connect to the selected SQL Server and create the Repository, and then click Next.
- If you want to audit the Repository or other databases associated with the selected SQL Server instance , click Yes, and then click Next.
- Specify the location where the SQL Compliance Manager Agent should store collected audit data, and then click Next. The specified folder will be the trace file directory on the audited SQL Server instance.
- Select whether you want to start the services immediately after install, and then click Next.
...
- Specify the location where the SQL Compliance Manager Agent should store collected audit data, and then click Next. The specified folder will be the trace file directory on the audited SQL Server instance.
- Specify the Windows user account the SQL Compliance Manager Agent service should run as to access databases associated with the audited SQL Server instance, and then click Next. If you are installing the agent on a computer that belongs to a workgroup or non-trusted domain , specify a valid local account (
MyComputer\AccountName). - Type the name of the computer on which the Collection Server is installed, and then click Next. If you are installing the SQL Compliance Manager Agent on a workstation or a computer that belongs to a non-trusted domain , the setup program is unable to validate a connection to the specified computer. Click No when prompted to specify another Collection Server computer.
- Click Browse to select the SQL Server instance you want to audit, specify the authentication the SQL Compliance Manager Agent should use to connect to associated databases, and then click Next.
- Select whether you want to start the SQL Compliance Manager Agent service immediately after install, and then click Next.
...
.
| Note |
|---|
The SQL Compliance Manager installer detects if the local machine has an older version of the SQL Server 2012 Native Client installed and if needed, SQL CM upgrades the Native Client to the latest version and proceeds with the installation. If no Native Client is installed on the a server, then SQL CM installs the latest Native Client version and proceeds with the installation. |
| Note |
SQL Compliance Manager is ONLY compatible with IDERA Dashboard version 4.6 and with limited support. |