Page History
This section guides you through the installation of Idera IDERA SQL Inventory Manager. You You can install Idera SQL Inventory IDERA SQL Inventory Manager on any computer that meets or exceeds the the product requirements.
Before you install IDERA SQL Inventory Manager, be sure to have:
- The Idera Dashboard installed. SQL Inventory Manager integrates with the Idera Dashboard.
- A local administrator account on the machine you are installing the product.
- A host machine for SQL Inventory Manager services.
- A host SQL host SQL Server for the product databases.
- A service account with permissions to read/write and create databases and update their schemas.
- .NET framework 4.6.1 or later version installed.
| Info |
|---|
To check the .NET Framework version you have installed in your computer, follow these steps:
|
| Note |
|---|
| Please note that in order to install SQL Inventory Manager you must use one of the following operating systems: Windows Server 2008 SP2+, Windows 8, Windows 10, Windows 2012 or Windows 2016. |
| Info |
|---|
You can also grant IDERA SQL Inventory Manager Product Administrator permissions in the Idera IDERA Dashboard. For more information, see Managing users in the Idera IDERA Dashboard. |
Installing
...
IDERA SQL Inventory Manager
Before you install IDERA SQL Inventory Manager, be sure to meet the requirements mentioned before. Open the installer and follow these steps:
- On the Welcome to the Idera IDERA SQL Inventory Manager Setup Wizardwindow, click Next to to continue with installation.
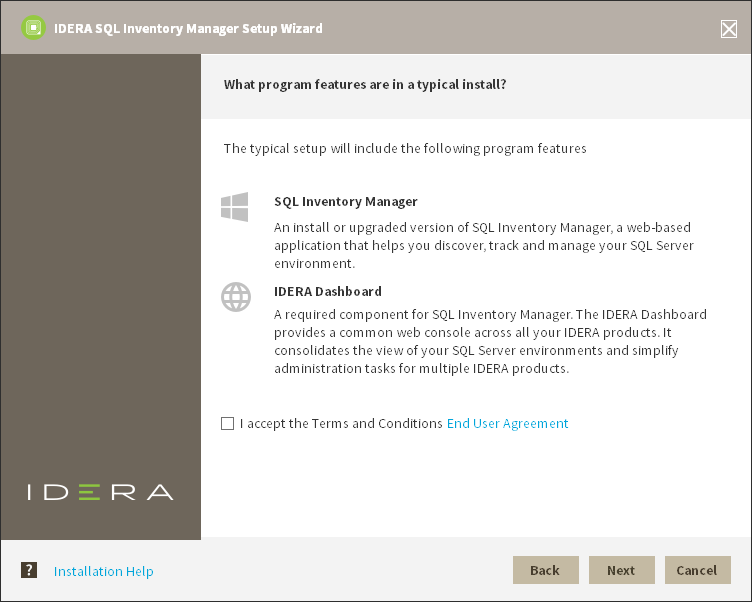
- Click I accept the terms in the License Agreement, and then click Next.
- On the Destination Folder page, click Next to install to the default folder or click Change to select the directory where you want to install SQL Inventory Manager. Click Next to continue.
- On the Idera SQL Inventory Manager Idera Dashboard page, specify:
- the URL of the Idera Dashboard
- the Idera Dashboard Administrator User Name
- the Idera Dashboard Administrator user account Password
- Click Next.
- Use the format
<Domain Name>\<User Name>when typing the administrator credentials. SQL Inventory Manager uses this account when accessing the Idera Dashboard to share data.
- On the Idera SQL Inventory Manager Service Account page, specify the User Name and Password, under which the services will run, and then click Next. Use the format
<Domain Name>\<User Name>when typing the User Name. SQL Inventory Manager uses this account to connect, discover, and gather configuration information from SQL Servers. The installer grants the "Log on as a Service" right to the account that you specify.
- the installation. You can optionally generate a script for generating the SQL Inventory Manager Repository database.
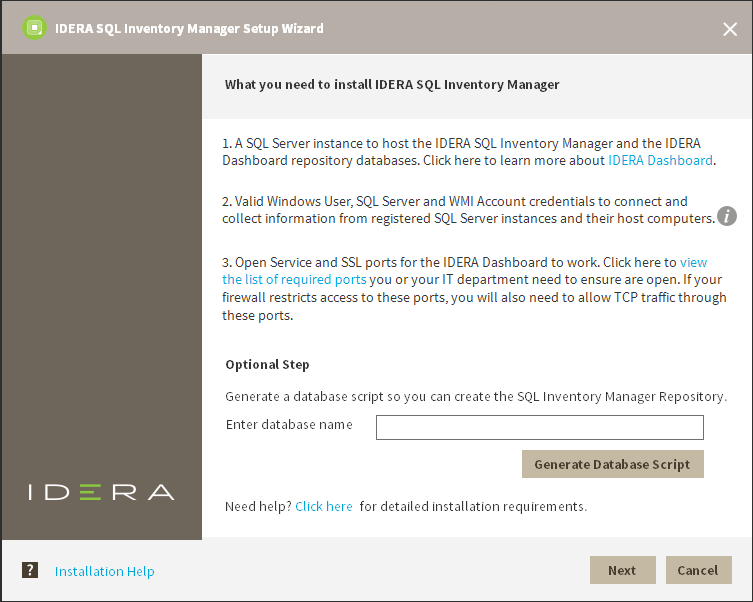
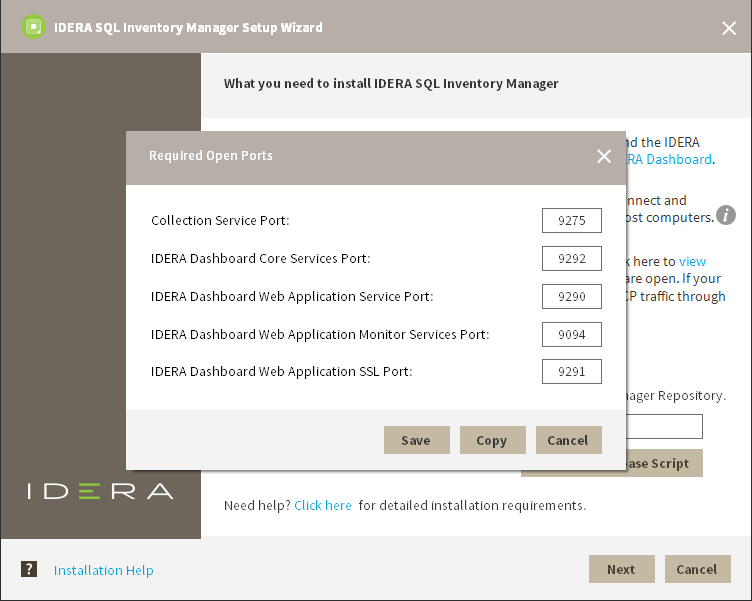
On the Service Ports section, determine which ports you want to use for the SQL Inventory Manager Collection Service and for the Web Application Service. You must verify that the Firewall allows TCP (Transmission Control Protocol) traffic through your specified ports.
The ports you want to use. By default, IDERA SQL Inventory Manager uses ports 9275 and 9276 9291 for the Collection and Web Application services respectively. Click Next
To see or edit the default ports SQL Inventory Manager uses click view the list of required ports.Info Port values should be between 1 and 65535.
Keep in mind, that browsers may block some specific ports. To check a list of all blocked ports on Mozilla Firefox, see Mozilla Port Blocking.
- Read the License Agreement. If you agree, click hereclick I accept the Terms and Conditions and then click Next.
- On the Idera this section you can specify a Display Name for your SQL Inventory Manager installation and the location of both SQL Inventory Manager and IDERA Dashboard.
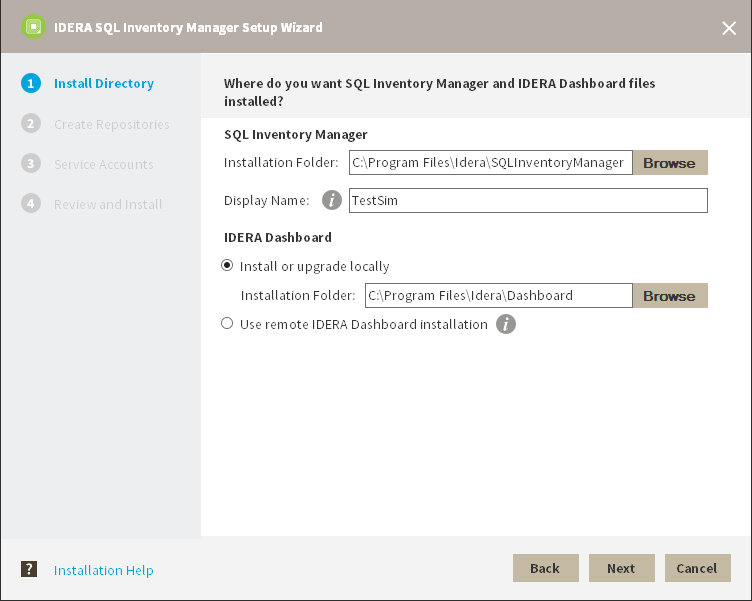
- If you want to change SQL Inventory Manager default path, click Browse.
- On the Display Name box, type a unique name for this instance of IDERA SQL Inventory Manager. A Display Name allows you to identify each instance of IDERA SQL Inventory Manager or other IDERA products when you have more than one installation of the same product. IDERA recommends that you use a name based on a location or function, such as SIM-Prod or SIM-West. Note that this field accepts only alphanumeric characters (A-Z, a-z, 0-9) and dashes (-).
- Choose Install or upgrade locally to install IDERA Dashboard on the default installation path. If you want to change IDERA Dashboard default path, click Browse.
If you want to register SQL Inventory Manager with an existing remote IDERA Dashboard installation, choose Use remote IDERA Dashboard Installation and follow these steps.
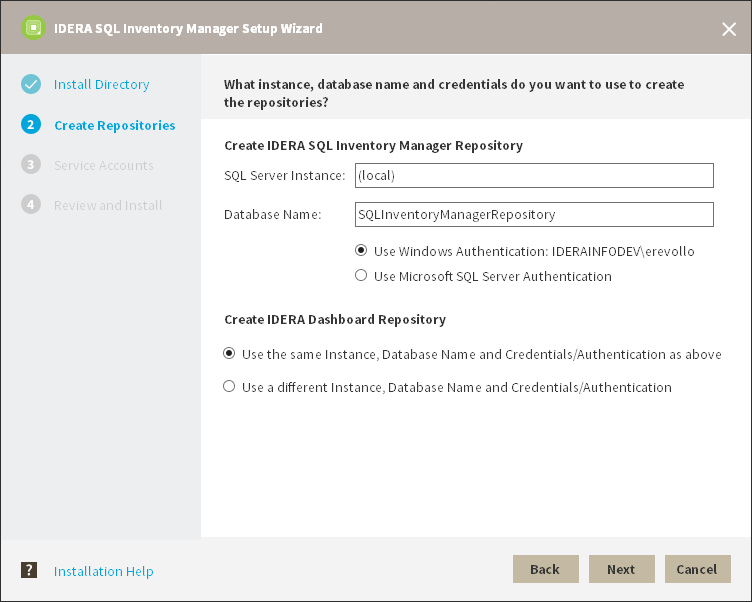
- Specify a SQL Server Instance host and database names for the creation of the SQL Inventory Manager Repository database and the IDERA Dashboard Repository database respectively Repository page, specify the host SQL Server instance where SQL Inventory Manager will create the Inventory Manager and Core databases and type their respective names. These databases store collected data, alert information, and alert configuration settings.
By default, the setup program uses your Windows logon account to create and access the Repository databases, but you can also choose . If you want to use Microsoft SQL Server connection credentials by checking the option , select Use Microsoft SQL Server Authentication. When you choose this option, a new window automatically opens, type the respective SQL Server login and password.
- The user that installs SQL Inventory Manager has access to the product. If you need other users to have access to SQL Inventory Manager, you can grant them access from inside the product after the installation is complete. Click Next.
- and enter your credentials on the Microsoft SQL Server credentials dialog.
- Specify a User Name and a Password for the Service Account for IDERA SQL Inventory Manager. Use the format
<Domain Name>\<User Name>. IDERA SQL Inventory Manager uses this account to connect, discover, and gather configuration information from SQL Servers. The installer grants the "Log on as a Service" right to the account that you specify. Click Next to continue.
If you want to use different credentials for the Service Account for IDERA Dashboard, choose Use different Credentials/Authentication, and type your credentials. IDERA Dashboard uses this account when accessing the IDERA Dashboard to share data.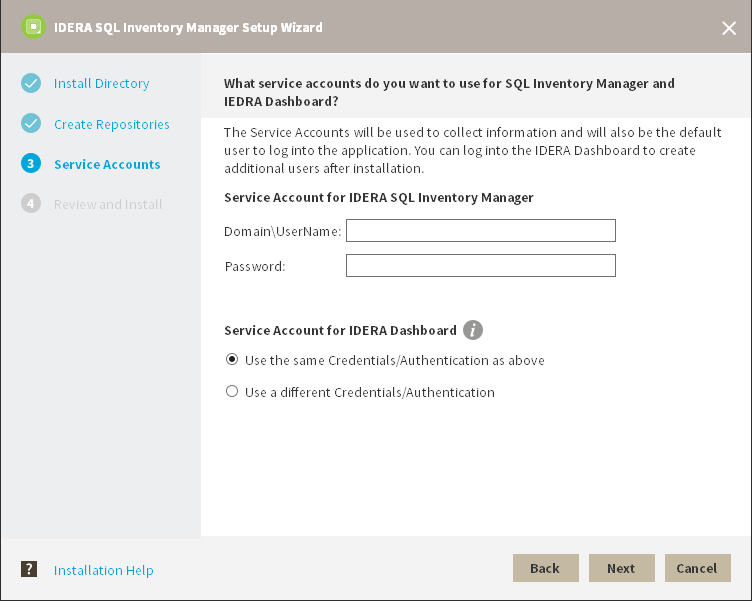
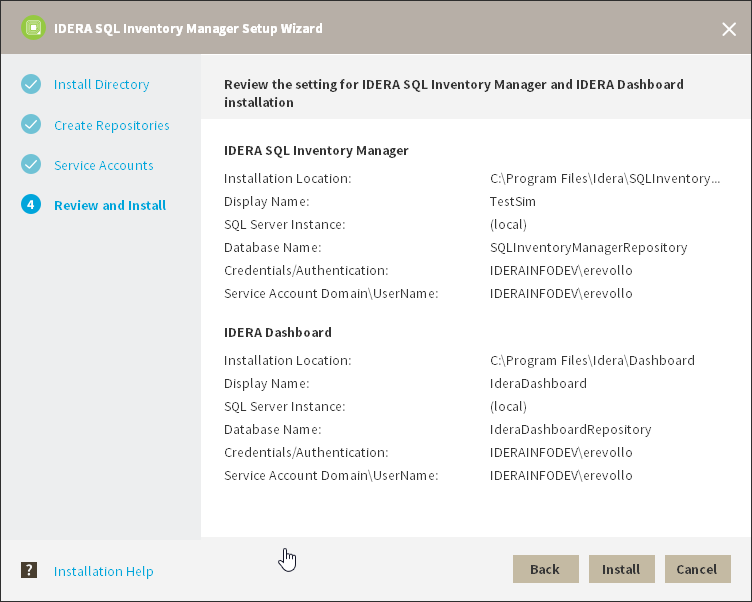
- Click Install if On the next section, click Install if you are ready to start the installation. If you want to review or change any of your installation settings, click Back.
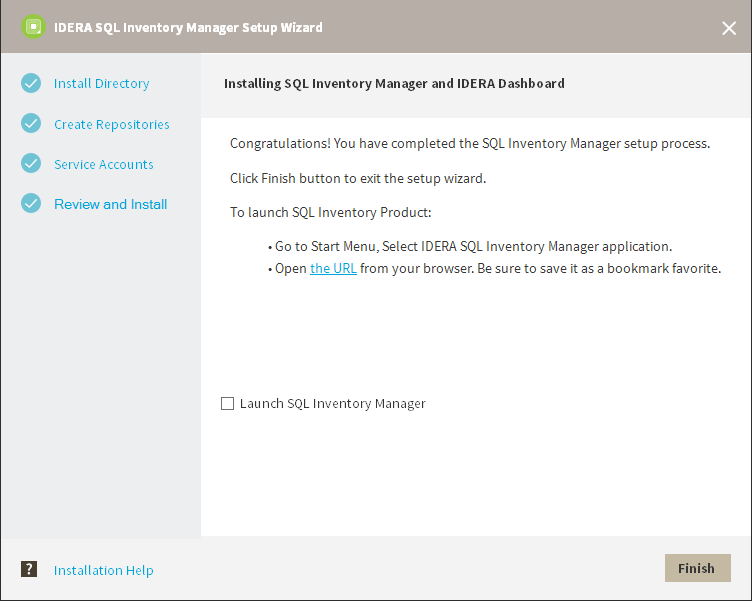
- After the installation is complete, click Finish. You can check the box for launching SQL Inventory Manager immediately after installationyou can select Launch IDERA SQL Inventory Manager to launch SQL Inventory Manager immediately after the installation window closes. Alternatively, you can access IDERA SQL Inventory Manager web application through the following link: http://<ServerName>:92769291 where ServerName is the name of the machine on which you installed the IDERA SQL Inventory Manager services.
...
When IDERA SQL Inventory Manager launches on your browser, you should use your Windows user account with your respective password to password to log in to the product. Please take into account that IDERA SQL Inventory Manager does not store passwords.
Need more help? Search the Idera Customer Support Portal.
...