Configuration comparison jobs compare the configuration settings between two registered data sources. They help you ensure consistency between the settings of two data sources in order to meet guidelines for data storage and retention.
Configuration comparison job results are presented as an overall “percentage matched” between two data sources. The results list individual configuration properties and details. The job shows:
- The total number of properties that match
- The total number of properties that do not match
- The properties available on only one data source
- The overall total number of properties compared in the job
You can create a configuration standard, which is a customized list of configuration parameters, values, and comparison operators, to compare against a data source. For more information, see Creating a standard for configuration settings.
You can also compare a data source or standard against an archive, which is a saved version of the configuration properties of a registered data source. For more information, see Creating a configuration archive.
The following tasks step you through creating and running a configuration comparison job:
All comparison jobs, archives, and standards provide version information with regards to each data source platform. For more information, see Version Information Reference.
Create or Open a Configuration Comparison Job
You create, modify, and run a configuration comparison job in the Configuration Comparison Job Editor.
To create a new configuration comparison job:
Select File > New > Configuration Comparison Job. The Configuration Comparison Job editor opens.
To open an existing configuration comparison job:
- Select File > Open Job.
- Select a configuration comparison job from the list.
- Click OK.
The Configuration Comparison Job editor opens.
Describe and Save the Job
The Job Name and Description pane contains more than just the Name field. It shows where the job is stored in Project Explorer. When you click the Details button, you can see the project’s file directory path.
If you want the job to monitor compliance against company standards or policies, you can add it to the Compliance Explorer list. This list lets you quickly see all the jobs that have recently passed or failed the compliance criteria you set.
To describe and save a job
- Type a new name for the job in the Name field. Enter a meaningful name that will quickly and uniquely identify the job in other views and dialogs.
- Add relevant information in the Notes field.
- Click Track Results in Compliance Explorer if you want the job to be listed in the Compliance Explorer.
- Click File > Save or File > Save All, or highlight the editor window, and then press Ctrl+S.
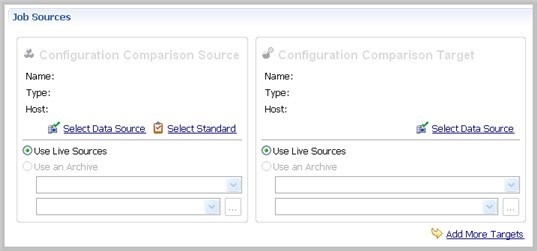
Specify Configuration Comparison Source and Targets
The Job Sources section of the Configuration Comparison Job editor specifies the data sources, archives, and standards to be compared. You can compare:
- Two data sources
- A data source against an archive
- A standard against a data source
- A standard against an archive
- An archive against a data source
- Two archives
You can also compare a single source against multiple targets.
To add a data source to a job
- Click and drag a data source from Data Source Explorer to the Comparison Source or Comparison Target box, or click Select Data Source in the appropriate box, and then choose a data source from the dialog.
Select Use Live Sources to compare the current properties of the data source when the job is executed.
You can change a data source selection by clicking Change Data Source from the appropriate box, or by dragging a different data source to the box from Data Source Explorer.
To add a configuration standard to the job
- If you have not already, create a configuration standard. For more information, see Creating a standard for configuration settings.
- Click and drag a standard from Data Source Explorer to the Comparison Source, or click Select Standard, and then choose a standard from the dialog.
To add a configuration archive to the job
- If you have not done so already, create a configuration archive. For more information, see Creating a configuration archive.
- Click and drag an archive from Data Source Explorer to the Comparison Source or Comparison Target box, or click Use an Archive, and then choose an archive from the dialog.
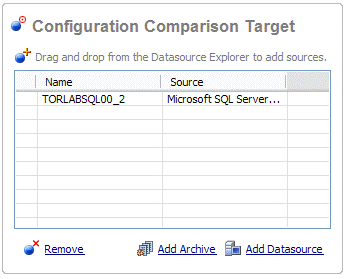
To add multiple targets to the comparison job
- At the bottom of the pane, click Add More Targets.
- Drag and drop additional data sources or archives from Data Source Explorer to the Configuration Comparison Target box, or click the Add Archive or Add Data Source commands below the table, and then select the appropriate target from the dialog.
When you are finished setting up the source and target or targets for the configuration comparison job, click Refinements to review the properties that are compared.
Refine property comparisons
After you specify a comparison job source and its target or targets, you can customize the comparison properties using the Refinements tab of the Configuration Comparison Job editor.
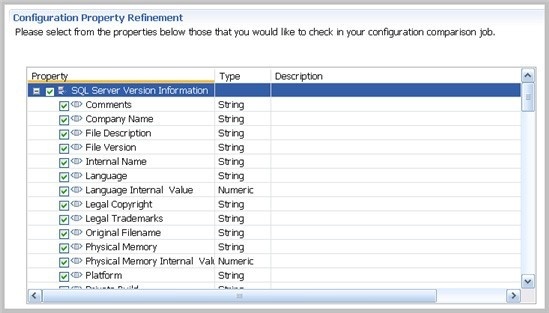
To specify the properties used in the comparison job
- In the Refinements tab, click the category to see all of its properties.
- Select the configuration properties you wish to compare, and then deselect the rest.
After you have set the comparison properties, you can set the job options that pertain to how the job is executed.
Specify Configuration Comparison Job Options
The Options tab in the Configuration Comparison Job editor contains the Extract DDL option. If you select it, the synchronization code produced by the job comparison appears in a separate editor window when the comparison is done.
Set Configuration Comparison Job Notifications
When a job completes, DB Change Manager provides various ways of notifying you. For more information, see Setting job notifications.
Run the Configuration Comparison Job
The configuration comparison job runs when you click the Run Job icon in the Configuration Comparison Job Editor.

While it runs, the Comparison Results tab appears and displays the progress of the job.
View the Results of the Configuration Comparison
When a job is complete, the Comparison Results tab displays the results.
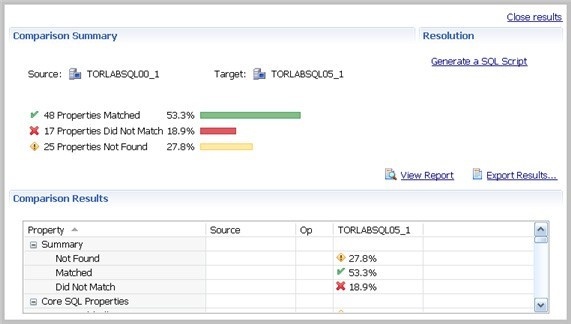
The Comparison Summary shows:
- The number of matching properties
- The number of mismatched properties
- The number of properties that are in the source but not in the target
The Comparison Results table lists the details further down in the window.
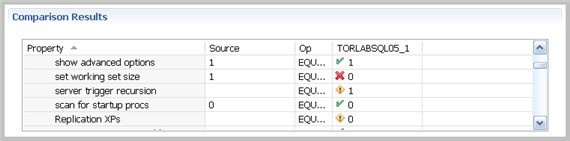
Comparison Results includes:
- The Property column lists settings found on the source.
- The Source column contains the value of the property on the source.
- The Op column provides the operator used in the job comparison that defines what constitutes a match. For most jobs, the operator is always EQUALS. For jobs that use a standard, it can be another operator.
- The last column, or columns if multiple targets were used, includes the target name and indicates the matches:
- A check mark icon, along with the value of the property, indicates a match.
- An X icon, along with the value of the property, indicates a mismatch.
- A warning icon, along with the value of the property, indicates a value in the target that was not set in the source.
Create a Job Report
After running a comparison job, you can create a job report using the View Report button on the Results tab. For more information, see Creating a job report.
Synchronize Configurations
If you want the configuration information to be the same between the source and target or targets, DB Change Manager can generate a script that will resolve the differences.
To create a SQL synchronization script
- In the Resolution pane of the Comparison Results tab, click Generate a SQL Script.
- In the SQL Editor, review the script, and then edit it is as needed.
Execute an SQL Synchronization Script
You can execute synchronization scripts in the SQL Editor. For more information, see SQL Editor.
To execute the SQL synchronization script
In the SQL Editor, click the Execute SQL icon. DB Change Manager executes the code on the target data source and displays the results.