Data masking is a way of securing sensitive data during the development or testing phases of a database development project. It is often performed as a security or compliance measure that protects important information. By masking valid production data, you can provide a copy of the data that is “scrambled” but still represents your production environment.
DB Change Manager lets you specify masking rules for moving data between a source and a target in a data comparison job. You can set rules for individual columns, tables, and entire databases. When you run a data comparison with the Automatically Synchronize option on, the data on the target is replaced with data from the source and any items configured with a masking rule will be masked. You can then use the masked data in your development and testing environments.
The following tasks describe how to create masked data:
Create a New Masking Job
Use the Data Comparison Job Editor to define a masking job.
To start creating a new Data Masking Job:
- Select File > New > Data Comparison Job.
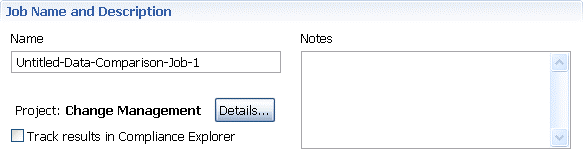
Specify a Masking Job Name
The name of the job distinguishes it between other jobs in the application environment.
To name a masked data job
- Type the name of the job in the Name field of the Data Masking Job Editor.
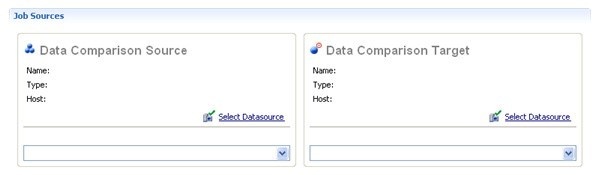
Specify Source and Target Data Sources
The Job Sources section of the Data Comparison Job Editor contains the Data Comparison Source box, which identifies the original data source, and Target Data Source box, which identifies the data source where the data is altered.
To specify source and target data sources
- Click and drag a data source to be masked from the Data Source Explorer to the Data Comparison Source box. Drag and drop a target data source, where the mask is applied, from the Data Source Explorer to the Data Comparison Target box.
- Use the drop-down Database menu to specify the database to be masked for the Data Comparison Source, and the database to which you want to apply masking definitions on the Data Comparison Target.
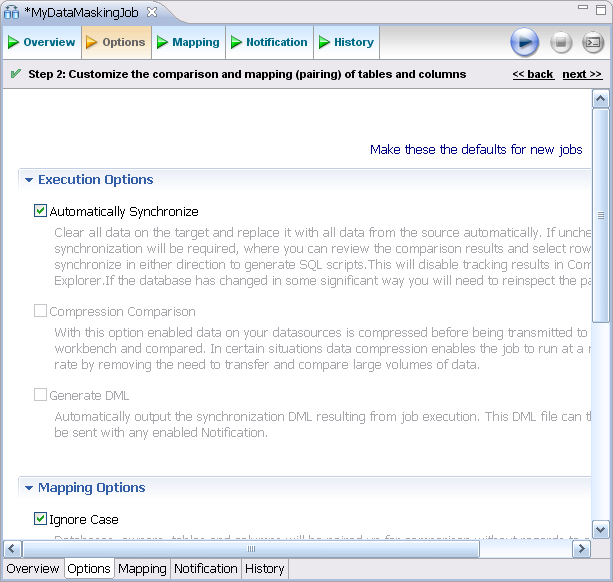
Set to Automatically Synchronize
Prior to running a masking job, set it to automatically clear all the data on the target and replace it with new, masked data.
To set synchronization
- Click on the Options tab.
- Select the Automatically Synchronize check box.
Specify Mapping Options
Use the Mappings tab to specify the tables to mask. You can apply a Default Masking Rule to selected columns using the pulldown menus.
The options are:
- Use Default. The default masking rule as set in the Database Mapping box.
- None. No masking is applied.
- Randomize. Replaces characters with random other characters.
- Shuffle. Reorders the values in different rows. For example, in a First Name column Bob, Ted, and Alice can change to Alice, Bob, and Ted.
Use the check boxes in the left-hand column to de-select any columns that you do not want to include in the data masking job process.
To specify mapping options
- Click on the Mappings tab.
- Select check box of the database you want to mask.
- Click on the Yes, retrieve the objects in the pair button to inspect the tables and columns.
The Table Mapping section opens. - Select a Default Masking Rule for the in the Database Mapping box.
- Select a Default Masking Rule in the Table Mapping box.
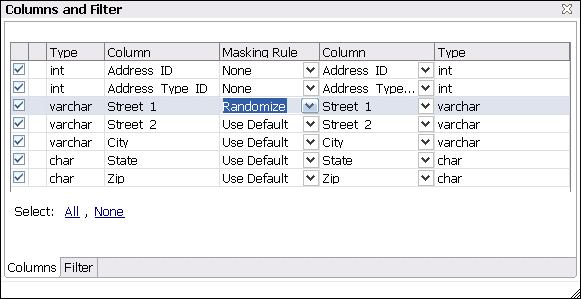
Specify Masking Rules for Individual Columns
You can specify different masking rules for different columns.
To specify a masking rule for a column
- In the Table Mapping box, click View Column Mapping.
- Click on the Data Masking Rule option for the column and select from the pulldown menu one of the following:
- Use Default. The default masking rule as set in the Database Mapping box.
- None. No masking is applied.
- Randomize. Replaces characters with random other characters.
- Shuffle. Reorders the values in different rows. For example, in a First Name column Bob, Ted, and Alice can change to Alice, Bob, and Ted.
- Close the window.
Run the Database Masking Job
To execute the data masking job
- Click File > Save to save the job.
- Click the Run Job icon in the upper right-hand corner of the screen.
- Click OK in the Confirmation dialog box to agree that you want to overwrite the target data.
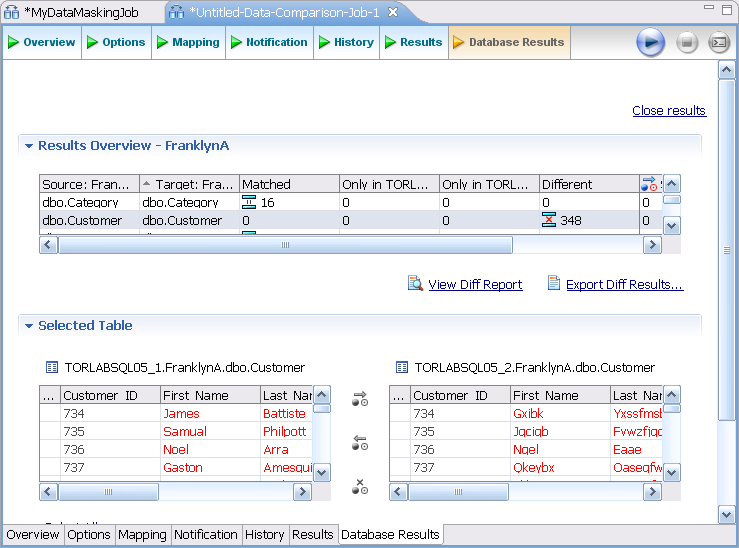
The Results tab displays the progression of the masking job as it executes, and the Rows Written column indicates how many rows of data have been masked by the job.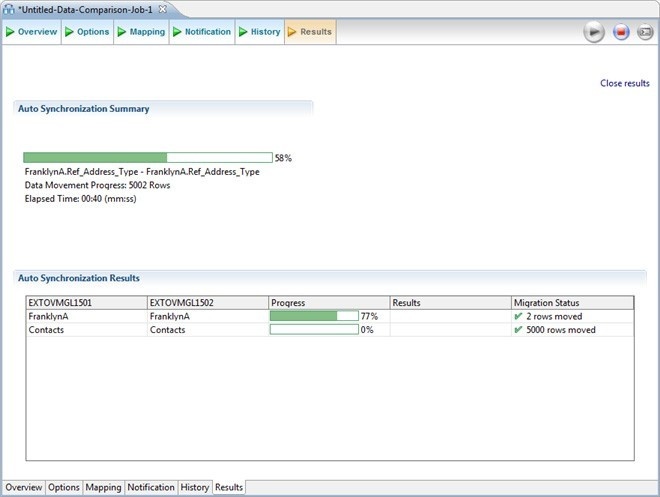
See the Masked Data
You can see the masked data by running a new Data Comparison job and looking at the changes. For more information, see Comparing data.
For rows that do not have masking applied, you should see “0” in the Different column of the Results Overview box. For rows that are masked, you should see the number of rows that changed.
In the Selected Table box, you can see the masked data in the target table. For example, the First and Last Name data shown below was masked using the Randomize setting.