When the user runs the WhereScape CICD Enablement Pack, this will start the process of connecting to GIT and building the WhereScape 3D and RED repositories.
This should be done at the following times:
- When connecting to a new GIT repository.
- When connecting to an existing GIT repository for the first time (on a Developer machine).
- When refreshing a Personal Access Token to an existing GIT repository.
- When rebuilding a corrupted Developer machine's GIT repository.
When the process is launched, it will prompt the user for the following information:
- Select the repository types: Select the product(s) you want to utilize from the check buttons, choosing RED, 3D or both.
- Environment Type: Developer Machine or Deployment Machine to be selected from the dropdown menu
- Environment Tag: One letter can be entered here to provide a description for what the environment is used for, For example ‘d’ for development, or ‘t’ for testing. This will be included in the Repository name.
- On Pull Action: Drop Schema or Drop Database to be selected from the dropdown menu.
- GIT URL
- GIT Organization: The organization name used within GIT.
- GIT Repository: The GIT Repository name to connect to.
- Username: The user's Username to be used on the build.
- Personal Access Token: The user's Personal Access Token.
- Local GIT Repository: The location of the GIT repository created locally on the machine/virtual machine will be displayed (read-only).
- Is this an initial Build? Select if this process starts an Initial Build.
- RED Repository Server and Port: Add the RED PostgreSQL Server and port.
- RED Repository Database Name: The repository database name will be calculated based on the information provided – this is read-only. This can have a max character length of 63 characters. If you would like to change the way this is configured, please consult section 'Changing the Repository Database Name'.
- RED Repository Username and Password: Add the RED Username and Password.
- RED Generate Files: Use the check buttons to select whether you would like to generate DDL, DML and/or JSON files.
- RED Repository Backup: If Initial Build is set to ‘Yes’ the user will have the opportunity to select a backup file to use as a copy for their repository.
Important
The backup files will need to be in SQL, BAK or a Repository files format.
These files must be created using pg_dump, and the PostgreSQL version used for the backup must match the version of the target repository. 3D Repository Server: Add the 3D PostgreSQL Server and port.
3D Repository Database Name: The repository database name will be calculated based on the information provided – this is read-only. This can have a max character length of 63 characters. If you would like to change the way this is configured, please consult section 'Changing the Repository Database Name'.
3D Repository Username and Password: Add the 3D Username and Password.
- If Initial Build is set to ‘Yes’ the user will have the opportunity to select a backup file to use as a copy for your repository.
Important
The backup files will need to be in SQL, BAK or a Repository files format.
These files must be created using pg_dump, and the PostgreSQL version used for the backup must match the version of the target repository.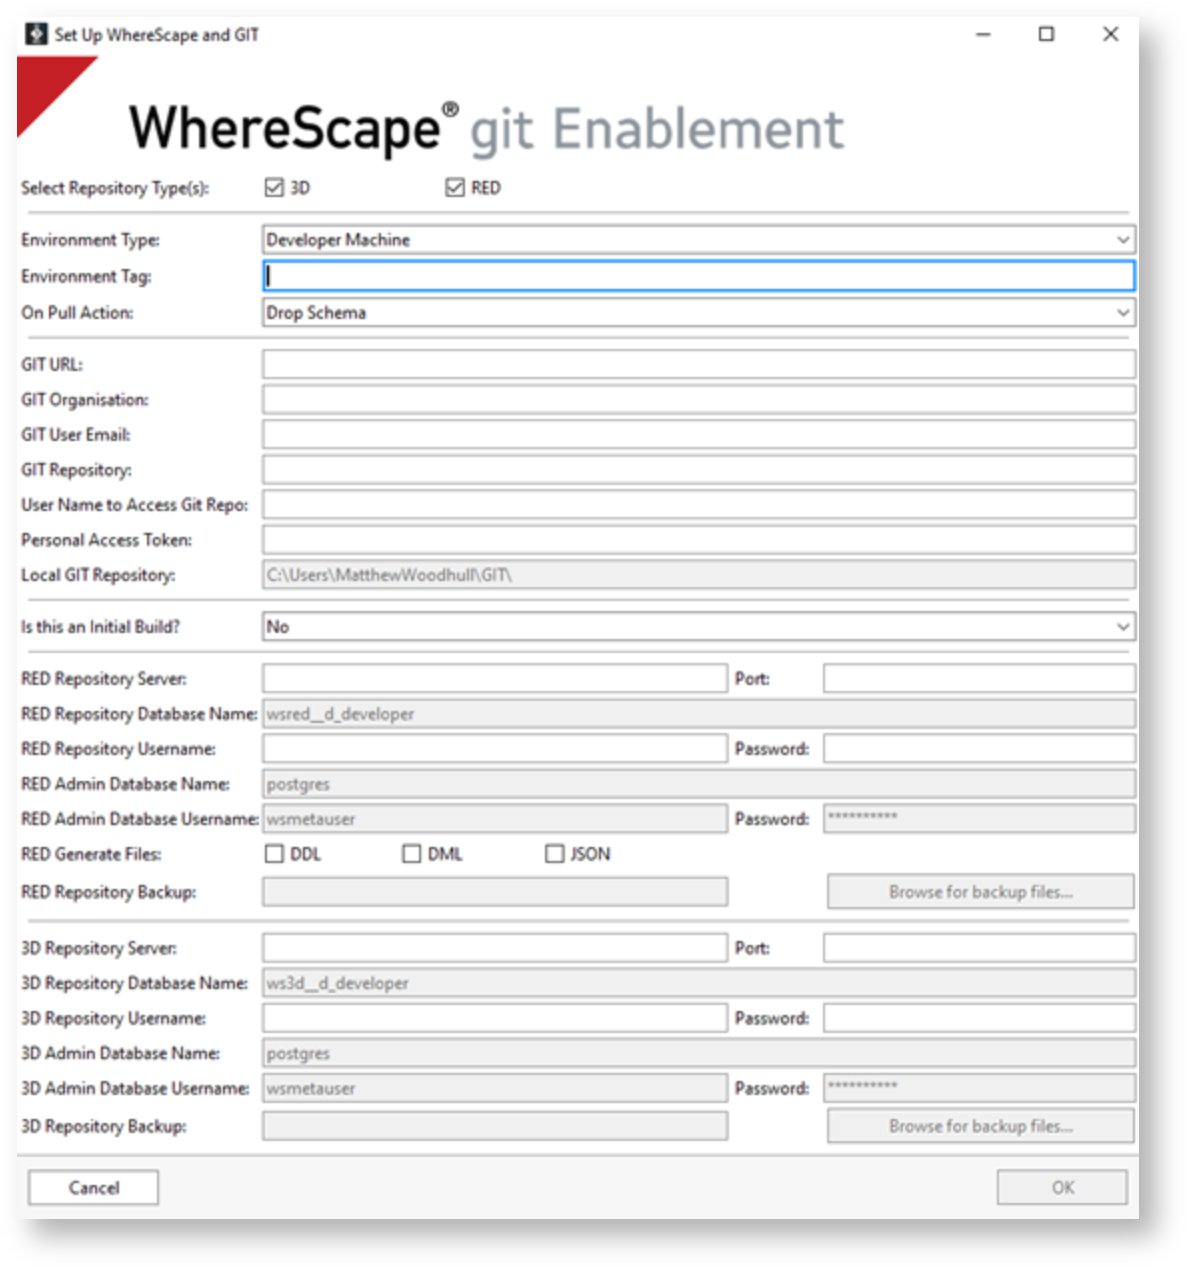
Once the form is created click on 'OK'. If there are any issues with connecting to the GIT repository, the user will receive an error message.
The local GIT directory will now be created.
- The user credentials for WhereScape RED and 3D repositories are created:
- These are stored locally at this location: `%USERPROFILE%\WhereScape\GIT`.
- This file stores the user's credentials and configuration details which are required for the workflows to run correctly.
Important
Each GIT Repository will have its own profile file. If it is deleted or modified incorrectly, the workflows will stop working.
The user will be prompted to select a branch from the remote GIT repository.

This action refreshes the local GIT repository with updates from the specified remote branch.
WhereScape 3D and/or RED is rebuilt using the files within the local GIT repository.
If the user requires to connect to a new or different GIT repository, these steps should be repeated using the new settings.
A GIT repository must exist before this process can start.
Important
A log file will be created and stored within the specified directory each time this process is executed. If there are any issues during this operation, the log file will be presented to the user for review. The log file can also be consulted to investigate steps taken as part of any interaction with the GIT Enablement Pack.
Warning
If this process is repeated for an existing GIT repository that has already been set up on the Developer machine, any changes not committed to GIT will be lost.
Changing the Repository Database Name
When completing the WhereScape CICD Enablement Pack form, the RED and 3D Repository Database names are read-only and are created based on the user information provided elsewhere on the form. However, this can be changed via the config file if required.
- The config is held in a JSON file named 'config.json' at the following location:
%USERPROFILE%\WhereScape\GIT - The repository database names are calculated within their resepective RED or 3D sections under the 'Repository Database name prefix and suffix' keys. These values can be amended to change the way that the repository database names are created when completing the WhereScape CICD Enablement Pack from.


WhereScape 3D
By default, WhereScape 3D and RED store their metadata in separate PostgreSQL databases. To make sure both applications stay in sync, GIT is used as the master source for all metadata.
When developers pull the latest metadata files from the remote GIT repository, their local WhereScape repositories are rebuilt using those files. This keeps everything aligned to the same version (called a commit ID) and ensures consistency across both tools.
This process has been designed to ensure that both WhereScape repositories are always aligned.
Using WhereScape 3D Workflows
The below lists all available Workflow processes in the WhereScape CICD Enablement Pack. All existing WhereScape 3D workflow processes remain available.
To configure your workflows, please consult section ‘Configuring Workflows’.
Committing to GIT
To commit a new model or changes to an existing model to GIT, users click the workflow button, which executes the ed3d_commit_to_git template.
This workflow is used for the following reasons:
- After making a change to a new data model.
- After making a change to an existing data model.
This workflow will perform the following tasks:
- Verifies connection to GIT Repository.
- Brings in the latest changes from the remote repository so your local setup is up to date.
- Saves the current version of your local repository.
- The user will be prompted to add their own commit message:

- If the user would like to link their commit to a backlog item or bug in GIT, they can use development tags in their commit message. Simply add a '#' followed by the backlog item ID. For example: '#123', will automatically associate the commit with the corresponding work item in your backlog.
- Commits your changes to the remote GIT repository with your message.
Important
A log file will be created and stored within the specified directory each time this workflow is executed. If there are any issues during this operation, the log file will be presented to the user for review.
Users can create/change the workflow configuration for any category, model, or model version; however, this function requires the user to select the model version to operate correctly.
Important
Only create a “Commit to GIT” button within a workflow for use at the Model Version level.
Any changes to workflows or categories will require a separate commit action; see committing configuration changes to GIT.
Committing ALL Objects to GIT
To commit all changes made to a WhereScape 3D Repository, users click the workflow button, which executes the ed3d_commit_all_objects_to_git template.
This workflow is used for the following reasons:
- After making changes to multiple new and/or existing data models.
- After making changes to data models and configuration.
This workflow will perform the following tasks:
- Verifies connection to GIT Repository.
- Brings in the latest changes from the remote repository so your local setup is up to date.
- Saves the current version of your local repository.
- The user will be prompted to add their own commit message:

- If the user would like to link their commit to a backlog item or bug in GIT, they can use development tags in their commit message. Simply add a '#' followed by the backlog item ID. For example: '#123', will automatically associate the commit with the corresponding work item in your backlog.
- If the user would like to link their commit to a backlog item or bug in GIT, they can use development tags in their commit message. Simply add a '#' followed by the backlog item ID. For example: '#123', will automatically associate the commit with the corresponding work item in your backlog.
- Commits all your changes to the remote GIT repository with your message.
Importnat
A log file will be created and stored within the specified directory each time workflow is executed. If there are any issues during this operation, the log file will be presented to the user for review.
Committing configuration changes to GIT
To commit any configuration changes to GIT, users will click the workflow button, which executes the ed3d_commit_config_to_git template.
This workflow is used for the following reasons:
- After creating a new configuration setting.
- After deleting an existing configuration setting.
- After changing an existing configuration setting.
This workflow will perform the following tasks:
- Verifies connection to GIT Repository.
- Brings in the latest config changes from the remote repository so your local setup is up to date.
- Refers to the GIT Audit Change log within the WhereScape 3D repository.
- Extracts the configuration files & stores them within the local GIT repository folder.
- The user will be prompted to add their own commit message:

- If the user would like to link their commit to a backlog item or bug in GIT, they can use development tags in their commit message. Simply add a '#' followed by the backlog item ID. For example: '#123', will automatically associate the commit with the corresponding work item in your backlog.
- Commits the config change to the remote GIT repository with your message.
Important
A log file will be created and stored within the specified directory each time this workflow is executed. If there are any issues during this operation, the log file will be presented to the user for review.
It is recommended that a “Commit Config to GIT” button be created within a workflow for use at the Category level.
Delete Model and Commit Changes
To delete a model from your repository and commit the changes, users will click the workflow button 'Delete Model and Commit', which executes the ed3d_delete_model_commit_to_git template.
This workflow is used for the following reasons:
- When a model is no longer required and needs to be removed.
This workflow will perform the following tasks:
- Deletes the currently selected model.
- Verifies connection to GIT Repository.
- Brings in the latest changes from the remote repository so your local setup is up to date.
- Saves the current version of your local repository.
- Commits the change to the remote GIT repository.
Important
A log file will be created and stored within the specified directory each time this workflow is executed. If there are any issues during this operation, the log file will be presented to the user for review.
Only create a “Delete Model and Commit” button within a workflow for use at the Model Version level.
Create Branch
Users will click the workflow button to create a new branch, which executes the ed3d_create_feature_branch template.
This workflow is used for the following reasons:
- Preparing a copy of an existing branch for a new purpose/development task/developer.
This workflow will perform the following tasks:
- Verifies connection to GIT Repository.
- Brings in the latest changes from the remote repository so your local setup is up to date.
- The user will be prompted with a window and asked to provide the following information:
- The branch they wish to clone.
- The name the new branch.
- Click 'Create'

- WhereScape 3D is closed.
- The selected branch will be cloned on the remote GIT repository.
- The new branch will be pulled onto the local\virtual machine.
- WhereScape 3D is rebuilt using the files within the local GIT repository.
- WhereScape RED (if using) is rebuilt using the files within the local GIT repository.
- WhereScape 3D is reopened.
Important
A log file will be created and stored within the specified directory each time this workflow is executed. If there are any issues during this operation, the log file will be presented to the user for review.
It is recommended that a “Create Feature Branch” button be created within a workflow for use at the Category level.
Close Branch
Users will click the workflow button to close a branch, which executes the ed3d_close_branch template.
This workflow is used for the following reasons:
- Close and discard the branch without merging changes into another branch.
- Merge the current branch into another branch (e.g. feature branch to be merged into development).
This workflow will perform the following tasks:
- Verifies connection to GIT Repository.
- The user is prompted to select the branch to close. The user can close a branch and discard all changes or close and merge the branch into another branch. The user will choose a branch to switch or merge to.

- If the user selects to close and merge, then a GIT merge action will take place between the selected branches. If there are any issues with this merge, the user will be prompted with the files creating issues.
- The local GIT repository is refreshed from the selected branch on the remote GIT repository.
- WhereScape 3D is rebuilt using the files within the local GIT repository.
- WhereScape RED (if using) is rebuilt using the files within the local GIT repository.
- WhereScape 3D is reopened.
Important
A log file will be created and stored within the specified directory each time this workflow is executed. If there are any issues during this operation, the log file will be presented to the user for review.
It is recommended that a “Close Branch” button be created within a workflow for use at the Category level.
Switch Branch
Users will click the workflow button to switch branch, which executes the ed3d_switch_branch template.
Warning
Ensure that all changes are committed before switching branches, as all uncommitted changes will be discarded as part of this workflow.
This workflow is used for the following reasons:
- To review the code/data model of the alternative branch.
- Start development on a different branch.
This workflow will perform the following tasks:
- Verifies connection to GIT Repository.
- The user is prompted to select the branch to switch to.

- Refreshes the local GIT repository from the remote GIT repository of the selected branch.
- WhereScape 3D is rebuilt using the files within the local GIT repository.
- WhereScape RED is rebuilt using the files within the local GIT repository.
- WhereScape 3D is reopened.
Pull from GIT
Users will click the workflow button to fetch changes from the remote GIT repository to their current local branch, which executes the ed3d_pull template.
Warning
Ensure that all changes are committed before making a pull request, as all uncommitted changes will be discarded as part of this workflow.
This workflow is used for the following reasons:
- Refresh the Developer machines WhereScape repositories with the current (commit) metadata on the remote GIT repository.
- Refresh and rebase the Developer machines WhereScape repositories, discarding any uncommitted changes.
This workflow will perform the following tasks:
- Verifies connection to GIT Repository.
- The “Branch” stored within the WhereScape Repository is the selected branch from which to pull.
- Refresh the local GIT repository with updates from the corresponding remote GIT repository.
- WhereScape 3D is rebuilt using the files within the local GIT repository.
- WhereScape RED is rebuilt using the files within the local GIT repository.
- WhereScape 3D is reopened.
Important
A log file will be created and stored within the specified directory each time this workflow is executed. If there are any issues during this operation, the log file will be presented to the user for review.
It is recommended that a “Pull from GIT” button be created within a workflow for use at the Category level.
Warning
If WhereScape RED is open while the Pull action is in progress, the RED application may lose connection to the PostgreSQL Database Repository or may become out of sync with the metadata. You may need to refresh the Repository window within RED, to synchronize the application with the metadata.
Export to RED
To export a RED export model WhereScape RED, users will click the workflow button, which executes the ed3d_git_to_red templates.
This workflow is used for the following reasons:
- Deploy a new Data Model into the WhereScape RED repository.
- Deploy changes to an existing Data Model into the WhereScape RED repository.
This workflow will perform the following tasks:
- Verifies connection to GIT Repository.
- Brings in the latest changes from the remote repository so your local setup is up to date.
- Saves the current version of your local repository.
- Commits the change to the remote GIT repository.
- You will be prompted to add a commit message:
- You will be prompted to update connections:
- You are able to select the connection and then input the username and password. When you click on apply, the command line will write the credentials to the RED metadata repository.
- This step will only update the credentials within the RED metadata repository. Any credentials within the RED profile file, will override the credentials in the metadata repository.

- Once you have updated the connections, click Next to continue the deployment.
- Deployment of the model to RED completes.
Important
A log file will be created and stored within the specified directory each time this workflow is executed. If there are any issues during this operation, the log file will be presented to the user for review.
Important
Users can create/change the workflow configuration for any category, model, or model version; however, this function requires the user to select the model version, specifically within the RED export category, to operate correctly.
Only create a “RED export” button within a workflow for use at the Model Version level.
Import Model
Users will click the workflow button to import a Data Model from a selected commit ID from a branch. This workflow button executes the ed3d_import_model_from_git template.
This workflow is used for the following reasons:
- Import merge conflicts from a different branch.
- Import a historical version of a data model into the existing branch.
This workflow will perform the following tasks:
- Verifies connection to GIT Repository.
- A window opens prompting the user for the following information:
- Select a branch
- Select a commit reference you wish to import from.
Please note: These commits are filtered only to show commits that include the selected data model version. - The user can review the commit changes they have selected in the text box.
- The user can overwrite the selected model version OR create a new version, using the commit ID as a prefix to the current model version name.
- Select 'OK'

The local GIT repository is synchronized to the selected commit.
A new model version is created, and the model is imported to your local repository.
The user must refresh the Repository Browser to see the imported data model.
Important
A log file will be created and stored within the specified directory each time this workflow is executed. If there are any issues during this operation, the log file will be presented to the user for review.
It is recommended that an “Import Model Version” button be created within a workflow for use at the model version level.
Configuring Workflows
Users will find the GIT integration tools within the Workflow pane. Depending on the type of model you are currently viewing, there may be different buttons available by default.
All existing WhereScape 3D workflow functions remain available. However, a maximum of 12 functions can be visible at a time, so users with pre-existing Workflow set-ups may need to manually reconfigure the Workflow to pick and choose which functionality they want to keep or replace.
Users can update their Workflow sets by doing the following:
- Click on Tools > Manage Workflows.

- The user will be presented with a list of customer model versions. Click on a version to view the Workflow configuration in the panel to the right.

- The user can either create a new Workflow set from scratch or edit an existing Workflow set.
- To create a new Workflow set the user can click on the 'Add Workflow Set' icon. Give the workflow set a name, select the Type from the dropdown and select 'OK'.


- To edit an existing Workflow set, the user can highlight the set they would like to edit by clicking on it, to bring up the Workflow configuration panel.
- To create a new Workflow set the user can click on the 'Add Workflow Set' icon. Give the workflow set a name, select the Type from the dropdown and select 'OK'.
- Users can add new buttons by clicking on the 'Add Button' icon positioned above the Workflow configuration panel.

- The user can then provide the details of their Workflow:
- Provide the name for the workflow button you are adding.
- Provide a description for the workflow button (optional)
- Select an Icon to represent your workflow button.
- Select the Type of workflow item you want to add. All GIT integration Workflows are kept as type 'Script'.
- Select the script from the dropdown which represents your required Workflow.
- Once you are happy with your Workflow button, click 'Apply'.

- The user will see their new Workflow button in the Workflow configuration panel.

- Users can reposition or delete any workflow buttons by right-clicking on a button and choosing the required action.

- Once the user is happy with their configuration, they can click 'OK'.
3D FAQS
Conflicts when merging branches
The Development Lead creates two feature branches, one for Developer A and one for Developer B.
Monday: Developer A completes their development within their feature branches, then merges the feature branch into Development.
Tuesday: Developer B completes development within their feature branches and then merges the feature branch into Development. This merge fails because both developers have made changes to the same model, resulting in a complex change that can not be automatically merged. In other words, there is a lack of understanding about which changes should be kept and which should be overwritten.
Therefore, the “close and merge” function will produce an error with a list of failed objects (within WhereScape 3d).
The “Import Model” function within 3D enables the developers to handle this situation.
The Development Lead starts by connecting to or switching to the Development branch.
Then, using the list of objects and the “Import Model” workflow, the Development Lead starts to import each model version from the feature branch into the current repository.
The developer will use 3D’s existing merge model function to ensure the right changes are kept and discarded. Once the issues have been resolved, they are committed to the Development branch.
Finally, the feature branch is closed.
WhereScape RED
By default, WhereScape RED’s metadata is held in a separate PostgreSQL database from WhereScape 3D.
GIT holds the master version of the WhereScape metadata. Therefore, to keep the Developer machine WhereScape repositories aligned, they are rebuilt from GIT after the metadata files are pulled directly from the remote GIT repository.
This ensures that both WhereScape applications are built to the same commit ID, ensuring the integrity of the data models & WhereScape application configuration across both applications.
Reminder
The RED Profile is created when the repository is first set up. This is created to ensure that the workflows run correctly. It can be found at the following location:
%USERPROFILE%\WhereScape\GIT
Using WhereScape RED Workflows
Committing ALL to GIT
Currently users are only able to Commit *all* changes to GIT in WhereScape RED. This workflow will look at all objects and settings within WhereScape RED, and extract them from the command line before pushing them to GIT.
To do this the user can right-click the 'All Objects' folder, and selecting 'Commit_All_to_GIT' from the workflows.

This workflow is used for the following reasons:
- After making any changes to objects or settings within RED which need to be saved to the remote repository.
This workflow will perform the following tasks:
- Verifies connection to GIT Repository.
- Brings in the latest changes from the remote repository so your local setup is up to date.
- Reviews recent changes made within the WhereScape RED repository.
- Extracts the current configuration & stores them within the local GIT repository folder.
- Adjusts files to make them reusable for different developers.
- Creates a full backup of the repository (excluding the connection details).
- Necessary files are zipped whilst temporary files are removed.
- The user will be prompted to add their own commit message:

- If the user would like to link their commit to a backlog item or bug in GIT, they can use development tags in their commit message. Simply add a '#' followed by the backlog item ID. For example: '#123', will automatically associate the commit with the corresponding work item in your backlog.
- Commits the changes to the remote GIT repository.
Important
A log file will be created and stored within the specified directory each time this workflow is executed. If there are any issues during this operation, the log file will be presented to the user for review.
Committing to GIT
Currently users can only Commit *all* changes to GIT.
Committing Configuration Changes to GIT
Currently users can only Commit *all* changes to GIT.
Create Branch
This function is currently available within WhereScape 3D. See WhereScape 3D Create Branch.
Close Branch
This function is currently available within WhereScape 3D. See WhereScape 3D Close Branch.
Switch Branch
This function is currently available within WhereScape 3D. See WhereScape 3D Switch Branch.
Pull from GIT
This function is currently available within WhereScape 3D. See WhereScape 3D Pull from GIT.
Upgrades
When the MSI is required to be updated, two options can be considered:
Option 1
Use this for partially complete development activities or code not ready to merge to the parent branch.
- Developer A is connected to a feature branch. Developer B is connected to the development branch.
- Both developers should commit our changes back to the branch they are connected to, ensuring their changes are within the GIT repository.
- The MSI is updated on all developer machines.
- Each developer would either:
- Use the desktop shortcut to reconnect to the GIT repository and their branch, or
- Open WhereScape 3D and click the "Pull" workflow button.
Option 2
This option can be used if all development activities are complete. It is not recommended for partially completed development activities.
- Developer A creates a feature branch for Developer B.
- Developer B is connected to a feature branch.
- Developer B completes development activities.
- Developer A merges the feature branch into the development branch.
- The MSI is updated on all developer machines.
- Developer A would either:
- Use the desktop shortcut to reconnect to the GIT repository and development branch, or
- Open up WhereScape 3D and click on the "Pull" workflow button.
- Developer A creates a feature branch for Developer B.
- Development activities continue.
In either option, the files from the remote GIT repository are pulled to the local machine, which is then used to reconfigure the local environment and the PostgreSQL repository used by WhereScape RED and 3D.
Other Considerations
The following list are known issues:
WhereScape 3D
- Importing XML Model Version files that contain custom UI source connections. This results in
- Command line performance issues – memory leakage when running parallel tasks.
- RED Discovery & profiling connection is not compatible with the CICD/GIT functions at present. Users can create this separately, but it must be manually refreshed.
- Target Storage Locations are added to WhereScape RED via the Python Scripts, not the WhereScape command line.
- It is possible to create duplicate Data Type names. However, this will produce an error when the command line interacts with the Data Types (duplicated name).
- Templates: Templates with XML contents can result in an error when imported/exported using the command line.
WhereScape RED
- It is not possible to change the Script Launcher options and commit them to GIT. This is only possible as a change request as it is possible within the Python Scripts.
- Passwords can be stored within WST. It is recommended that any new repositories are set NOT to store passwords within WST. Within WhereScape RED, go to the Options to make these changes.
- WST File – If a table or view object contains a duplicate column name, it is possible to commit these changes to GIT; however, it will produce an error when deploying the WST file.
- If the initial build fails and the log file returns an error relating to the License Agreement, open WhereScape RED and agree to the license agreement when prompted.
- PostgreSQL command line
- Ensure that the command line applications, found in `C:\Program Files\WhereScape\RED\Tools` are kept in line with the version of the PostgreSQL database being used to host the WhereScape RED & 3D applications.
- It is not recommended to mix versions of PostgreSQL across WhereScape applications.
Python
- Changes to the Python version may change how the script operates.
- Python will execute PowerShell script to create/remove ODBC (DSN) for the WhereScape RED repository. This may require the user/Developer machine to grant permissions for unsigned PowerShell script to be executed.
GIT
- File size is limited to 50 MB. AS WST files can exceed this limit, the Python script compresses the WST files into a ZIP file (binary) before committing to GIT. Other files may exceed this limit in the future.
- Ensure that the GIT runner folder allows the account executiong the Python scripts with Full Control permissions. Failure to do this, may result in the WST deployment script from working correctly.
- Ensure that the default branch within the global gitconfig file (`C:\Program Files\Git\etc\gitconfig`) is set to the default branch within the Python config settings. This will avoid issues when cloning the remote GIT repository to the Developer machine. This must be completed with administration privileges.
- For example:
[init]defaultBranch = main[safe]directory = *
- For example: