
This section provides information on how to configure the WhereScape CICD Enablement Pack on both Developer and Deployment Machines.
Prerequisites
The following technologies should be in place before following the configuration setup for all Development and Deployment machines:
Software
- WhereScape 3D, 9.0.6.0+
- Instructions on installation can be found at the following link: WhereScape 3D Installation Instructions.
- Includes the WhereScape MetaServer (wsmetaserver) which installs a local PostgreSQL database server used to store metadata.
- This PostgreSQL server is typically installed automatically during the WhereScape 3D setup process.
- Alternatively, users can connect to an existing PostgreSQL server if preferred.
WhereScape 3D must be on the default install location
- WhereScape RED, 10.5.0.2+
- Requires a PostgreSQL database to store metadata.
- This can be hosted on the same MetaServer (wsmetaserver) installed with WhereScape 3D or on a separate PostgreSQL server, depending on your environment setup
WhereScape RED must be on the default install location
- GIT
- Repository – this must be created separately. Instructions to do this can be found in the GitHub Documentation here: Creating a GitHub Repository.
- Supported GIT Platforms:
- GitHub
- GitHub Enterprise
- Azure DevOps
- GIT Tools
- GIT CMD: can be installed here: GIT CMD Install
Environment Configuration
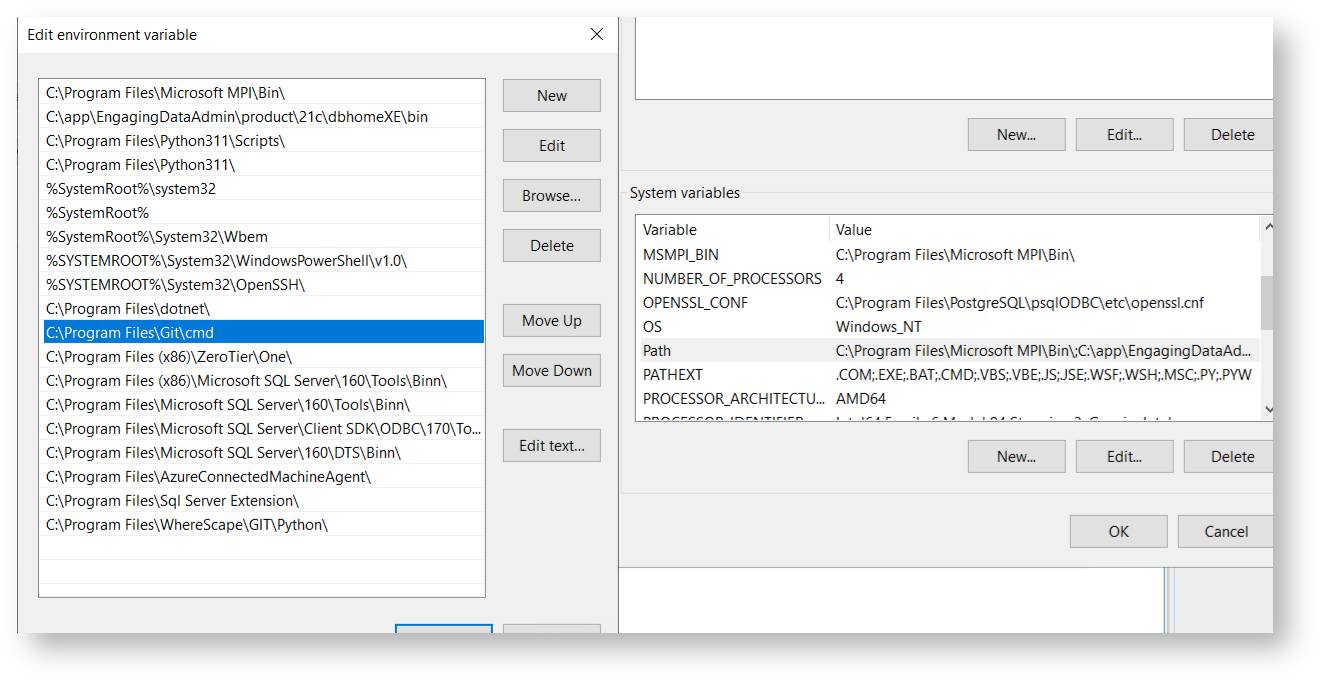
Ensure that the system-wide PATH environment variable includes the path to the GIT CMD executable (e.g. "C:\Program Files\Git\cmd"):
You may need to add Proxy authentication, to enable access to the API for Personal Access token authentication:
- Add http_proxy: http://[ProxyAddress]:[Proxy Port]
- Add https_proxy: https://[ProxyAddress]:[Proxy Port]
Installing the WhereScape CICD Enablement Pack
- Locate the WhereScape CICD Enablement Pack MSI file.
- Double-click the .msi file to launch the installer.
- Follow the on-screen instructions to complete the installation.
- Once installed, a shortcut to the Enablement Pack should appear on your desktop:
- Shortcut name: WhereScape CICD Enablement Pack
- Location: %ProgramFiles%\WhereScape\GIT
![]()
Note
If the shortcut is not created automatically, you can manually create one by navigating to the installation directory and right-clicking the executable.
Permisisons Note
You may need administrator rights to complete the installation.
Developer Machine Configuration
This section describes how the workflow should be configured on the Development machine.
Machine Configuration
All developer machines must have the same configuration and installation steps in the Prerequisite section. These processes have been deployed and tested on the following Development machine types:
- Microsoft Virtual Machines
- Citrix Machines
- Desktop machines
WhereScape 3D and RED - Additional Installation Steps
Downloads for the latest versions of WhereScape 3D & RED, along with installation guides, can be found here: https://www1.wherescape.com/support/software-downloads-documentation/
WhereScape 3D and RED Repository (PostgresSQL)
With WhereScape 3D and RED, the metadata is stored in a repository within a PostgreSQL database. The installation process will check and update the PostgreSQL database structure, ensuring that the structure matches the software update requirements.
Note
If there are any updates to WhereScape 3D or RED in the future, please follow the installation instructions. Update the software to ALL Developer Machines and the shared repository outside of business hours to remove the risk of corrupting the repository. Always back up the repository before you start the software update.
WhereScape RED Only
Ensure that the Azkaban service has been installed and started. This can be found in the services of the Virtual Machine.
WhereScape RED Repository Connection Details
Server: User-specified
Port: User-specified
Database: A database must already exist and be named like wsred_[Name of GIT repository][_$ENVIRONMENT$]_$DEVELOPER$, for example: wsred_cicdrepo_d_username
Username: User-specified
Password: User-specified
Note
It is a prerequisite of the CICD Enablement Pack that the user has already set up an ODBC connection for both source and target databases. The naming conventions for the ODBCs need to be consistent across all users.
Please note, if the user would like to explore the local PostgreSQL server, they will need to connect pgAdmin UI to the local wsMetaServer (WhereScape’s PostgreSQL server installed as part of WhereScape 3d). Use the Server details above to achieve this.
GIT Repository Settings
Each end user will require access to the shared GIT repository. The end user’s credentials are used when pushing commits (during the WhereScape 3D & RED workflows).
Repository Name: User-supplied
Repository local path: %USERPROFILE%\Git\[Name of Repo]
Note
The location of the local GIT repository can be changed within the User Config file.
The workflow is designed to push individual files to the repository. However, if there are any errors when pushing to Git, please use a GIT GUI to manage conflicts.
Deployment Machine Configuration
This section describes how to setup a deployment machine that can be used to create a CICD workflow to publish changes into a selected target database.
This enablement pack will trigger the WST deployment process via the command line. For further information on this, please refer to the WhereScape RED help guide.
Machine Configuration
All deployment machines must have the same configuration and installation steps in the prerequisites section.
Configure Target Environment Runners
To deploy the application to target environments, the below link provides instructions to configure a self-hosted runner as a service.
For more information consult the documentation here: GitHub - Hosting your Own Runners
Consideration when Setting up Agents/Runners
It is recommended that you consider this before continuing or selecting the option.
Option1: Create a runner per deployment machine
This will enable the machine to be configured specifically for that runner and the required deployment tasks. For example, you may require specific software for that runner.
However, this will create a more complex environment to support and may also be more cost-inefficient.
Option 2: You can create many runners within one deployment machine
This will enable the runners to utilize the setup of the deployment machine environment configuration for many runners.
When creating the agents or runners, include the solution name within the name of the runner, for example: [Machine Name]_[Project]_[Environment]
Your selected option depends on how complex you wish to make the environment. Having one deployment machine with many runners may be simpler to support and more cost-effective in the long run. However, this may create an environmental configuration restriction that may prevent you from scaling the solution in the future.
Also, you should understand the CPU requirements for deployment, as the deployment machine will use the CPU while executing the deployment to the target platform. This is only a consideration if you have many runners on a single deployment machine and, therefore, parallel tasks taking place that are trying to consume the CPU from that deployment machine.
Workflow Logs
When you run the WhereScape CICD Enablement Pack all workflow logs will automatically be created within the following folder:
%USERPROFILE%\WhereScape\GIT\Logs
Whenever you run a workflow task, the user can access these logs to see information relating to them.
Note
If this folder is used, please ensure that the user profiles have read/write permissions. Failure to do this will prevent the workflow tasks from working correctly.
WhereScape 3D, RED & GIT Naming Convention
When you create a repository in WhereScape 3D or RED, its name is automatically linked to the name of your GIT repository.
Important
If you rename your WhereScape 3D or RED repository later, it will break the connection to your GIT repository and the CI/CD configuration files. This can cause issues with version control and automated deployments.
Don’t create new repositories in WhereScape 3D that point to existing ones already set up for CI/CD.
Firewall Rules and Proxy Configuration
- Your Git Repository. This can include dev.azure.com, github.com
- GitHub API: api.github.com
- For Git Enterprise users: https://[url]/api/v3/user/repos
Note
Please note, that some organisations using proxy servers, may need to run the following git command:
git config --global http.proxy http://[NTUserName]:[NTPassword]@[Proxy Server Address]:[Port]
WhereScape 3D and RED Backup Files
When using the WhereScape GIT Enablement Pack, users can use a backup on the initial build of their WhereScape GIT repository. For WhereScape RED, this is mandatory.
These backup files must be in either SQL or BAK file format, and the PostgreSQL version used for the backup must match the version of the target repository.
Backups generated in WhereScape 3D or WhereScape RED are not supported by the WhereScape GIT Enablement Pack. Instead, backups must be created using PostgreSQL.
Important
An example of setting up the backup using PostgreSQL 16 in pgAdmin can be found below:
As a prerequisite for creating a backup in pgAdmin using PostgreSQL 16, users must update their PostgreSQL Binary Path Preferences on their selected PosgreSQL version to the following: C:\Program Files\PostgreSQL\<PostgreSQL version number>\bin. This can be done using pgadmin as follows: 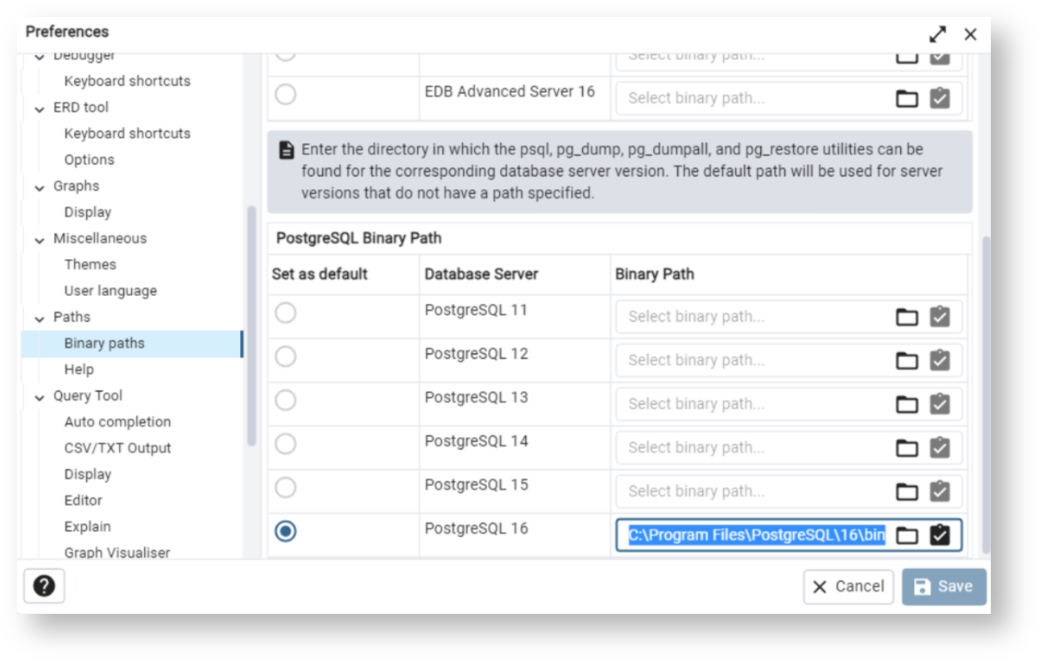
To use your backup file, all files held in C:\Program Files\PostgreSQL\16\bin must be copied into the relevant WhereScape folder: Program Files\WhereScape\RED\tools for WhereScape RED, or Program Files\WhereScape\RED\tools for WhereScape 3D.
Next:
Getting Started with WhereScape CICD Enablement Pack