REASON
SQL Server databases are primarily backed by two categories of files – data files and log files. The data files contain all of the data related to the database, including tables, indexes, and object definitions, while the log files contain a log of all of the changes which have been made to that data. Data files are further subdivided into primary and secondary data files, which can be grouped into collections called filegroups.
RESOLUTION
As databases grow in size, the underlying data files will naturally grow as well. When a database grows to the point that a data file filegroup cannot grow any further, further attempts to add data will result in an error. When your data files are full, you can increase free space by manually increasing the size of the files, increasing the free space available on the disk, or by adding additional data files on new disks. Instructions on how to add new files are available here.
Data files may be configured to grow automatically to prevent out-of-space situations, but they remain limited by the space available on the disk drive, and autogrowth should generally be considered a failsafe alternative. It is a better practice to manually grow your data files to accommodate for expected growth before they fill up.
Update health checks
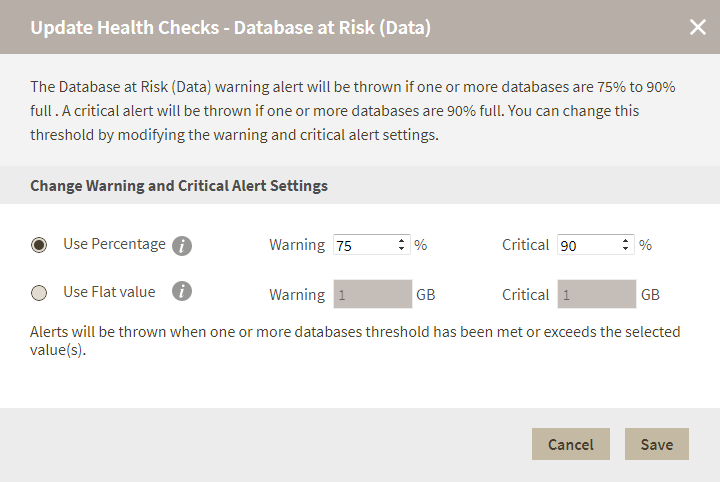
The Database at risk (Data) health check allows you to set the database at risk warnings as either a percentage or flat value, which represents the remaining space. You also can select the threshold values for warning and critical alerts.
By default, the Database at Risk (Data) warning alert is displayed when the storage capacity is between 75-90% full and a critical alert is displayed when the storage capacity is above 90% full. You can change the threshold by modifying the percentage for the storage capacity or assigning a flat value for the storage capacity remaining. For example, settings can prevent IDERA SQL Inventory Manager from displaying an alert unless the storage capacity has only has 2 GB remaining. The changes are applied to all databases that are part of the managed instances. After making any change, alerts are not displayed until the new thresholds meet or exceed the selected value.
To configure a health check, in the Administration view, click Manage Health Checks, and then click Configure for the appropriate health check. In this case, IDERA SQL Inventory Manager displays the Update Health Checks - Database at Risk (Data) window.
Make the appropriate changes, and then click Save.
Available Health Checks
For more information about the Health Checks performed by IDERA SQL Inventory Manager, go to What Health Checks are available with SQL Inventory Manager?
