If you have any issues connecting to your Oracle instance, make sure that you can ping your server with ’tnsping’.
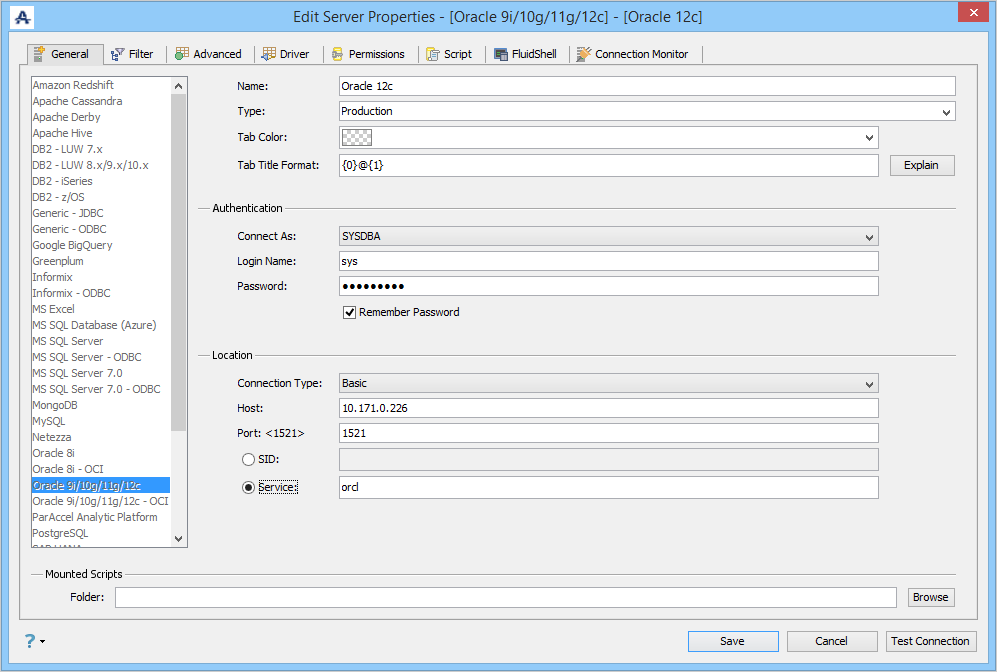
The UI supports three connection types for Oracle: Basic, TNS Descriptor, and LDAP.
General Tab
Tab Coloring
To Identify Server Environments, whether it is a Production, Development or Test, use the Tab Coloring feature:
- Locate the Server in the Server Browser.
- Right-click the Server - A Popup Menu Appears.
- Click the Item which displays Server Properties.
- Based on the Server Type, you can edit the Tab Coloring option to identify your environments.
| Connection Type - Basic | Connection Type - TNS Connect Descriptor |
|---|---|
|
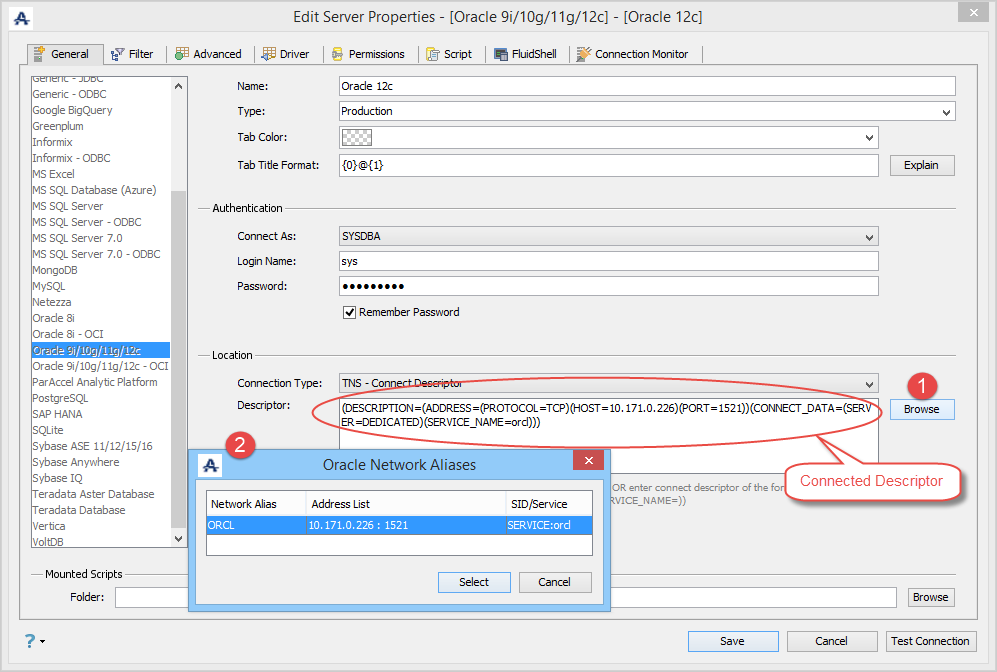
Aqua Data Studio also allows you to connect to Oracle RAC and Oracle Connection Manager by entering into the TNS Descriptor:
Oracle Connection Manager Examples for TNS - CONNECT Descriptor
(description=(address_list=(address=(protocol=tcp)(port=1610)(host=webHost)) (address=(protocol=tcp)(port=1521)(host=oraHost))) (connect_data=(INSTANCE_NAME=orcl))(source_route=yes))
Oracle RAC Examples for TNS - CONNECT Descriptor
Use one of the two examples below, depending on your set up.
(DESCRIPTION=(ADDRESS_LIST=(ADDRESS=(PROTOCOL=TCP)(HOST=PRIMARY_NODE_HOSTNAME)(PORT=1521)) (ADDRESS=(PROTOCOL=TCP)(HOST=SECONDARY_NODE_HOSTNAME)(PORT=1521))) (CONNECT_DATA=(SERVICE_NAME=DATABASE_SERVICENAME)))
or
(DESCRIPTION=(FAILOVER=ON)(ADDRESS_LIST=(LOAD_BALANCE=ON)(ADDRESS=(PROTOCOL=TCP)(HOST=xxxxx) (PORT=1526))(ADDRESS=(PROTOCOL=TCP)(HOST=xxxx)(PORT=1526))) (CONNECT_DATA=(SERVICE_NAME=somesid)))
Connection Type - LDAP
Oracle with Kerberos
A prerequisite of ADS v25.0.1 and above.
ADS requires a specialized authentication configuration to be set up in order to obtain a Kerberos connection to Oracle. Here is a brief explanation of the configuration and properties.
A krb5.configuration file(krb5.conf) is required to establish the KDC location, Kerberos properties and the realm domain relationship. A sample configuration is included in the datastudio directory.
Sample krb5.conf File
[libdefaults]
    default_realm = AD.EXAMPLE.COM
    dns_lookup_kdc = false
    dns_lookup_realm = false
    ticket_lifetime = 24h
    forwardable = true
    default_tgs_enctypes = aes256-cts-hmac-sha1-96 aes128-cts-hmac-sha1-96
    default_tkt_enctypes = aes256-cts-hmac-sha1-96 aes128-cts-hmac-sha1-96
    permitted_enctypes = aes256-cts-hmac-sha1-96 aes128-cts-hmac-sha1-96

[realms]
    AD.EXAMPLE.COM = {
        kdc = dc.ad.example.com
        admin_server = dc.ad.example.com
        default_domain = ad.example.com
    }

[domain_realm]
    .ad.example.com = AD.EXAMPLE.COM
    ad.example.com = AD.EXAMPLE.COM
The information in this configuration file needs to be updated and saved. Your Kerberos administrator should be able to help you with the details as each company has its own set up. The default location of the krb5.conf file is typically in the /etc directory on Unix-like systems, while on Windows, it is usually found in C:\windows.
Depending on how the user is authenticated, a jaas configuration file might be needed. The jaas.conf file is used to configure the Java Authentication and Authorization Service (JAAS) by specifying the login modules and their options for user authentication in Java applications. It defines how the application will authenticate users by detailing the authentication technology and parameters needed for the login process. A basic sample configuration is included in the datastudio directory.
Sample jaas.conf File
Client {
    com.sun.security.auth.module.Krb5LoginModule required
};
The location of the jaas.conf file can vary, but it is commonly found in the user's home directory as .java.login.config or specified by the java.security.auth.login.config property in the Java Virtual Machine (JVM). If not set, the system will look for it in the home directory of the user who started the JVM.
The operating system specific configuration is detailed here:
Windows Configuration
On Windows, the default location of the krb5.conf file is typically in the C:\Windows directory. The krb5.conf file needs to be defined in order for Kerberos to work. For Windows, typically jaas.conf is required for Kerberos Authentication to work. The location of the jaas.conf file can vary, but it is commonly found in the user's home directory as .java.login.config
You can also specify a different location by setting the Java runtime parameter.
Application Launcher (datastudio.exe)
You can specify location of the krb5.conf by setting the Java parameter -Djava.security.krb5.conf=C:\Windows\krb5.conf in the datastudio.ini file like vmarg.5=-Djava.security.krb5.conf=C:\Windows\krb5.conf when executing ADS with the datastudio.exe file.
You can specify jaas.conf location in the datastudio.ini using the parameter -Djava.security.auth.login.config=C:\...when executing ADS with the datastudio.exe file.
Typically, configuring ADS to use Oracle with Kerberos needs both properties and datastudio.ini looks similar to this:
working.directory=.

# JVM Properties
vm.location=.\jre\bin\server\jvm.dll

# Specify a proportion of the available physical memory to use (ie. relates to -Xmx arg). For example, vm.heapsize.max.percent=75. Note that this will use the maximum memory possible.
#vm.heapsize.max.percent=

#Specify a proportion of the available physical memory to use as the minimum starting heap size (ie. relates to -Xms arg).
#vm.heapsize.min.percent=

#Specify a preferred amount (in MB) for the heap size (ie. relates to -Xmx arg). If this amount is not available it will use the maximum amount possible given the physical memory available.
#vm.heapsize.preferred=

#Specifies that only one instance of the product should run at any given time
#single.instance=window
single.instance=dde
dde.enabled=true
dde.class=com.common.windows.noobfus.WinDDE
dde.server.name=datastudio

vmarg.1=-Dsun.swing.enableImprovedDragGesture
vmarg.2=-Xmx2048M

vmarg.3=-XX:MetaspaceSize=128m

vmarg.4=-Djsse.enableCBCProtection=false

vmarg.5=-Djava.security.krb5.conf=C:\Windows\krb5.conf
vmarg.6=-Djava.security.auth.login.config=C:\Users\oracle_tom\jaas.conf

classpath.1=.\lib\*.jar
classpath.2=.\lib\antlr\*.jar
classpath.3=.\lib\apache\*.jar
classpath.4=.\lib\apple\*.jar
classpath.5=.\lib\aquafold\*.jar
classpath.6=.\lib\aspose\*.jar
classpath.7=.\lib\dnsjava\*.jar
classpath.8=.\lib\drivers\*.jar
classpath.9=.\lib\google\*.jar
classpath.10=.\lib\java\*.jar
classpath.11=.\lib\jcraft\*.jar
classpath.12=.\lib\jgoodies\*.jar
classpath.13=.\lib\jgraph\*.jar
classpath.14=.\lib\jide\*.jar
classpath.15=.\lib\jinterop\*.jar
classpath.16=.\lib\jna\*.jar
classpath.17=.\lib\jogl\*.jar
classpath.18=.\lib\kryo\*.jar
classpath.19=.\lib\perforce\*.jar
classpath.20=.\lib\platform-core\*.jar
classpath.21=.\lib\platform-dep\*.jar
classpath.22=.\lib\quartz\*.jar
classpath.23=.\lib\slf4j\*.jar
classpath.24=.\lib\snmp4j\*.jar
classpath.25=.\lib\ssh2\*.jar
classpath.26=.\lib\stndeditor\*.jar
classpath.27=.\lib\svnkit\*.jar
classpath.28=.\lib\thrift\*.jar
classpath.29=.\lib\util\*.jar
classpath.30=.\lib\cron-utils\*.jar

main.class=com.aquafold.datastudio.DataStudio
Command-line Launcher (datastudio-bundled.bat)
If you choose to start ADS from the command line, krb5.conf and jaas.conf can be specified in the datastudio-bundled.bat.
Typically, configuring ADS to use Oracle with Kerberos will use both properties and will have a datastudio-bundled.bat that looks similar to this:
ECHO OFF

SET ADS_PATH=
SET ADS_PATH=%ADS_PATH%;.\lib\*
SET ADS_PATH=%ADS_PATH%;.\lib\antlr\*
SET ADS_PATH=%ADS_PATH%;.\lib\apache\*
SET ADS_PATH=%ADS_PATH%;.\lib\apple\*
SET ADS_PATH=%ADS_PATH%;.\lib\aquafold\*
SET ADS_PATH=%ADS_PATH%;.\lib\aspose\*
SET ADS_PATH=%ADS_PATH%;.\lib\dnsjava\*
SET ADS_PATH=%ADS_PATH%;.\lib\drivers\*
SET ADS_PATH=%ADS_PATH%;.\lib\google\*
SET ADS_PATH=%ADS_PATH%;.\lib\java\*
SET ADS_PATH=%ADS_PATH%;.\lib\jcraft\*
SET ADS_PATH=%ADS_PATH%;.\lib\jgoodies\*
SET ADS_PATH=%ADS_PATH%;.\lib\jgraph\*
SET ADS_PATH=%ADS_PATH%;.\lib\jide\*
SET ADS_PATH=%ADS_PATH%;.\lib\jinterop\*
SET ADS_PATH=%ADS_PATH%;.\lib\jna\*
SET ADS_PATH=%ADS_PATH%;.\lib\jogl\*
SET ADS_PATH=%ADS_PATH%;.\lib\kryo\*
SET ADS_PATH=%ADS_PATH%;.\lib\perforce\*
SET ADS_PATH=%ADS_PATH%;.\lib\platform-core\*
SET ADS_PATH=%ADS_PATH%;.\lib\platform-dep\*
SET ADS_PATH=%ADS_PATH%;.\lib\quartz\*
SET ADS_PATH=%ADS_PATH%;.\lib\cron-utils\*
SET ADS_PATH=%ADS_PATH%;.\lib\slf4j\*
SET ADS_PATH=%ADS_PATH%;.\lib\snmp4j\*
SET ADS_PATH=%ADS_PATH%;.\lib\ssh2\*
SET ADS_PATH=%ADS_PATH%;.\lib\stndeditor\*
SET ADS_PATH=%ADS_PATH%;.\lib\svnkit\*
SET ADS_PATH=%ADS_PATH%;.\lib\thrift\*
SET ADS_PATH=%ADS_PATH%;.\lib\util\*

SET path=.;%path%;.\iany\lib

ECHO ON

.\jre\bin\java -Djava.security.krb5.conf=C:\Windows\krb5.conf -Djava.security.auth.login.config=C:\Users\oracle_tom\jaas.conf -Djsse.enableCBCProtection=false -Xmx2048M -XX:MetaspaceSize=128m -cp "%ADS_PATH%" com.aquafold.datastudio.DataStudio
MacOS Configuration for .app
The default location of the krb5.conf file is typically in the /etc directory on MacOS. The krb5.conf file needs to be defined in order for Kerberos on MacOS to work. You can also specify a different location by setting the Java parameter.
Application Launcher (Aqua Data Studio.app)
Following steps outline how to modify the Info.plist file of Aqua Data Studio macOS app to configure Kerberos authentication.
Steps to Modify Info.plist for configuring ADS:
Locate
Aqua Data Studio.App/Contentsfolder:Navigate to the location of your
.appfile.Right-click the
.appfile and select Show Package Contents.Inside the package, find the
Contentsfolder and open it.
Copy
kerb5.confandjaas.confinto theContentsfolder.Locate
Info.plistin theContentsfolder. TheInfo.plistfile is a core configuration file for macOS applications. It contains essential metadata about your app, such as the bundle identifier, version, and JVM-related configurations.Open
Info.plistfor Editing: Open theInfo.plistfile with a text editor such as TextEdit, or any other preferred editor.Modify JVM Options: You need to modify JVM options in the
Info.plistfile. Insert the following section inside theInfo.plist, under the<key>JVMOptions</key>section after defining JVM parameters.<key>JVMOptions</key> <array> <!-- Other JVM arguments go here → <string>-Djava.security.krb5.conf=$APP_ROOT/Contents/krb5.conf</string> <string>-Djava.security.auth.login.config=$APP_ROOT/Contents/jaas.conf</string> </array>- Save Changes: Once you’ve added the JVM options, save the
Info.plistfile and close the editor. - Run the Application: After modifying the
Info.plist, relaunchAqua Data Studio.Appto apply the changes.
Command-line Launcher (datastudio-osx.sh)
You can also specify a different location by setting the Java parameter -Djava.security.krb5.conf=/home/mydirectory/krb5.conf in datastudio-osx.sh.
This file would look like this:
#!/bin/bash
#SET ADS_HOME to the root installation directory for DataStudio

ADS_HOME=.

CLASSES=$ADS_HOME/lib/*
CLASSES=$ADS_HOME/lib/antlr/*:$CLASSES
CLASSES=$ADS_HOME/lib/apache/*:$CLASSES
CLASSES=$ADS_HOME/lib/apple/*:$CLASSES
CLASSES=$ADS_HOME/lib/aquafold/*:$CLASSES
CLASSES=$ADS_HOME/lib/aspose/*:$CLASSES
CLASSES=$ADS_HOME/lib/dnsjava/*:$CLASSES
CLASSES=$ADS_HOME/lib/drivers/*:$CLASSES
CLASSES=$ADS_HOME/lib/google/*:$CLASSES
CLASSES=$ADS_HOME/lib/java/*:$CLASSES
CLASSES=$ADS_HOME/lib/jcraft/*:$CLASSES
CLASSES=$ADS_HOME/lib/jgoodies/*:$CLASSES
CLASSES=$ADS_HOME/lib/jgraph/*:$CLASSES
CLASSES=$ADS_HOME/lib/jide/*:$CLASSES
CLASSES=$ADS_HOME/lib/jinterop/*:$CLASSES
CLASSES=$ADS_HOME/lib/jna/*:$CLASSES
CLASSES=$ADS_HOME/lib/jogl/*:$CLASSES
CLASSES=$ADS_HOME/lib/kryo/*:$CLASSES
CLASSES=$ADS_HOME/lib/perforce/*:$CLASSES
CLASSES=$ADS_HOME/lib/platform-core/*:$CLASSES
CLASSES=$ADS_HOME/lib/platform-dep/*:$CLASSES
CLASSES=$ADS_HOME/lib/quartz/*:$CLASSES
CLASSES=$ADS_HOME/lib/cron-utils/*:$CLASSES
CLASSES=$ADS_HOME/lib/slf4j/*:$CLASSES
CLASSES=$ADS_HOME/lib/snmp4j/*:$CLASSES
CLASSES=$ADS_HOME/lib/ssh2/*:$CLASSES
CLASSES=$ADS_HOME/lib/stndeditor/*:$CLASSES
CLASSES=$ADS_HOME/lib/svnkit/*:$CLASSES
CLASSES=$ADS_HOME/lib/thrift/*:$CLASSES
CLASSES=$ADS_HOME/lib/util/*:$CLASSES

export DYLD_LIBRARY_PATH=$ADS_HOME:$ADS_HOME/iany/lib/:$LD_LIBRARY_PATH

./jre/bin/java -Djava.security.krb5.conf=/home/mydirectory/krb5.conf -Djsse.enableCBCProtection=false -Xmx2048M -XX:MetaspaceSize=128m -cp $CLASSES com.aquafold.datastudio.DataStudio
Linux Configuration
The default location of the krb5.conf file is typically in the /etc directory on Linux systems. The krb5.conf file needs to be defined in order for Kerberos on Linux to work. You can also specify a different location by setting the Java parameter, -Djava.security.krb5.conf=/home/mydirectory/krb5.conf in datastudio-bundled.sh.
This file would look like this:
#!/bin/bash
#SET ADS_HOME to the root installation directory for DataStudio

ADS_HOME=`dirname $0`

CLASSES=$ADS_HOME/lib/*
CLASSES=$ADS_HOME/lib/antlr/*:$CLASSES
CLASSES=$ADS_HOME/lib/apache/*:$CLASSES
CLASSES=$ADS_HOME/lib/apple/*:$CLASSES
CLASSES=$ADS_HOME/lib/aquafold/*:$CLASSES
CLASSES=$ADS_HOME/lib/aspose/*:$CLASSES
CLASSES=$ADS_HOME/lib/dnsjava/*:$CLASSES
CLASSES=$ADS_HOME/lib/drivers/*:$CLASSES
CLASSES=$ADS_HOME/lib/google/*:$CLASSES
CLASSES=$ADS_HOME/lib/java/*:$CLASSES
CLASSES=$ADS_HOME/lib/jcraft/*:$CLASSES
CLASSES=$ADS_HOME/lib/jgoodies/*:$CLASSES
CLASSES=$ADS_HOME/lib/jgraph/*:$CLASSES
CLASSES=$ADS_HOME/lib/jide/*:$CLASSES
CLASSES=$ADS_HOME/lib/jinterop/*:$CLASSES
CLASSES=$ADS_HOME/lib/jna/*:$CLASSES
CLASSES=$ADS_HOME/lib/jogl/*:$CLASSES
CLASSES=$ADS_HOME/lib/kryo/*:$CLASSES
CLASSES=$ADS_HOME/lib/perforce/*:$CLASSES
CLASSES=$ADS_HOME/lib/platform-core/*:$CLASSES
CLASSES=$ADS_HOME/lib/platform-dep/*:$CLASSES
CLASSES=$ADS_HOME/lib/quartz/*:$CLASSES
CLASSES=$ADS_HOME/lib/cron-utils/*:$CLASSES
CLASSES=$ADS_HOME/lib/slf4j/*:$CLASSES
CLASSES=$ADS_HOME/lib/snmp4j/*:$CLASSES
CLASSES=$ADS_HOME/lib/ssh2/*:$CLASSES
CLASSES=$ADS_HOME/lib/stndeditor/*:$CLASSES
CLASSES=$ADS_HOME/lib/svnkit/*:$CLASSES
CLASSES=$ADS_HOME/lib/thrift/*:$CLASSES
CLASSES=$ADS_HOME/lib/util/*:$CLASSES

export LD_LIBRARY_PATH=$ADS_HOME:$ADS_HOME/iany/lib/:$LD_LIBRARY_PATH

$ADS_HOME/jre/bin/java -Djava.security.krb5.conf=/home/mydirectory/krb5.conf -Djsse.enableCBCProtection=false -Xmx2048M -XX:MetaspaceSize=128m -cp $CLASSES com.aquafold.datastudio.DataStudio
Kerberos Token Initialization
Kerberos tokens should be initialized to use Kerberos Authentication from within ADS. For Windows Single Signon, typically Kerberos token would be generated while sign-in. If not, the user would need to run kinit or equivalent command to initialize Kerberos Token.
>kinit oracle_user@ad.example.com
Register Server with Kerberos Authentication
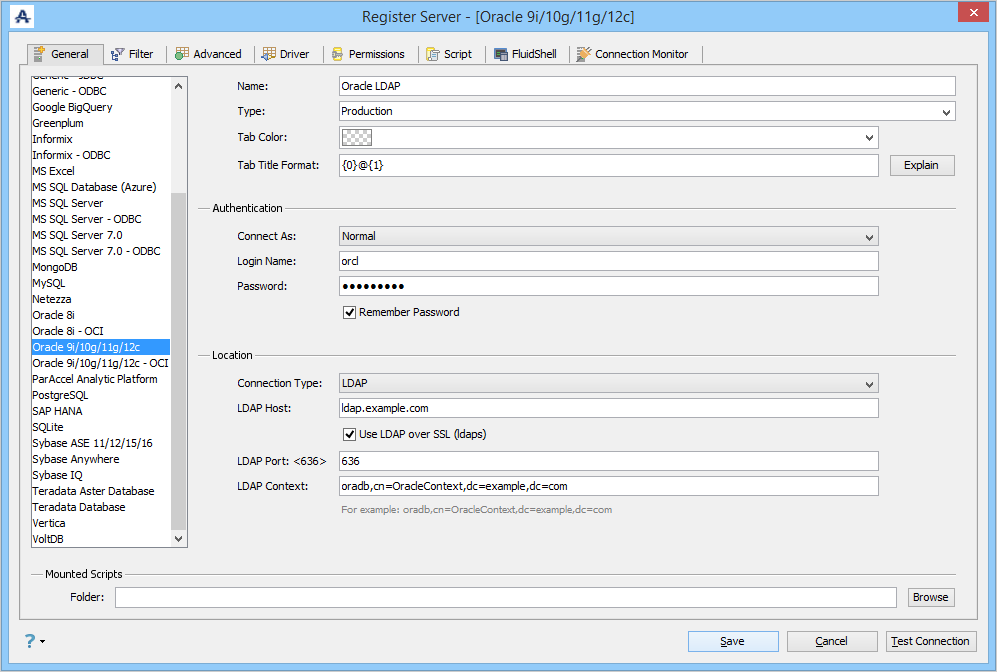
Once the above Kerberos configuration is complete based on the OS, the user can now configure a server properties connection inside of ADS for Oracle. A restart of ADS is required to establish the above changes. The user should register an Oracle connection by picking the Oracle 9i/10g/11g/12c/18c/19c/21c as seen below.
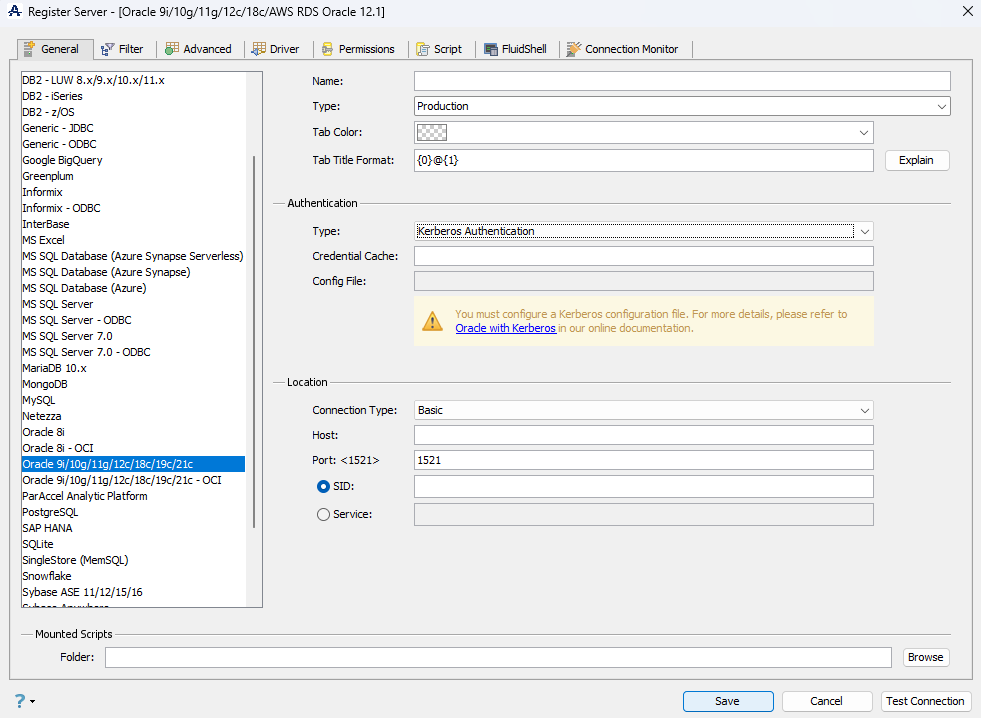
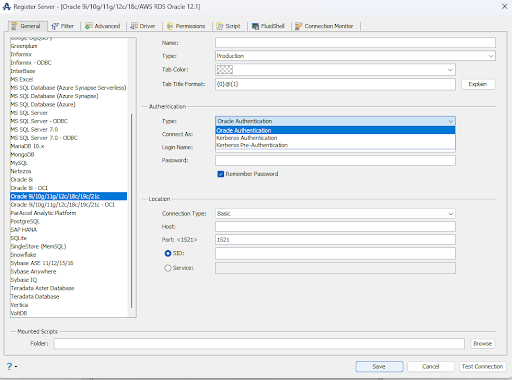
The user should select the “Kerberos Authentication” from the drop down authentication menu.
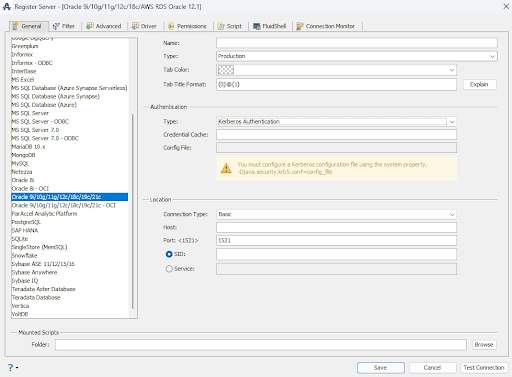
The Kerberos authentication panel is displayed below. The Config File should be populated with the location of the krb5.conf file configured above. When using AD Windows sign on credentials, the Credential Cache field will be empty as the credentials are stored in memory cache. If you should decide to use local file cache as in “kinit -c /tmp/mycache”, you should add the cache location to the Credential Cache field.kinit -c /tmp/mycachekinit -c /tmp/mycachekinit -c /tmp/mycachkinit -c /tmp/mycach
Additional Debug Information
There are some additional debug properties that can be added to the Aqua Data Studio launch configuration file to trace Kerberos. Here are the Java runtime properties:
-Dsun.security.krb5.debug=true
-Dsun.security.jgss.debug=true
To know more about the current tokens, user can run commands like klist to list the current Kerberos tokens.
>klist
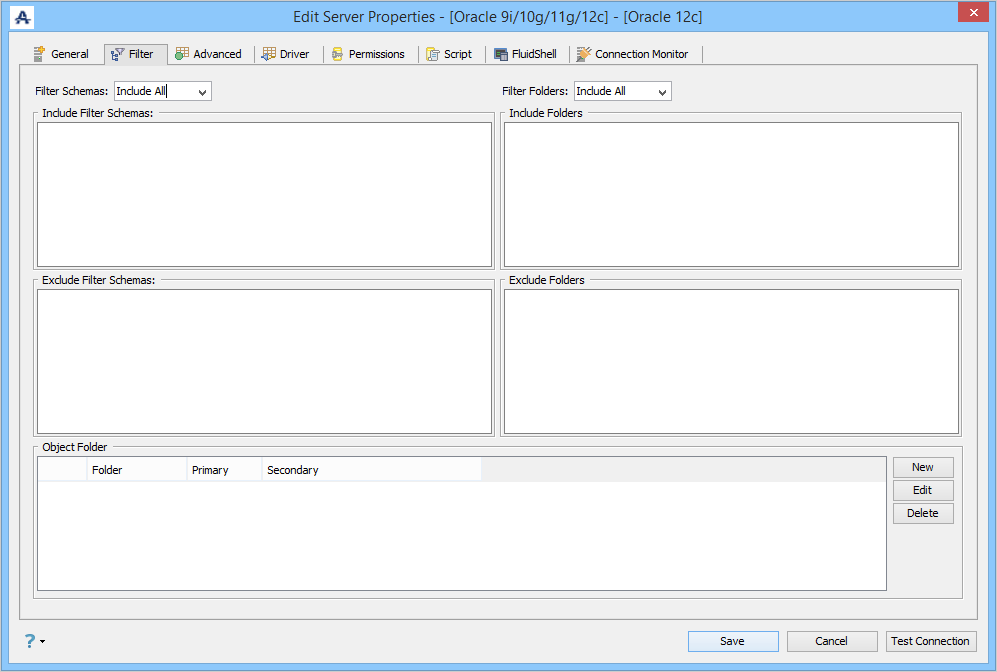
Using Filters Options in Registration (Filter Tab)
Edit the Server Properties, to use FILTER options for a Server in Aqua Data Studio:
- Locate the Server in the Server Browser.
- Right-click the Server - A Popup Menu Appears.
- Click the Item which displays Server Properties.
- Go to the Filter Tab and make changes in the Options.
- Filter Databases/Schemas: Allows the user to specify the main schema browser filter for databases or schemas, on whether to include or exclude all.
- Include Databases/Schemas: A list of databases/schemas to include after the main filter is applied.
- Exclude Databases/Schemas: A list of databases/schemas to exclude after the main filter is applied.
- Filter Objects: Allows the user to specify the main schema browser filter for object types, on whether to include or exclude all.
- Include Objects: A list of objects to include after the main filter is applied.
- Exclude Objects: A list of objects to exclude after the main filter is applied.
Features
- You can Create, Edit or Delete Object Folders. Default Folders are Tables, System Tables, Views, Indexes, Triggers, Procedures, Functions.
- Sometimes you would like to view only specific Schemas. Use options to INCLUDE or EXCLUDE all Schemas and Folders. For more information see Improve the connection performance.
- Enter the Schema or Folder name in the specified text area and click OK. The current Connection will be terminated. Reconnect to see the changes.
- Filters are case-sensitive.
- Filter Databases works on the list of Schemas.
- Filter Folders works on the list of folders inside a particular Schema. Example folders: Tables, View, Procedures, etc.
- Object Folder filter works on individual folders inside a particular Schema. The user can define filters for each of the Tables, Views, etc. folders.
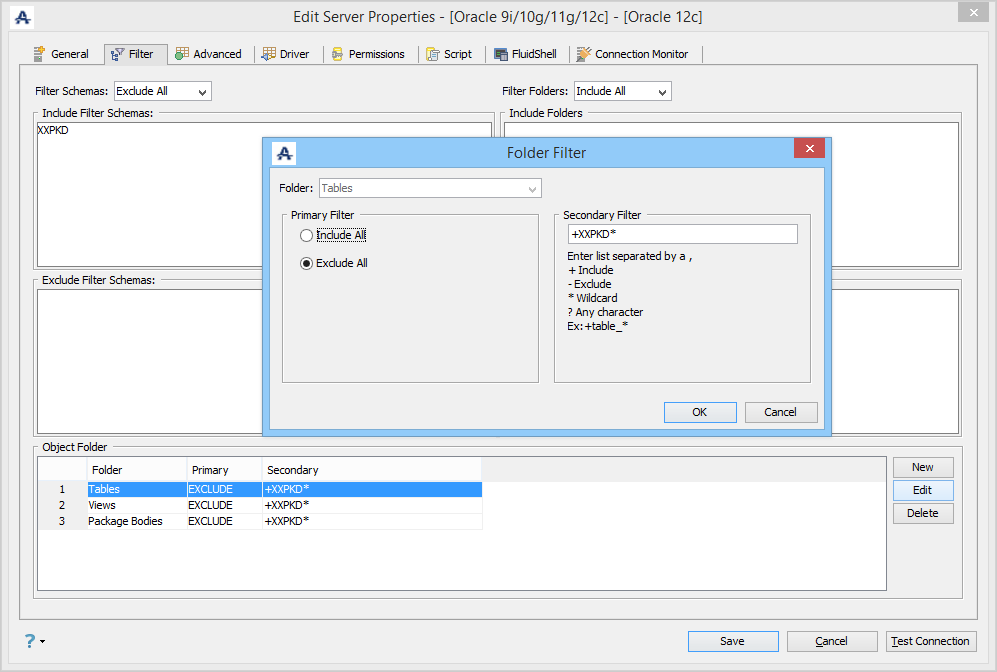
Filter Examples:
If your intention is to show only the tables that start with XXPKD, then you'll need to change your main filter to "Exclude All", and secondary filter to "+XXPKD*". Note the "+" in front of the XXPKD pattern. Also, note that the filter pattern is case-sensitive.
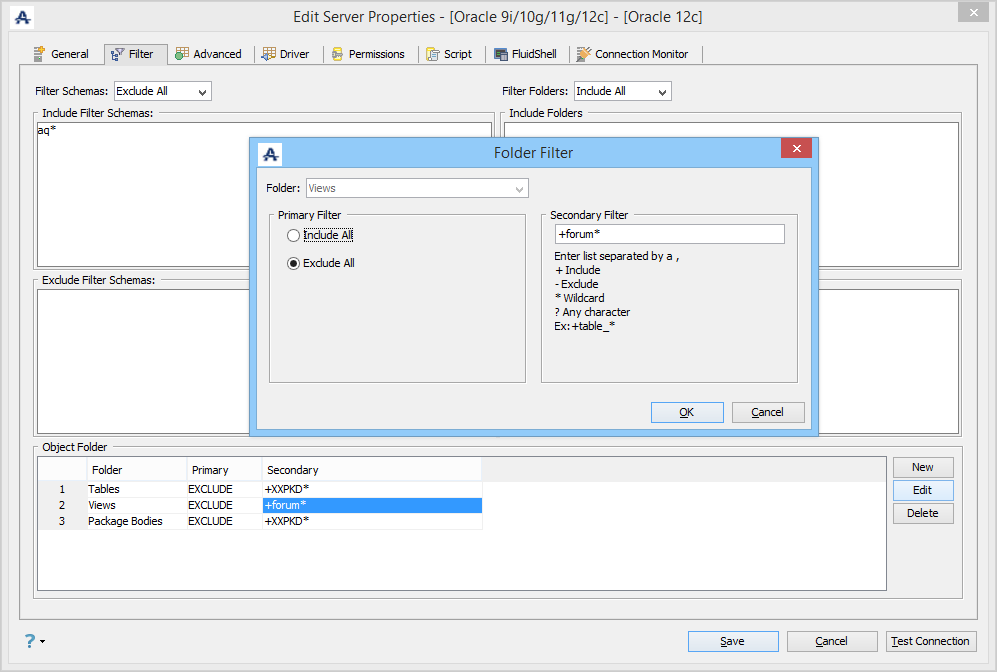
The filter shown below is set to exclude all databases except those that start with "aq". This is similar to the above example where all schemas, except the XXPKD schema, are excluded. Then, there is an "Object Folder" filter on the Tables folder, which excludes everything except those that start with "forum".
Improve the Schema Tree and Query Analyzer connection performance
If you have a large number of schemas on an Oracle Database the connection process can take a long time. If you want to improve the connection performance or simply limit the number of schemas displayed in the Schema Tree or in the Query Analyzer schema drop-down you can follow the steps below:
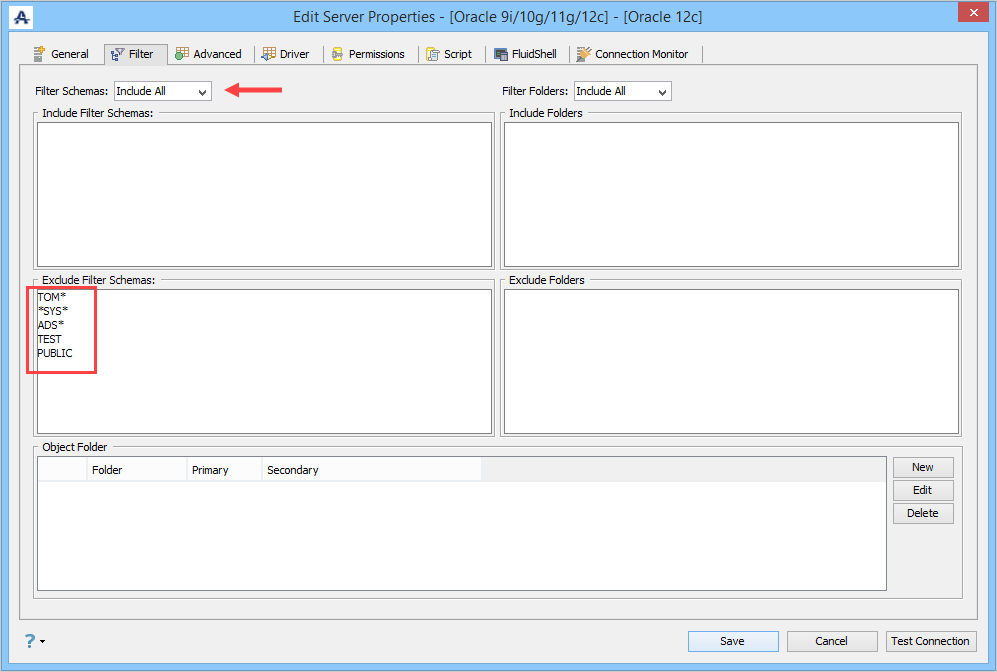
In order to determine which Schemas should be displayed in the Schema Tree, select "Filter Schemas: Exclude All" and enter only the list of schemas you want to see under "Include Filter Schemas".

On the other hand, if you want to exclude schemas from the Schema Tree, select "Filter Schemas: Include All" and enter the list of schemas under "Exclude Filter Schemas". This will prevent them from loading during the connection process.
To further improve the connection performance you need to enable the following options in the Advanced Tab by checking the boxes next to the option:
- Enable DB Filters for Query Window
- Enable DB Filters for the Schema Queries
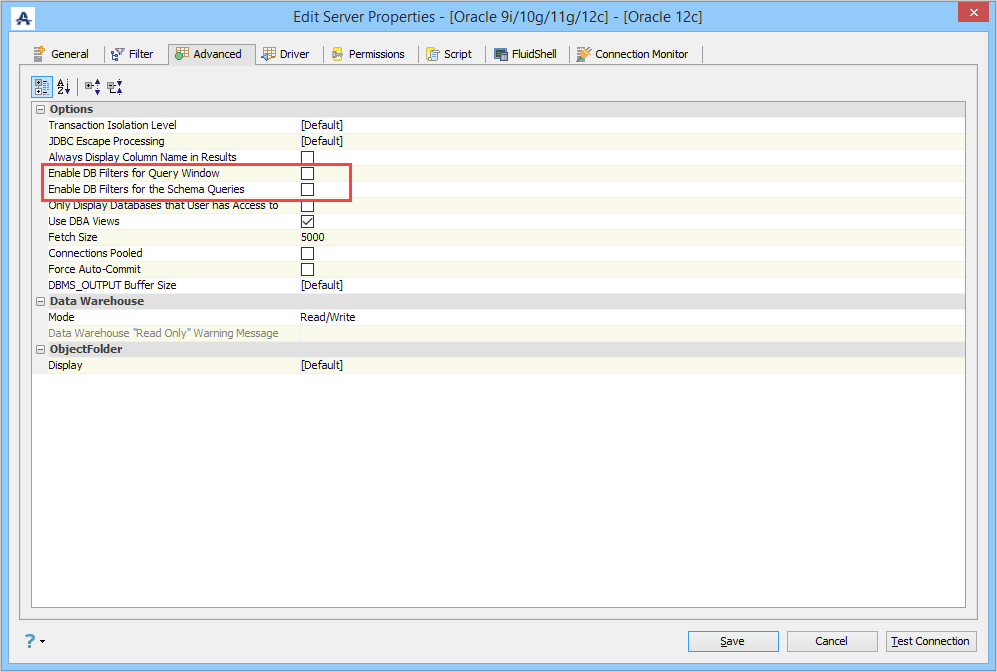
Checking the box next to "Enable DB Filters for Query Window" option enables the schema filter configuration and applies it to the Query Analyzer window schema drop-down.
Checking the box next to "Enable DB Filters for the Schema Queries" option enables the schema filter configuration and applies it to the WHERE clause of the query that extracts the list of schemas from the database.
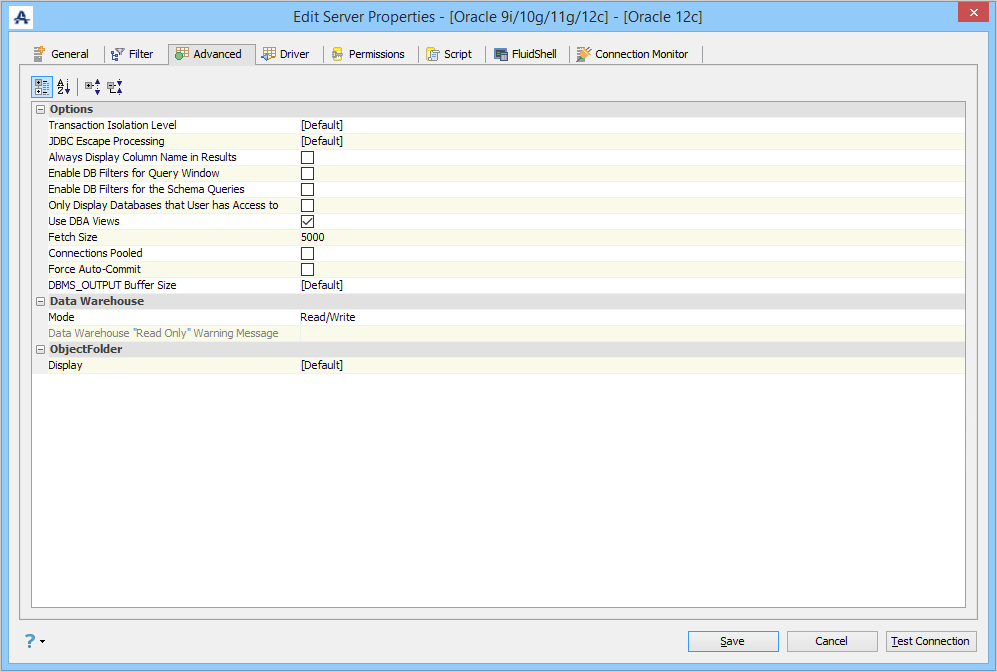
Using Advanced Properties (Advanced Tab)
Edit the Server Properties to use Advanced Properties in Aqua Data Studio:
- Locate the Server in the Server Browser.
- Right-click the Server - A Popup Menu Appears.
- Click the Item which displays Server Properties.
- Go to the Advanced Tab and make changes in the Options.
With options in Advanced properties of a Server, you can:
- Change Transaction Isolation Modes.
- Manage Driver Parameters.
- Enable Database Filters in Query Analyzer.
- Change Read Only / Read- Write Mode.
- Change Object Folder Display.
- Transaction Isolation Level: Support for setting Transaction Isolation Level
- TRANSACTION_NONE - A constant indicating that transactions are not supported.
- TRANSACTION_READ_COMMITTED - A constant indicating that dirty reads are prevented; non-repeatable reads and phantom reads can occur.
- TRANSACTION_READ_UNCOMMITTED - A constant indicating that dirty reads, non-repeatable reads, and phantom reads can occur.
- TRANSACTION_REPEATABLE_READ - A constant indicating that dirty reads and non-repeatable reads are prevented; phantom reads can occur.
- TRANSACTION_SERIALIZABLE - A constant indicating that dirty reads, non-repeatable reads, and phantom reads are prevented. - JDBC Escape Processing: Allows JDBC driver to perform an escape sequence before sending the SQL code to the server.
- Always Display Column Name in Results: Allows to show/hide column names in query results.
- Enable DB Filters for Query Window: Enables/Disables the schema filter configuration and applies it to the Query Analyzer window schema drop-down.
- Enable DB Filters for the Schema Queries: Enables/Disables the schema filter configuration and applies it to the WHERE clause of the query that extracts the list of schemas from the database. Enabling this option significantly improves the Schema Tree and Query Analyzer connection performance.
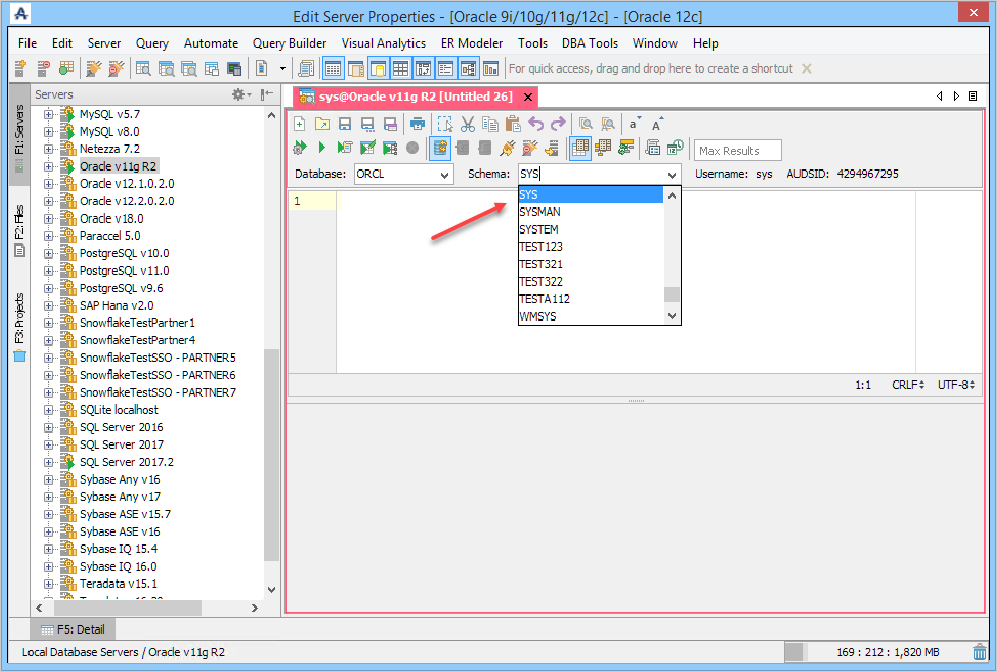
- Only Display Databases that User has Access to: Displays only the databases the current user (from the Login Name on the General tab) has access to within the schema browser.
- Use DBA Views: Allows logging in with an account with DBA privileges.
- Fetch Size: Determines the Fetch Size (number of rows physically retrieved from the database at one time by the JDBC driver). One way to improve query performance is to set an appropriate Fetch Size. In general, configuring a larger fetch size increases performance, but it will also increase memory usage. The optimum fetch size depends on the nature of the database query being executed. You may want to start with a fetch size of 5000 or 10000, and then adjust it up or down to see which fetch size gives you the best balance between performance and memory usage.
- Connections Pooled: Enables connection pooling. Read more about connection pooling here.
- Force Auto-Commit: When this option is selected, it sets auto-commit to TRUE for any Query Window to this server and disables the icons on the toolbar, regardless of the option in File > Options > Query Analyzer > [DATABASE] > [Auto Commit].
- DBMS_OUTPUT Buffer Size: Allows setting the upper limit for the amount of buffered information.
- Data Warehouse Mode: Read Only or Read/Write.
- Object Folder Display: [Default], [Name], [Schema].[Name] or [Name]([Schema]) sets how the Schemas will be displayed.
Using the drop-down at the bottom of the Advanced Tab, quickly change your Object Display in the Server Browser.
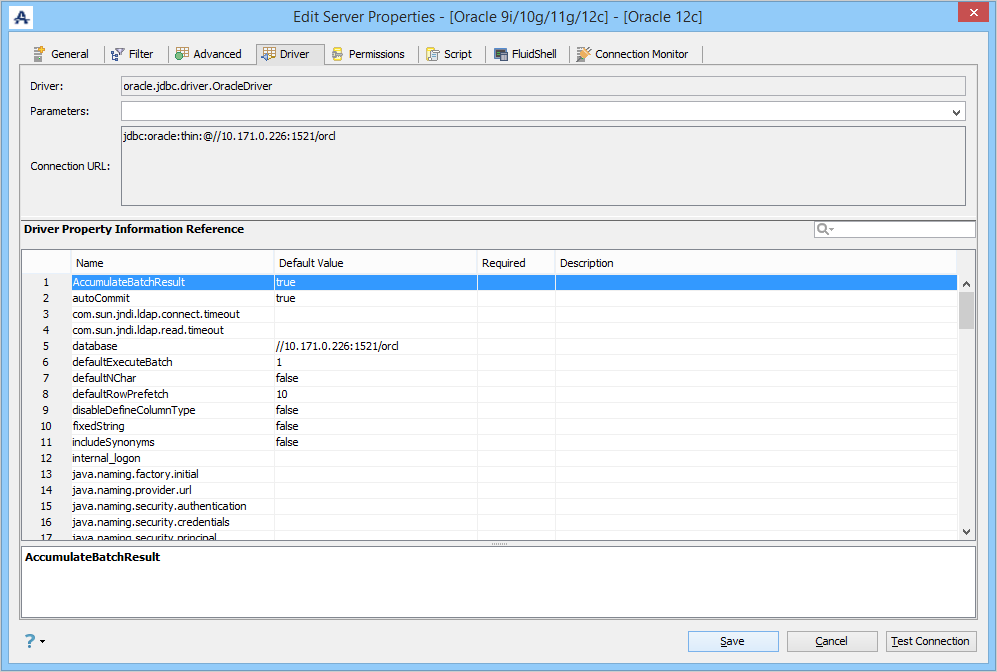
Using Driver Properties (Driver Tab)
Edit the Drivers Properties to use Driver Parameters in Aqua Data Studio:
- Locate the Server in the Server Browser.
- Right-click the Server - A Popup Menu Appears.
- Click the Item which displays Server Properties.
- Go to the Driver Tab and make changes in the Options.
With options in Driver properties of a Server, you can edit/view the:
- Driver: This displays the JDBC driver used for this connection.
- Driver Parameters: This option is to allow a user to specify extra JDBC parameters that a user might want use in establishing a connection.
- Connection URL: This displays the connection URL for this server connection.
- Driver Parameters Quickfilter: This option is to allow a user to search JDBC parameters that a user might want to use in establishing a connection.
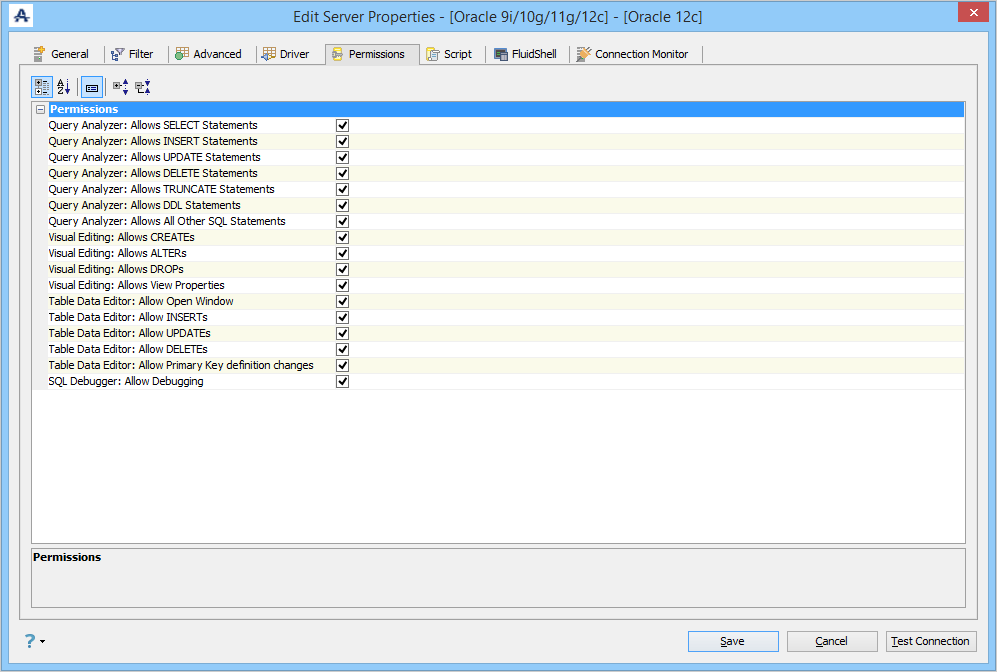
Server Permissions (Permissions Tab)
Edit the Permissions in Server Properties in Aqua Data Studio:
- Locate the Server in the Server Browser.
- Right-click the Server - A Popup Menu Appears.
- Click the Item which displays Server Properties.
- Go to the Permissions Tab and make changes in the Options.
With options in the Permissions Tab of a Server, you can:
- Control Statement execution and Properties of the Query Analyzer, Table Data Editor, and Visual Editing.
- Grant / Revoke Permissions easily for executing DDL and DML Statements in the Query Analyzer.
- Change the behavior of the Table Data Editor for manipulating rows in Tables.
- Grant / Revoke Alters, Creates, Drops and View Properties of Visual Editing Tools.
- Allow SQL debugging for this server connection.
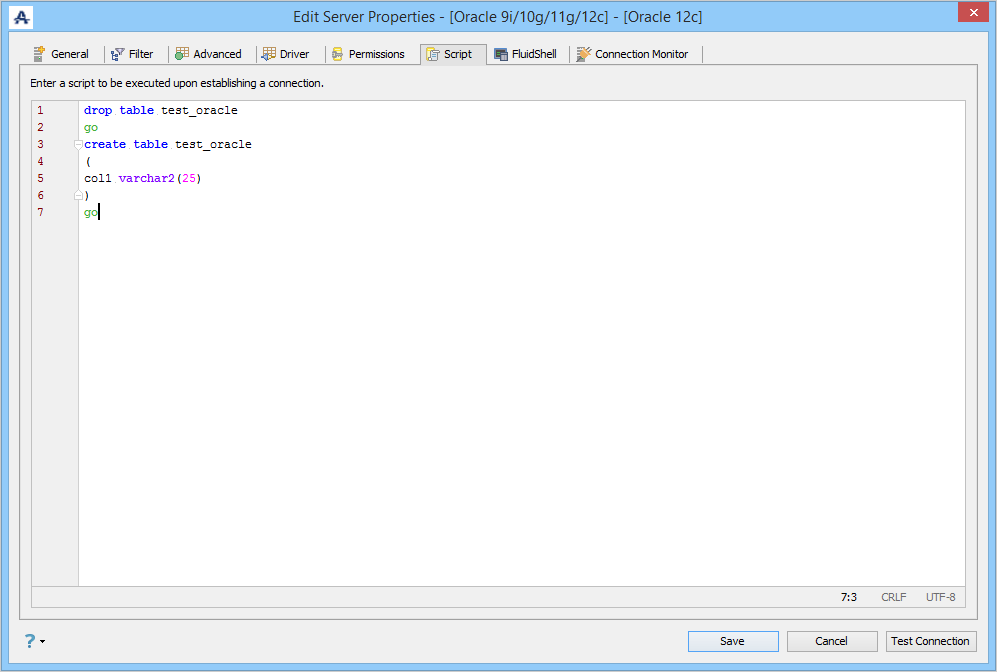
Server Scripts (Script Tab)
Edit Scripts in Server Properties in Aqua Data Studio:
- Locate the Server in the Server Browser.
- Right-click the Server - A Popup Menu Appears.
- Click the Item which displays Server Properties.
- Go to the Script Tab and make changes in the Options.
With scripts in the Script Tab of a Server, you can:
- Enter an SQL Script that is executed each time a new connection is established.
- This allows the user to SET connection settings for a server connection. (eg: SET ROLE, ALTER SESSION SET XXX)
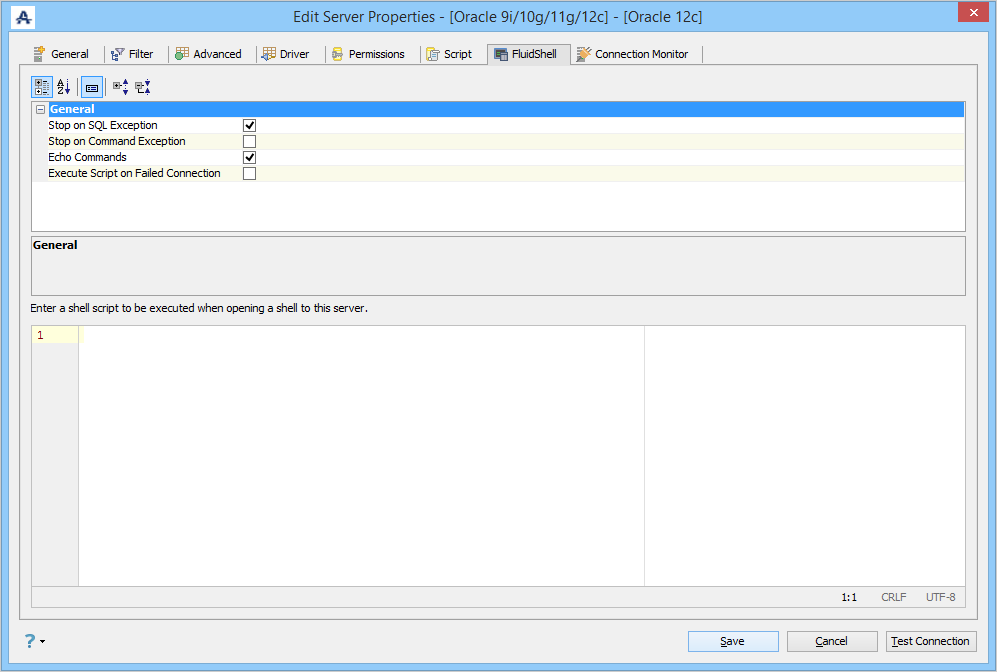
Shell Scripts (FluidShell Tab)
Edit Shell Scripts in Server Properties in Aqua Data Studio:
- Locate the Server in the Server Browser.
- Right-click the Server - A Popup Menu Appears.
- Click the Item which displays Server Properties.
- Go to the FluidShell Tab and make changes in the Options.
With scripts in the FluidShell Tab of a Server, you can:
- Enter a FluidShell Script that is executed each time a new FluidShell connection is established.
- This allows the user to cd (change directory) for a server connection. (eg: cd /scripts)
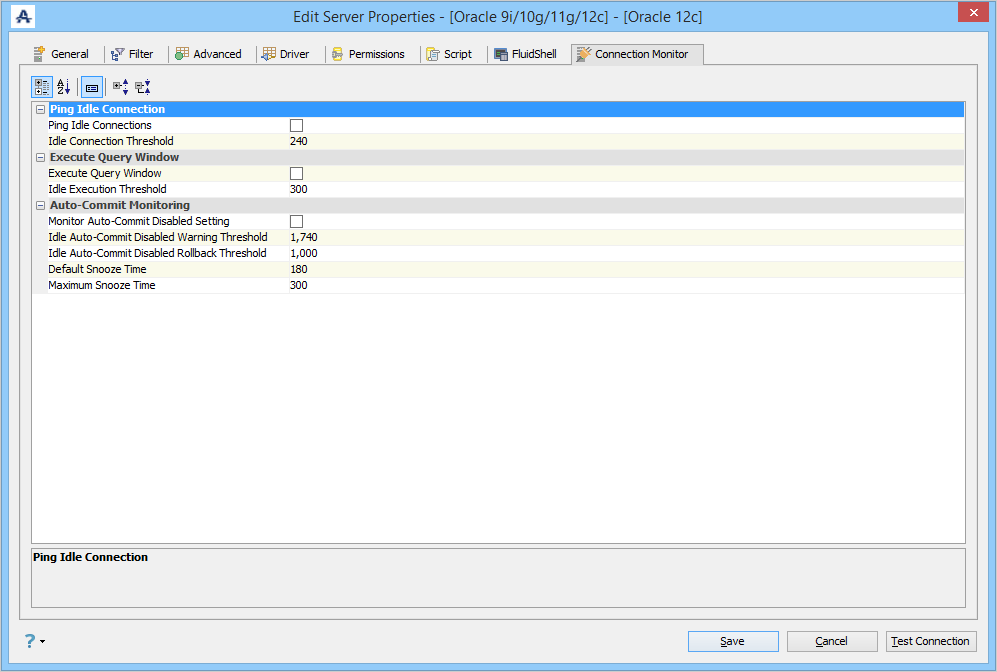
Server Connections (Connection Monitor Tab)
Enable the connection monitor to start an application thread that monitors the status of the connection associated with the Query Window.
With the connection monitor, you can:
- Set a ping operation that allows activity on the connection to prevent the connection from being terminated.
- Set an execute operation that executes the Query Window on a periodic basis.
- Set an auto-commit operation that checks how long the auto-commit has been disabled and whether the idle threshold has been exceeded. A warning threshold can also be configured so users can turn on auto-commit before it happens.
For more information, see Connection Monitor.