This is a guide to installing the WhereScape Enablement Pack for Microsoft Fabric in WhereScape RED10
Prerequisites For PostgreSQL Metadata
Before you begin the following prerequisites must be met:
- Create Database and ODBC DSN:
- Supported* version of PostgreSQL (PostgreSQL 12 or higher)
- A database to house the RED Metadata Repository.
- A database for the Range Table DB (Optional)
- A database to house scheduler (Optional)
- Software Installations
- WhereScape RED10 with valid license key entered and EULA accepted
- WhereScape Enablement Pack for target database version RED10
- Supported* version of PostgreSQL (PostgreSQL 12 or higher)
- Windows Powershell (64-bit) version 4 or higher
- To check the Windows Powershell Version:
- Run the below command in Windows Powershell
Get-Host|Select-Object Version
- Run the below command in Windows Powershell
- To check the Windows Powershell Version:
- Run the below command in the Command Prompt
powershell $psversiontable
- Run the below command in the Command Prompt
- Run the following command using PowerShell
- The security protocol TLS 1.0 and 1.1 used by PowerShell to communicate with the PowerShell gallery has been deprecated and TLS 1.2 has been made mandatory
[Net.ServicePointManager]::SecurityProtocol = [Net.ServicePointManager]::SecurityProtocol -bor [Net.SecurityProtocolType]::Tls12
Register-PSRepository -Default -Verbose
Set-PSRepository -Name "PSGallery" -InstallationPolicy Trusted
- The security protocol TLS 1.0 and 1.1 used by PowerShell to communicate with the PowerShell gallery has been deprecated and TLS 1.2 has been made mandatory
- Progress bar placeholder info line
Install-Module -Name PoshProgressBar -SkipPublisherCheck -Force
- Progress bar placeholder info line
- RED supports the following versions for the metadata repository: PostgreSQL 12 or higher
Prerequisites For Microsoft Fabric
Before you begin the following prerequisites must be met:
- For Windows
- Install the latest Azure CLI package - Latest MSI of the Azure CLI (64-bit)
- For Linux
- Install latest Azure CLI package using command:
curl -sL https://aka.ms/InstallAzureCLIDeb | bash
- Install latest Azure CLI package using command:
- Open the command prompt:
az login
- Login using an Azure account having a Microsoft Fabric subscription.
- Create a Database and ODBC DSN:
- Microsoft Fabric
- At least one schema available to use as a RED Data Warehouse Target.
- Microsoft Fabric
- Python 3.8 or higher
- Select "Add Python 3.8 to PATH" from installation Window.
- Pip Manager Install with command :
python -m pip install --upgrade pip
- We recommend using case-insensitive (CI) collations during the creation of your Fabric Warehouse
Enablement Pack Setup Scripts
The Enablement Pack Install process is entirely driven by scripts. The below table outlines these scripts, their purpose and if "Run as Administrator" is required.
| 1 | Setup_Enablement_Pack.ps1 | Setup and configure a RED Metadata Repository for target database If RED repository exists then updates the repository with 1.Templates 2.Scripts 3.Extended Properties 4.Datatype Mappings 5.UI Configurations | Yes | New and Existing installations |
| 2 | install_WslPython_Modules.bat | Installs or updates WslPython Modules and required Python libraries on this machine. | Yes | New and Existing installations |
| 3 | import_python_templates.ps1 | Imports or updates the Python Templates to a RED Metadata Repository. Also includes any Script Imports | No* | Existing installations |
| 4 | set_default_templates.ps1 | Applies the RED Connection defaults in a RED Metadata Repository for Python or Powershell templates. | No* | Existing installations |
* Note that on some systems executing Windows Powershell scripts is disabled by default, see troubleshooting for workarounds
Each Powershell script in the list above provides some help at the command line, this can be output by passing the "-help" parameter to the script.For Example > .\Setup_Enablement_Pack.ps1 -help
Step-By-Step Guide
Setup and configure RED Metadata Repository
Run Powershell as Administrator:
Script 1 > Powershell -ExecutionPolicy Bypass -File .\Setup_Enablement_Pack.ps1
Important Upgrades Notes
If RED repository exists, it will prompt to upgrade the repository.
This enablement pack will overwrite any existing Source Enablement Pack UI Configs:
To ensure existing Source Enablement Pack connections and associated Load Tables continue to browse and load:
| Connection UI Config | Load UI Config |
|---|---|
| Amazon S3 | Load From Amazon S3 |
Azure Data Lake Storage Gen2 | Load From Azure Data Lake Storage Gen2 |
Google Cloud | Load From Google Cloud |
Azure One Lake | Load From Azure One Lake |
Go into UI Configuration Maintenance in RED prior to installing this Enablement Pack and rename the affected UI Configurations. While the updated Load Template will work with previous Source Enablement Pack's we recommend moving these previous versions of Load Tables to newly created Parser based connections following this install. The earlier versions of the Source Enablement Pack will be deprecated following this release.
Important
Install or Update WhereScape Python Modules
Run Script As Administrator
Script 2 > install_WslPython_Modules.bat
There are two steps in this script:
1. Installs the WhereScape WslPython modules to C:\Program Data\WhereScape\Modules\
2. PIP to download/update required Python libraries - for offline install please see the required library list for Python in the Troubleshooting section.
Install or Update WhereScape Python Templates (For Existing Installations)
Run Script as Administrator
Script 2 > install_WslPython_Modules.bat
Script 3 > . .\import_python_templates.ps1
Script 4 > . .\set_default_templates.ps1
Note
Set Connection defaults for a Template Set (For Existing Installations)
Script 4 > . .\set_default_templates.ps1
Choose "Python" when prompted.
Guide for setting Fabric Data Factory Pipeline
The EP contains 2 load templates:
- wsl_fabric_pyscript_load will support load for Database, OneLake and traditional file parser.
- wsl_fabric_pyscript_load_df template is for FDF and does not support XML and JSON file in this release.
Fabric Data Factory Guide using load_df template:
In Fabric Data Factory, currently only OneLake sources are supported. When creating a connection to browse files, the Lakehouse name must be specified in the source connection. After browsing the connection and selecting a file, dragging the table will automatically populate the source properties.
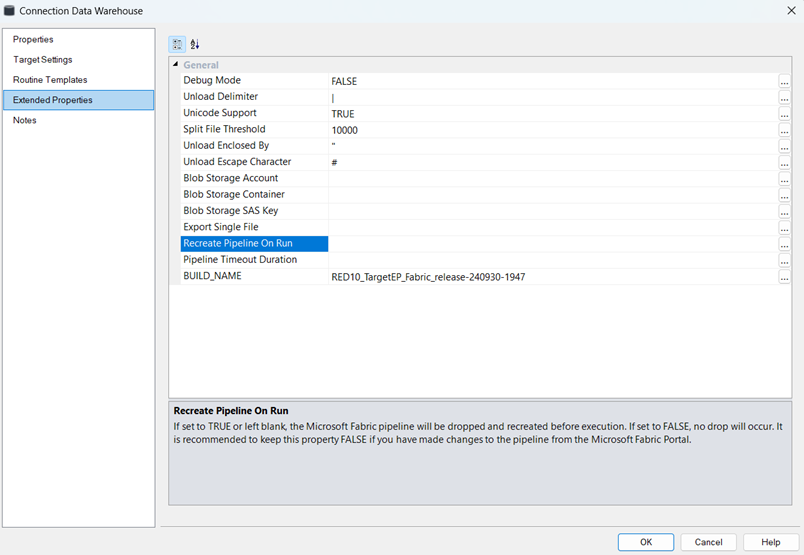
Two additional extended properties are specifically available for pipelines: “Recreate Pipeline on run” and “Pipeline Timeout Duration.”
Setting “Recreate Pipeline on run” to “True” ensures that a new pipeline is created each time the job is executed, with any existing pipeline with same name being deleted beforehand. If set to “False,” the existing pipeline remains intact, and only the execution is performed. However, if a pipeline fails due to a data type issue or any other property-related problem, the pipeline must be deleted and recreated, as the pipeline's JSON code cannot be modified when the “Recreate Pipeline on run” property is set to “False”. The default to this property is set to “True” in the script.
Whenever the Pipeline is created and data is loaded to the table, changing the Extended property to “False” will keep that existing pipeline as it is and act as a starting point for other operations which can be done.
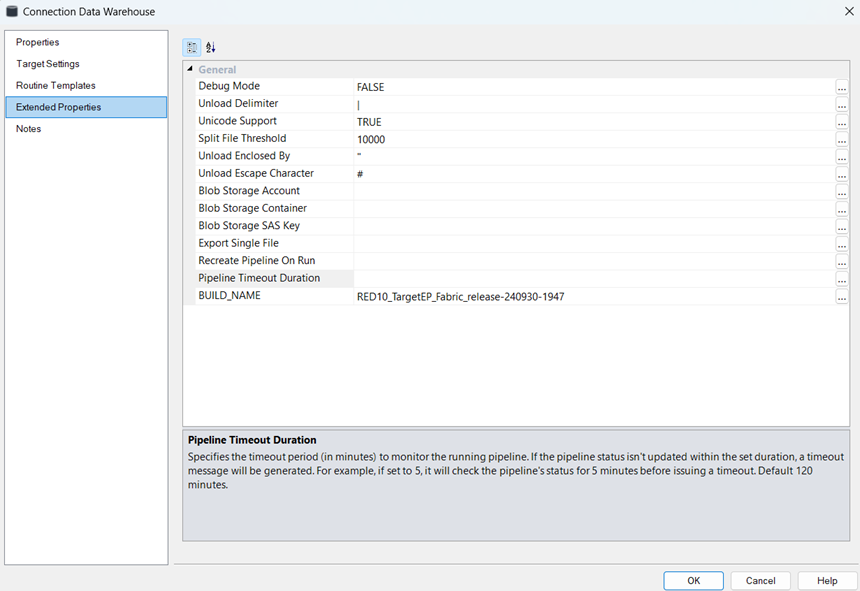
The second property, “Pipeline Timeout Duration,” is responsible for monitoring the pipeline once it is executed. By default, the timeout is set to 120 minutes in script. If the execution exceeds this duration, the pipeline will continue running in the background, but RED will notify the user that the pipeline is still in progress. At this point, the user can monitor the pipeline through the Fabric portal.
It’s important to note that even if the timeout is set to 120 minutes, if the job completes in a shorter time—such as within a minute or two—RED will mark the job as successful and display the result in the result pane accordingly
There can be issues with data types when loading data through Fabric Data Factory.In such cases, the Fabric pipeline will display an error, suggesting using varchar(8000) for the affected column (e.g., “”). The user should update the column’s data type to match the recommendation from Data Factory.After making the changes, the table should be recreated, the script regenerated,and the pipeline executed again with the extended property “Recreate Pipeline on run” set to “True” or left blank.
Post Install Steps – Optional
If you used the script Setup Wizard for installation then the following optional post-install steps are available.
Configure Connections
These connections added that will optionally require your attention:
- Connection: Data Warehouse ('Fabrics') - This connection was setup as per parameters provided in Setup Wizard
- open Properties and click derive button for Database Host/Server and Database ID.
- open it's properties and check extended properties tab, set it up for Blob Storage Account , Blob Storage Container and Blob Storage SAS Key
- Connection: 'Database Source System' - this connection was setup as an example source connection,
- open its properties and set it up for a source DB in your environment
- or you can remove it if not required
Enable Script Launcher Toolbar
There are a number of stand-alone scripts which provide some features such as "Ranged Loading", these scripts have been added to the Script Launcher menu but you will need to enable the menu toolbar item to see them.
To enable the Script Launcher menu in RED: Select menu item Home > Script Launcher
Source Enablement Pack Support
| Source Pack Name | Supported By Microsoft Fabric | Supported Features | Prerequisites/Permissions Required for Microsoft Fabric |
|---|---|---|---|
| Google Cloud Storage | Yes | Download to local and load | None |
| Yes | Download to local and load | None | |
| Amazon S3 | Yes | Download to local and load | None |
| Windows Parser | Yes | Load Template, Source Properties will have option to select parser type to load the files. | Refer to Windows Parser Guide |
| Azure One Lake | Yes | Download to local and load | Refer to Windows Parser Guide |
Troubleshooting and Tips
Run As Administrator
Press the Windows Key on your keyboard and start typing cmd.exe, when the cmd.exe icon shows up in the search list right click it to bring up the context menu, select "Run As Administrator"
Now you have an admin prompt navigate to to the folder where you have unpacked your WhereScape Red Enablement Pack to using the 'cd' command:
C:\Windows\system32> cd <full path to the unpacked folder>
Run batch (.bat) scripts from the administrator prompt by simply typing the name at the prompt and hit enter, for example:
C:\temp\EnablementPack>install_WslPowershell_Modules.bat
Run Powershell (.ps1) scripts from the administrator prompt by typing the Powershell run script command, for example:
C:\temp\EnablementPack>Powershell -ExecutionPolicy Bypass -File .\Setup_Enablement_Pack.ps1
Note
Windows Powershell Script Execution
On some systems Windows Powershell script execution is disabled by default. There are a number of workarounds for this which can be found by searching the term "Powershell Execution Policy".
Here is the most common workaround which WhereScape suggests, which does not permanently change the execution rights:
Start a Windows CMD prompt as Administrator, change directory to your script directory and run the WhereScape Powershell scripts with this command:
cmd:>Powershell -ExecutionPolicy Bypass -File .\<script_file_name.ps1>
Re-install Python Libraries
Press the Windows Key on your keyboard and start typing cmd.exe, when the cmd.exe icon shows up in the search list right click it to bring up the context menu, select "Run As Administrator"
Now you have an admin prompt navigate to to the folder where you have unpacked your WhereScape Red Enablement Pack to using the 'cd' command:
C:\Windows\system32> cd <full path to the unpacked folder>
C:\Windows\system32> cd <full path to the unpacked folder>
Run batch (.bat) scripts from the administrator prompt by simply typing the name at the prompt and hit enter, for example:
C:\temp\EnablementPack>uninstall_WslPython_Modules.bat
For installation of Python libraries there are two methods
Method 1
Press the Windows Key on your keyboard and start typing cmd.exe, when the cmd.exe icon shows up in the search list right click it to bring up the context menu, select "Run As Administrator"
Now you have an admin prompt navigate to to the folder where you have unpacked your WhereScape Red Enablement Pack to using the 'cd' command:
C:\Windows\system32> cd <full path to the unpacked folder>
Run batch (.bat) scripts from the administrator prompt by simply typing the name at the prompt and hit enter, for example:
C:\temp\EnablementPack>install_WslPython_Modules.bat
Method 2
Press the Windows Key on your keyboard and start typing cmd.exe, when the cmd.exe icon shows up in the search list right click it to bring up the context menu, select "Run As Administrator"
Now you have an admin prompt navigate to to the folder where you have unpacked your WhereScape Red Enablement Pack to using the 'cd' command:
C:\Windows\system32> cd <full path to the unpacked folder>
Run the below command
python -m pip install -r requirements.txt
Python requirements for offline install
Additionally to the base Python installation being required, the WhereScape Python Template set also requires certain additional Python libraries. The install scripts uses the PIP (package manager) to download these libraries, however for offline installs you will need to install the required libraries yourself.
Required Python libraries/add-ons:
- pywin32-ctypes
- python-tds
- pywin32
- glob2
- gzip-reader
- regex
- pyodbc
Restarting failed scripts
Some of the setup scripts will track each step and output the step number when there is a failure. To restart from the failed step (or to skip the step) provide the parameter "-startAtStep <step number>" to the script.
Example:
Powershell -ExecutionPolicy Bypass -File .\<script_file_name.ps1> -startAtStep 123
Tip
To avoid having to provide all the parameters again you can copy the full command line with parameters from the first "INFO" message from the beginning of the console output.
For upgrade of existing repository

In upgrade of exiting repository if the user gets above error then it means the script type of wsl_post_install_enablement_pack is set to PowerShell(64-bit) change the script type to Auto Execute-PowerShell before upgrade or manually run the wsl_post_install_enablement_pack script from host script from RED after upgrade.
If a valid RED installation can not be found
If you have RED 10.x or higher installed but the script (Setup_Enablement_Pack.ps1) fails to find it on you system then you are most likely running PowerShell (x86) version which does not show installed 64 bit apps by default. Please open a 64 bit version of Powershell instead and re-run the script
Table name should be given in lowercase only
While loading the table, the table name should be given in lowercase, for example, load_tablename; otherwise, loaded data will now get displayed.