Notifications can be set to alert you if a job is successful, unsuccessful, or either result. Additionally, a notification can also indicate if a job was launched from the Workbench or from a command line, and can produce a report in a number of different file formats.
You can select the following options and option parameters using the job notification plugin:
| Notification Option | Option Parameters |
|---|---|
| Notify When Run From |
|
| Attached Report |
|
| Send Notification |
|
Notification parameters are set independently on each job configured in DB Change Manager. Additionally, each set of notification options apply individually per job selected.
The notification plugin must be defined in Eclipse and then activated in DB Change Manager. The following tasks provide a high-level overview of defining and implementing the notification plugin:
Create a plugin project
In order to start building a plugin, you need to create a new plugin platform in Eclipse.
To create a plugin project
- Select File > New > Other.
The Select a Wizard dialog appears. - Select Plugin Project, and then click Next.
- Type a name for the plugin in the appropriate field, and leave the remainder of the parameters as they appear.
- Click Next.
- Retain the default parameters on the next dialog, and then click Finish.
The new plugin project is created in Eclipse and is ready for plugin development.
Configure the target platform
The target platform for the plugin development process needs to be identified in DB Change Manager. This indicates to the new plugin for what product it extends, and grants the plugin access to the system.
To configure the target platform
- Select Window > Preferences.
The Preferences dialog appears. - Choose the Plugin Development > Target Platform node, and then click Browse.
- Navigate to the install directory for DB Change Manager.
- Click Apply, and then click OK.
The Preferences dialog closes and the target platform of the plugin is now indicated.
Define dependencies
The new plugin requires a pair of dependency definitions on the DB Change Manager Notification plugin:
com.idera.change.notificationsorg.eclipse.ui.forms
- Navigate to the META-INF folder in your project and double-click MANIFEST.MF.
The MANIFEST.MF file opens in Eclipse. - Select the Dependencies tab, and then click Add.
- Choose
com.idera.change.notifications, and then click OK.
The dependency is added. - Choose
org.eclipse.ui.forms, and then click OK.
The dependency is added. - Press Ctrl+S to save the changes; or choose File>Save from the menu to retain the new dependencies, and then close the editor.
Implement a notifier class
Each notification plugin requires a Notifier class that must implement the interface com.idera.change.notifications.api.INotifier. To do this, you subclass com.idera.change.notifications.api.AbstractNotifier and customize it.
If AbstractNotifier or INotifier cannot be found in Eclipse, the target platform or plugin dependencies are not configured properly. Ensure that you have configured these prerequisites and then search again for the notifier classes.
To implement a notifier class
- Right-click on your project, and then select New > Class.
The New Java Class dialog appears.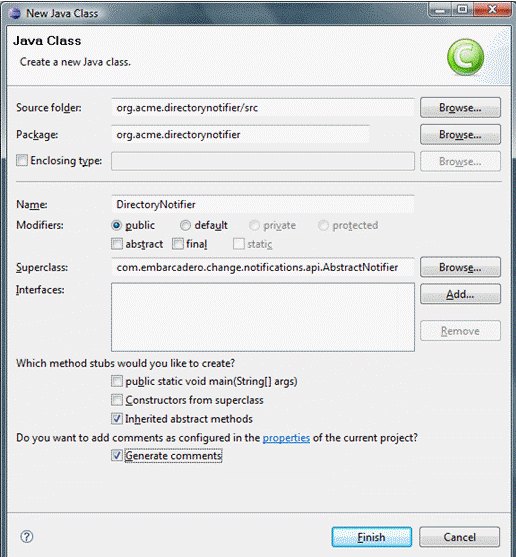
- Enter the appropriate information in the fields provided to define the new Java class:
- In the Name field, type “DirectoryNotifier”.
- In the Package field, type “org.acme.directorynotifier”.
- In the Superclass field, type “com.idera.change.notifications.api.AbstractNotifier”.
- Click Finish to create the new class.
Once you have defined the DirectoryNotifier class, two methods require implementation:
isReportSupportedreturns a Boolean value indicating if the notification can include a report. The directory notifier returns true, because reports can be replaced in a directory, but a notification may not support reports. This method is called when creating job editors to determine if the reporting section is shown for this type of notification.sendNotificationis called after a job runs and is responsible for the notification. The three parameters are as follows:Parameter Type Description notifierDataiNotifierData This instance contains the configuration for the notification of the job just run. jobMetaDataMap<String, String> This map contains information about the job execution. The keys in the map correspond to entries in the NotificationPropertyEnum.
For example, to get the data and time of the execution, you would code:
“jobMetaData.get(NotificationPropertyEnum.DATE_TIME.getTag())
”notificationInfoiReportGenerator