Scheduled tasks help optimize processes by making commands available to be executed automatically at specific times intervals defined by the user on a Windows Operating System. There are two ways to schedule a task, it can be a SQL task or an Aqua Script task.
Creating scheduler tasks in Aqua Data Studio is very simple. There are different managing options within these scheduled tasks such as refreshing, editing, deleting, and viewing logs and results, You can also set an email address to receive email notifications when the tasks are run with different details. See E-mail Options to configure these settings.
Scheduled SQL tasks can be created by:
- Selecting Create Scheduled Task from the Tools menu in the Main Application Menu

- Selecting Tools > Create Scheduled Task from the right-click pop-up menu on a database in the Schema Browser.

- Clicking the Create Scheduled Tasks icon in the Query Analyzer Toolbar.

Creating a SQL Scheduled Task
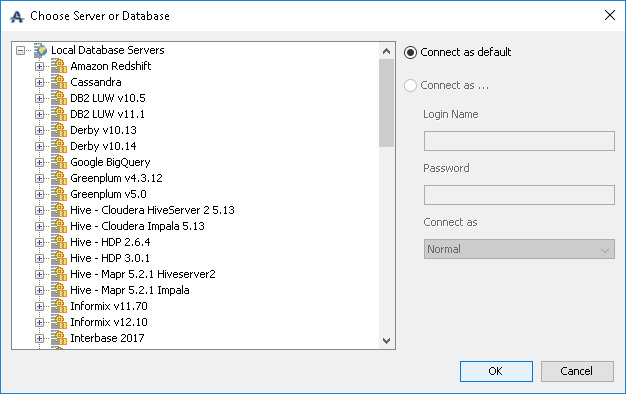
1. Select Create Scheduled Task in any of the above-mentioned ways. Choose a server in which to create a Scheduled Task. Select the server, navigate the database and schema objects, and click OK. This will bring up the Create Scheduled Task dialog.
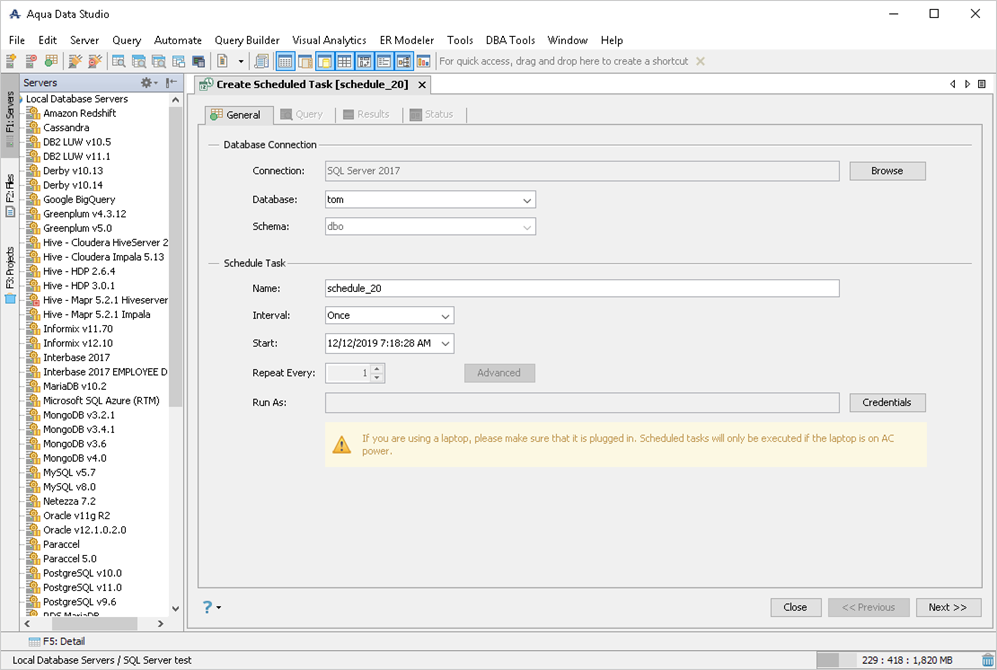
2. The first tab in the Create Scheduled Task Dialog is the General Tab. In this section, specify the Database Connection. The first option is to specify a connection, a database, and a Schema where the scheduled task will be run. Next, specify a Name for the task, by default the name is schedule_number, this can be changed to any name you want that contains only ASCII characters. Now, select the Interval for the task, select from the drop-down menu the interval you want (Once, Daily, Weekly, Monthly). Then choose the start date and time in the drop-down calendar menu. If the interval you chose is Daily, Weekly, or Monthly you have to choose the repetition frequency of the task. When the interval is Weekly or Monthly the Advanced menu pops up. Once you chose the Advanced Task Settings, next is the Run as credentials option. Click Next to select the Query Tab.
3. In the Query Tab, select an existing SQL file or enter a query for the scheduled task to run. Open an existing script by clicking on the Specify the Open Script icon. Run the query, stop it, execute all statements in a single transaction, or reconnect. Be aware that executing the queries may modify data in your database depending on the content of the queries. Click Next to select the Results Tab.

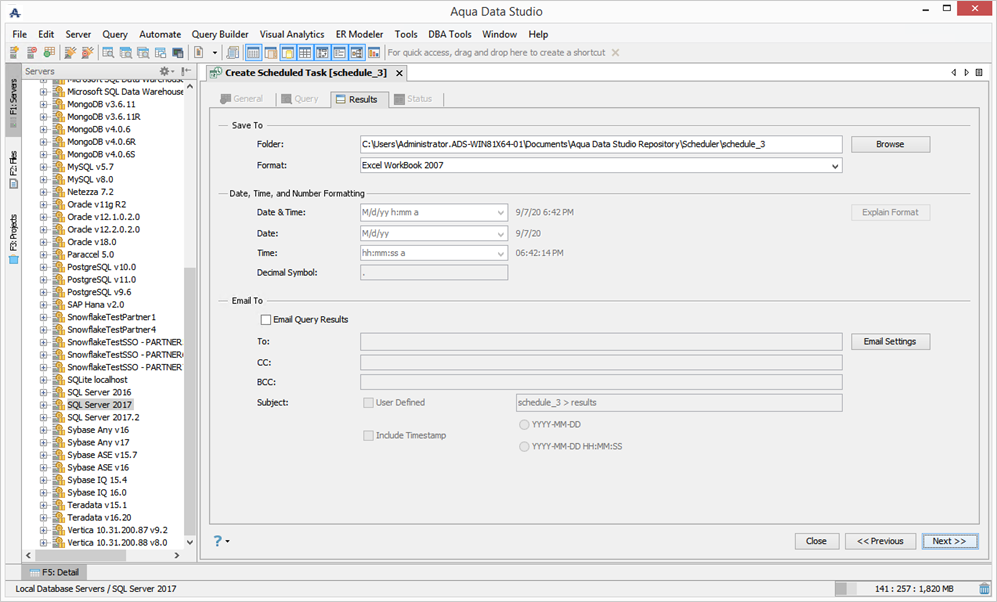
4. In the Results Tab, specify where the scheduled task will be saved to. The first option is to determine the folder where the results will be stored. By default, the path is a new folder inside the user's Documents for Aqua Data Studio Repository and Scheduler. Change this path by clicking on the Browse button. Next choose the format for the results file in the drop-down menu between CSV, XLS, or XLSX. The next section is to set up a Date, Time, and Number Formatting according to your needs. Then, fill out the email section, if you want your query results emailed click the checkbox. Click on the Email Settings button to review or edit your email configuration. Then, fill in the email you want to send the results to, you can also fill in emails for CC and BCC. The subject of the email will be the scheduled task name > results if you want to change this check the User Defined box and type in the name you want. Finally, you can choose to include a timestamp and its format on the subject. Click Next to select the Status Tab.
5. The Status Tab schedules the task, the bar at the top shows the progress in the scheduling, when it finishes the status is displayed as well as the elapsed time. The log shows the procedure for scheduling the task and status. Click Close to leave the Create Scheduled Task Dialog. Find the scheduled tasks in theManage Scheduled Tasks window.

Advanced Menu
Inside the General Tab in the Create Scheduled Tasks Dialog when the interval is chosen the advanced menu is available when the interval is Daily, Weekly, or Monthly.

If you choose a Daily Interval, the Advanced menu is enabled and you can choose a date for the scheduled task to expire.

If you choose the Weekly Interval, the advanced menu immediately pops up, where you can choose a date for the scheduled task to expire and the days of the week the task will be run.
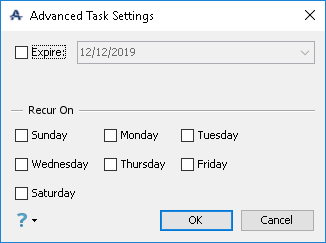
When the monthly interval is chosen, the advanced menu pops up as well, here you can choose a date for the scheduled task to expire and also the months and the specific day of the month the task will be run.

Run as credentials
Inside the Run As option in the General Tab click on the Credentials button. Aqua Data Studio displays a window where you should type in your Login Name, the Password, and Confirm it.

Each time you schedule a task you need to click on the Credentials button to select a user, however, the last Login Name and Password you set for the scheduled task will be automatically populated. Then Click OK and Next in the General Tab to continue scheduling.
Assign Permissions
If the user trying to run a scheduled task is a Non-Admin, Domain User or Group User make sure to assign the right permissions to the user or group.
First, go to Local Security Policy in Windows, Choose Security Settings > Local policies > User Rights Assignment > Logon as a batch job.
Add the user or group to the list. Then go to the following folder:
C:\Users\<Username>\Documents\Aqua Data Studio Repository\ Scheduler
Right-click the folder, select Properties. Then, go to the Security tab and make sure the user or group you added is included in the list.