You can create a schema comparison job to capture, compare, and synchronize database schemas. In addition, you can compare a schema against an archived version of a schema. For more information, see Creating a schema archive.
The following tasks step you through creating and running a schema comparison job:
After comparing the data, you can synchronize it to match; see Synchronizing Data Repositories.
Create or Open a Schema Comparison Job
You create, modify, and run a schema comparison job in the Schema Comparison Job editor.
To create a new schema comparison job
- Select File > New > Schema Comparison Job. The Schema Comparison Job editor opens.
To open an existing schema comparison job
- Select File > Open Job. Select a job from the list, and then click OK. The Schema Comparison Job editor opens.
Describe and Save the Schema Comparison Job
The Job Name and Description pane shows where the job is stored in Project Explorer. When you click the Details button, you can see the project’s file directory path.
If the job is used to monitor compliance against company standards or policies, you can add it to the Compliance Explorer list. This list lets you quickly see all the jobs that have recently passed or failed the compliance criteria you set.
To describe and save a job
- Type a new name for the job in the Name field. Enter a meaningful name that will quickly and uniquely identify the job in other views and dialogs.
- Add relevant information in the Notes field.
- Click Track Results in Compliance Explorer if you want the job to be listed in the Compliance Explorer.
- Click File > Save or File > Save All, or highlight the editor window, and then press Ctrl+S.
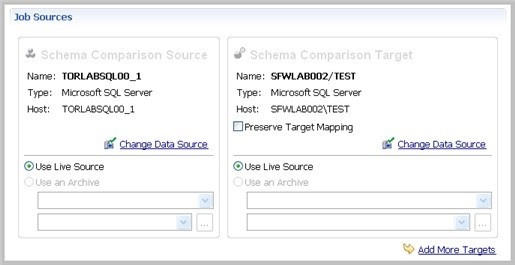
Specify a Schema Comparison Source and Targets
The Schema Comparison Source and Schema Comparison Target panes identify what data sources or schema archives are compared when the job runs. The Schema Comparison Job editor displays the Name, Type, and Host of the source and target.
You can also use a schema archive in a schema comparison job, to compare an older schema against a new one. For more information, see Creating a schema archive.
In addition, you can use the following radio buttons to specify whether to compare the current properties of the live data source, or an archived set of properties previously stored in DB Change Manager.
- Select Use Live Sources to compare the current properties of the data source when the job is executed.
- Select Use an Archive, and then select the schema archive and version from the pulldown menu.
To add a data source to a schema comparison job
- Click and drag a data source from Data Source Explorer to the Schema Comparison Source or Schema Comparison Target box, or click Change Data Source, and then choose a data source from the dialog box.
To add a schema archive to a schema comparison job
- Click and drag a schema archive from Data Source Explorer to the Schema Comparison Source or Schema Comparison Target box.
To change a schema archive or data source in a schema comparison job
- Click Change Data Source in the appropriate box, and then select a new data source from the dialog; or drag a different data source from Data Source Explorer to the box.
Cross-Platform Schema Comparisons Supported by DB Change Manager
DB Change Manager supports cross-platform schema comparisons. However, such jobs are limited to the following DBMS combinations and data source objects:
| DBMS Source/Target | Objects Compared |
|---|---|
| Sybase / SQL Server | Tables, Unique Keys, Check Constraints, Foreign Keys, Indexes, Primary Keys, Views |
| Oracle / SQL Server | Tables, Unique Keys, Check Constraints, Foreign Keys, Indexes, Primary Keys, Views |
If you attempt to compare two data sources that are not compatible, the Schema Comparison Job editor does not let you place objects in the Source or Target panes.
Add Multiple Schema Comparison Job Targets
You can add more targets to compare a source schema against multiple target schemas.
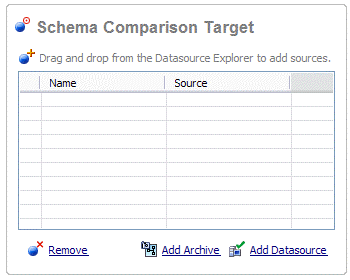
To add multiple targets to a schema comparison job
Drag and drop additional data sources or schema archives from Data Source Explorer to the Schema Comparison Target box, or click the Add Archive or Add Data Source buttons beneath the table and select the appropriate target from the dialog box.
Refine Schema Comparisons
You can refine the schema comparison to use only the schema objects you want to include using the Refinements tab in the Schema Comparison Job editor.
- The Object Refinement pane lists the database objects of the comparison source. Objects are listed by owner (if applicable to the database platform) or by object type.
- The Filter by Owner and Filter by Type panes let you add or remove objects from the Object Refinement pane by owner (if applicable to the database platform) or by object type.

To specify the objects used in a schema comparison job
- In the Refinements tab, select or deselect objects in the Filter by Owner and/or Filter by Type panes to add or remove objects from the Object Refinement pane.
- Select or deselect the objects in the Object Refinement pane.
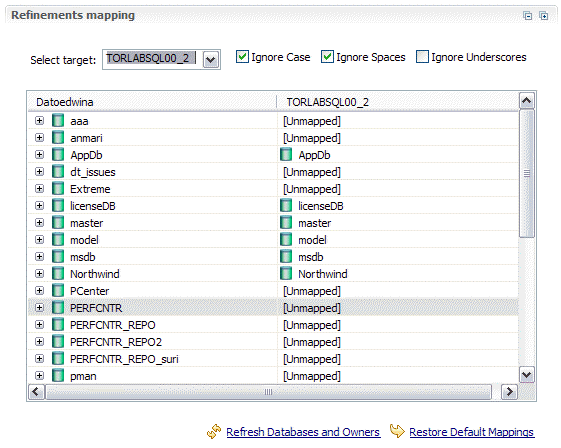
Customize Schema Mapping
The mapping process pairs objects between the job source and target so that the objects can be compared. You can see and modify pairs using the Mapping tab of the Schema Comparison Job editor.
DB Change Manager automatically maps schema objects based on its interpretation of both schemas. Elements that do not match are initially excluded; you can manually map them prior to running the job.
The Refinements Mapping table lists schema elements for the job source and target.
By default, new objects are included in this list. For more information, see CM/Schema > Refinements Options.
When comparing master catalogs or user mappings, you can select multiple targets against a single source.
To redefine schema object mappings
- In the Refinements Mapping tab, click the target of the pair you want to change. Use the drop-down menu to define the object you prefer.
To restore original schema object mappings
- Click Restore Default Mappings to revert to the original object mappings as determined by DB Change Manager.
Specify Schema Comparison Job Options
Prior to running a job, you can set various options to control aspects of the comparison process. Set them using the Options tab.
The list of options differs depending on the DMBS of the source and target data sources. Options differ according to the objects included in the job. For example, Ignore Constraint Name Differences do not appear if you exclude constants from the job.
The options you see in the job have defaults. You can change the defaults using Preferences.
Schema comparison job options include:
- Synchronization Options. These options specify how you want DB Change Manager to handle the synchronization script after it runs the comparison job, either:
- Manual causes DB Change Manager to display the results of the comparison, but it does not automatically attempt to repair any synchronization issues. If you choose this option, you will still be able to manually generate and run a synchronization script after the job runs.
- Automatic causes DB Change Manager to automatically generate and run a synchronization script immediately after the comparison job runs.
- Include Object Options. These settings determine what elements of the job source and target will be omitted when running a schema comparison job and synchronization. For more information, see CM/Schema > Comparison Options > Include Objects Options.
- Compare Options. These settings affect how objects are treated in the comparison process. You can include or exclude specific object types in the job, and specify the behavior of the comparison job and synchronization scripts. For more information, see CM/Schema > Comparison Options > Compare Options.
- Decorator Options. These settings affect particular database objects. For more information, see CM/Schema > Comparison Options > Decorator Options.
- Identifier Options. These settings determine what elements of the source and target data source will be ignored during the schema comparison and synchronization process. For more information, see CM/Schema > Comparison Options > Identifier Options.
- DDL Extract Option. This setting causes the DDL code to appear in a separate editor window after the comparison job runs. For more information, see CM/Schema > Comparison Options > DDL Extract Options.
- Custom Options. This section lists options that you defined in the Create New Schema Custom Compare Options dialog. For more information, see Select Schema Properties to Ignore During a Comparison.
As needed, DBMS-specific options settings are also listed. For more information, see CM/Schema > Comparison Options > Additional Options.
Select Schema Properties to Ignore During a Comparison
You can create a custom list of schema properties that are ignored by a schema comparison job.
To define schema properties to ignore
- Click File > New > Custom Schema Comparison Option.
- Name the custom properties and add a description.
- Select the properties that you want to ignore.
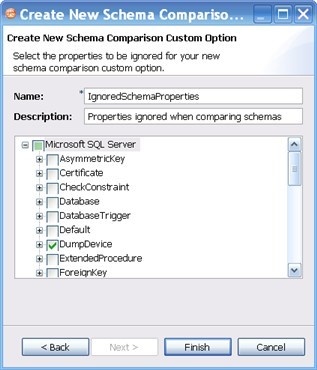
- Click Finish.
- Open a schema comparison job Options tab.
- Under Custom Options, select the custom option.
Set Schema Comparison Job Notifications
When a job completes, DB Change Manager provides various ways of notifying you. For more information, see Setting job notifications.
Run the Schema Comparison Job
To run the schema comparison job:
- Click the Run icon located in the upper right-hand corner of the Schema Comparison Job editor.

While the process runs, the Comparison Results tab appears and indicates the progress of the job.
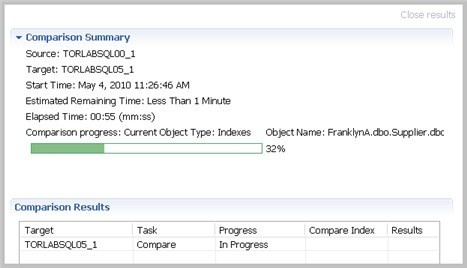
When the job is complete, the Comparison Results pane shows information about the comparison.
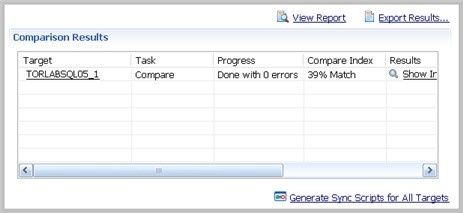
The Comparison Results pane includes these columns:
- The Target column shows the name of the target, and provides a link to open the Individual Comparison Results tab, which provides more details. For more information on viewing individual results, see View Individual Schema Comparison Results.
- The Task column shows what kind of job was run.
- The Progress column shows whether the job is in progress or has completed, and how many errors were encountered.
- The Compare Index column indicates the percentage of schema that matched between the source and targets of the job.
- The Results column provides a Show Individual Results link to open the Individual Comparison Results tab, which provides more details. For more information on viewing individual results, see View Individual Schema Comparison Results.
- The Resolution column provides a command that produces a synchronization script that, when run, automatically synchronizes the compared schema. For more information on generating a synchronization script, see Synchronizing schemas.
- The Errors column indicates how many errors were encountered during the comparison process, and provides a link to view them in a separate window.
View Individual Schema Comparison Results
To see specific schema comparison results
- After a job runs, in the Comparison Results table, click Show Individual Results.
The Individual Comparison Results window appears.
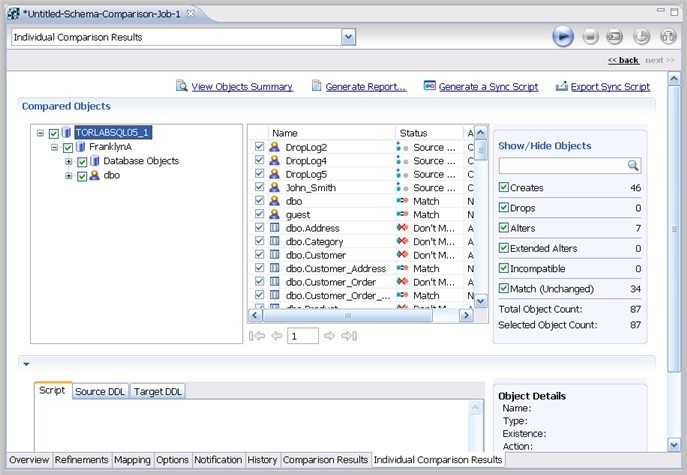
To browse the objects
- Select or deselect the check boxes in the left-panel list.
- Right-click and use the menu to select or deselect objects at the global or page levels.
- Click the right and left arrows underneath the middle panel.
- Enter a page number in the box underneath the middle panel.
To filter the objects
Type a search string into the Show/Hide Objects search box.
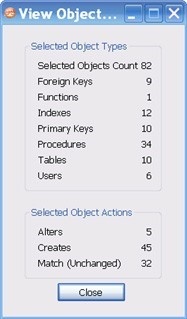
To see a summary report
- Click Generate Report.
To view the DDL between two schema comparison results
- Click View Details.
To save individual schema comparison results data to a text file
- Click Export to File.
To view the synchronization script and DDL between two individual objects
- In the Individual Comparison Results window Compared Objects pane, select an object that does not match.

Script and DDL details appear in the pane below.
- In the Script tab, view the SQL that synchronizes the objects.
Create a Schema Comparison Job Report
After running a comparison job, you can create a job report using the View Report button in the Results tab. For more information, see Creating a job report.
Cloning a schema comparison job
You can create a copy of a schema comparison job, using a different data source.
To clone a schema comparison job
- After you have saved and run a job, the Clone Job button is enabled in the Schema Comparison Job Editor.
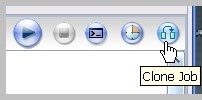
- Click Clone Job.
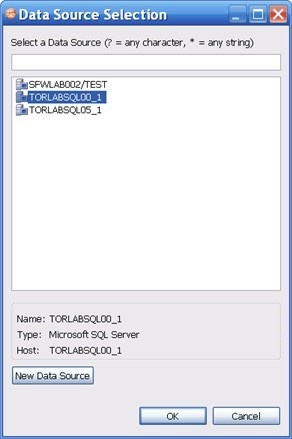
- In the Data Source Selection list, select the new target for the cloned job. If you need to add a new data source to the list, click New Data Source.
- Click OK.
DB Change Manager lists the new, cloned job in the Job Explorer. You can modify and run the cloned job as just as any other schema comparison job. In addition, you can preserve the target mapping from the original job.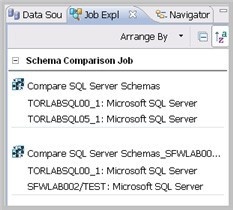
To preserve target mapping in a cloned schema comparison job
- Open the cloned job in the Schema Comparison Job editor.
- In the Job Sources target pane, click Preserve Target Mapping.