A schema archive is a snapshot of the schema of a registered data source. You use a schema archive in schema comparisons against other data sources and archives. It is useful as a baseline to monitor data loss and inconsistencies when you move databases between testing and production environments.
Archive jobs are versioned. Older versions are retained within an archive.
Archive jobs are located in Data Source Explorer on the Schema Archive Jobs node of the corresponding data source.
The following tasks step you through creating a schema archive:
Create or Open a Schema Archive Job
You create or modify a schema archive in the Configuration Archive Job editor. For more details about the editor, see Schema Archive Job Editor.
To create a new schema archive
- Select File > New > Schema Archive Job. The Schema Archive Job editor opens.
To open an existing schema archive
- Select File > Open Archive.
- Select a job from the list, and then click OK.
The Schema Archive Job editor opens.
Describe and Save the Schema Archive Job
The Job Name and Description pane shows where the job is stored in Project Explorer. When you click the Details button, you can see the project file directory path.
To describe and save a configuration archive job
- Type a new name for the job in the Name field. Enter a meaningful name that will quickly and uniquely identify the job in other views and dialogs.
- Add relevant information in the Notes field.
- Click File > Save or File > Save All, or highlight the editor window, and then press Ctrl+S.
Specify a Schema Archive Job Source
The Schema Archive Source table specifies the data source from which the archive job is created.
To specify a schema archive job source
- Drag and drop the data source to be archived from Data Source Explorer to the Schema Archive Source box. The data source is listed by name, database type, and host.
Refine Schema Archive Properties
When you create a new schema archive, by default all schema properties are included. However, you may choose to archive only a specific group of properties. For example, you may want to define an archive that retains a subset of the properties. You can create multiple schema archives for the same data source.
Archive job properties are located on the Refinements tab of the Schema Archive Job Editor, where they are listed by object name, owner (if applicable to the database platform), and type.
To refine schema archive properties
- In the Schema Archive editor, click the Refinements tab.
DB Change Manager analyzes the data source and displays schema information in the Refinements tab.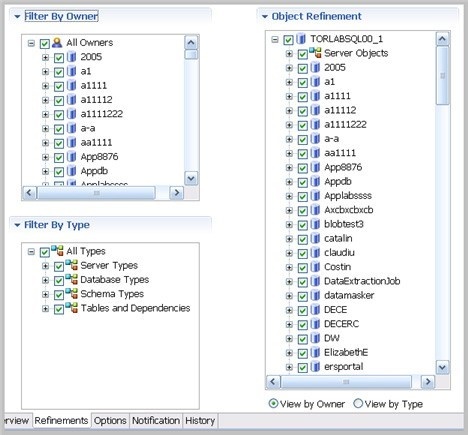
Use the check boxes to select only the data source objects from which you want to create a schema archive.
Within the same archive, properties are retained across versions unless you specify new values.Each time you create a new schema archive, DB Change Manager includes all properties of the specified data source and you must again refine the properties.
Specify Schema Archive Job Options
The Options tab contains the Include Objects Options, DDL Extraction Options, and the Automatic Purge Options settings.
Include Objects Options
The Include Table Dependencies option includes table dependent objects in the results of the archive job.
DDL Extraction Options
You define whether DDL is extracted and stored in files during the archive process using the DDL Extraction Options. You can also obtain the DDL from the archive after the job runs.
These options include:
- The default, None, means that the process does not separately save the DDL when building the schema archive.
- One File means that the DDL also is saved to a single .SQL file.
- Multiple Files means that the DDL also is saved to multiple .SQL files. Each object will have a corresponding file.
If you choose to store the DDL, you can find the directory location of the saved files on the History tab of the editor after archive versions are created.
To specify the DDL extraction process
- In the Options tab, select None, One File, or Multiple Files to indicate how the DDL is stored.
Automatic Purge Options
The Automatic Purge Options delete archive files after a number of days, number of versions, and/or when the size of the files reaches a certain limit. The purge conditions are checked and enforced when an archive job is saved or when a new version is created.
To specify the conditions for automatically deleting archives
- In the Options tab, fill in one, two, or all of the options:
- The number of Days after which archives are deleted.
- The number of Versions stored, after which the oldest version is deleted.
The number of MB total size of the version files, after which the oldest version is deleted.
Set Schema Archive Job Notifications
When a job completes, DB Change Manager provides various ways of notifying you. For more information, see Setting job notifications.
Create a Version and Save the Schema Archive Job
When you first run an archive job, DB Change Manager creates the first version of the archive. A version stores snapshots of the same archive job for backup or tracking comparison purposes. Versions are listed in the Archive Job History table on the History tab and in the Data Source Explorer.
To create a version and save a schema archive job
- In the Archive Job Editor, click Run Job.
The New Unsaved Version tab lists the properties of the archive. - Highlight the tab, and then select File > Save or File > Save All.
A version appears in the Archive Job History table on the History tab containing the name of the archive, the number of properties retained by the version, a time stamp, and whether the archive job was run from the workbench or the command line.
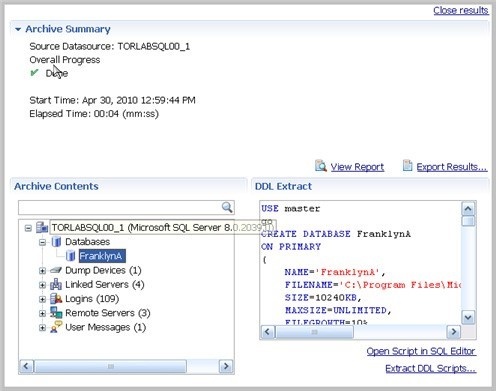
Browse and Modify Schema Archive Contents
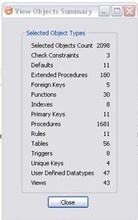
After you run a schema archive job, you can look at its contents and, if needed, modify the list of objects to be included in the job. A View Objects Summary report shows you what objects are selected and are included in the DDL Extract script.
To browse the contents of the archive
- In the Archive Contents list, use the scroll bar and page arrow buttons at the bottom to see all the archive contents.
- At the top of the Archive Contents list, use the search box to filter and find objects.
To modify the contents of the archive
- In the Archive Contents list, right-click an object to select or deselect multiple objects.
- Check or uncheck the boxes to select or deselect single objects.
To see a list of objects used in the Extract DDL script
- At the top of the archive Results tab, click View Objects Summary. The report lists details about the types and number of objects in the job.
To see the DDL
- In the Archive Contents list, right-click the object, and then select Extract. The DDL appears in the DDL Extract pane. You create additional versions within the same archive job each time you click Run Job. Each new version contains the latest values for the archive job properties you specified on the Refinements tab.
To edit the DDL
- Open the Version tab of the schema archive.
- At the bottom of the tab, click the Open Script in SQL Editor button.
The SQL Editor appears. For more information, see SQL Editor.
To extract the DDL of the archive contents to a file
- Open the Version tab of the schema archive.
- In the Archive Contents list, right-click the object, and then select Extract DLL Scripts.
The Extract DLL Scripts window opens. For more information, see Extract DDL Scripts.
Review the History of Archived Objects
You can compare two versions of an object and restore an object to a previous version.
To see the history of an archived object
- In the Archive Contents list, right-click the object, and then select History.
The Object History window appears.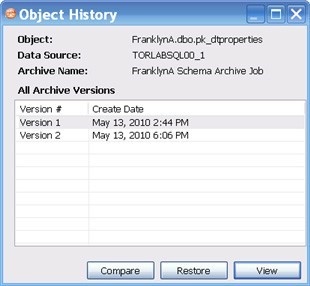
- Select the two versions that you want to compare.
- Click Compare.
DB Change Manager compares the two and reports on the differences, if any.
To restore an archived object to its previous version
- In the Object History window, select the version you want to replace and the version with which you want to replace it.
- Click Restore.
The newer version is replaced by a copy of the older version.
Create a Job Report
After running a schema archive job, you can create a job report using the View Report button on the Version tab. For more information, see Creating a job report.
Use an Archive in Schema Comparison Jobs
You can use a schema archive in schema comparison job.
To add a schema archive to a schema comparison job
- In the Schema Comparison Job editor, drag and drop an archive version from Data Source Explorer to the Comparison Source or Comparison Target boxes.
- Alternatively, if a data source is selected as the source or target, select Use an Archive in the respective box, and then use the drop-down menu to choose an archive.
For more information, see Comparing schemas.