Before installing the Precise framework, see Precise requirements for installation.
To install the Precise framework
- Download the following zip file for the appropriate Precise version:
Precise x.x.x from https://downloadfiles.idera.com/products/Precise.zip/ - Unzip the downloaded files for Precise x.x.x into an empty folder. We recommend that you keep the Precise x.x.x download available for use after finishing the Precise installation.
- On a Windows server, open the folder containing the unzipped Precise x.x.x files.
- Open the Precise x.x.x folder, and then double-click setup.exe. The Precise Framework installer appears to guide you through the Precise Framework installation.
The Precise framework installer displays a series of screens, most of which require you to input details regarding your information systems. Below is the Framework installation procedure and a brief explanation of the requested input on each screen. It is recommended to compile a list of all required user inputs based on this section before continuing.
Welcome
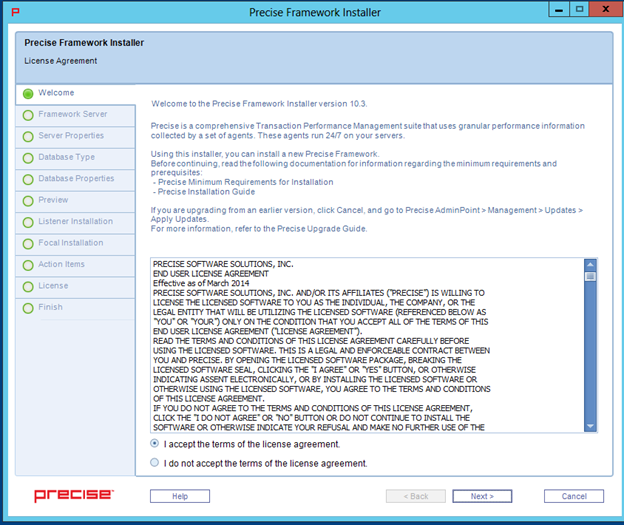
The Welcome screen is the first to appear in the installation process.
To complete the Welcome screen
- Click I accept the terms of the license agreement.
- Click Next. The Framework Server screen appears.
Framework Server
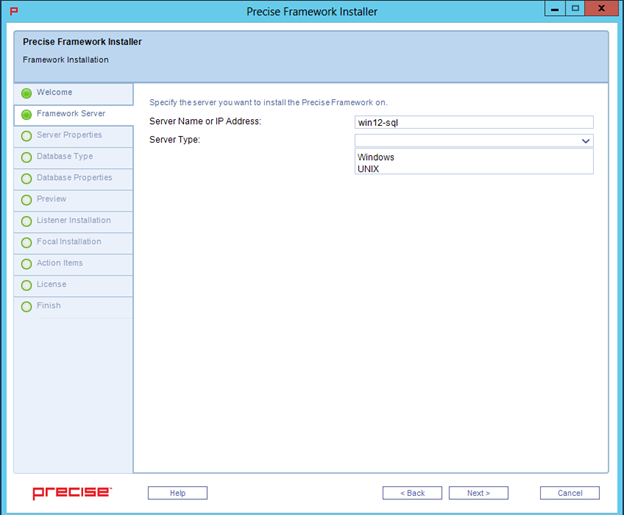
The Framework Server screen allows you to select details about the server on which you want to install the Precise framework.
To complete the Framework Server screen
- In Server Name or IP Address, type the name or IP address of the server on which you want to install the Precise framework.
- In Server Type, use the drop-down list to select the operating system type for the server, whether Windows or UNIX.
- Click Next.
Server Properties
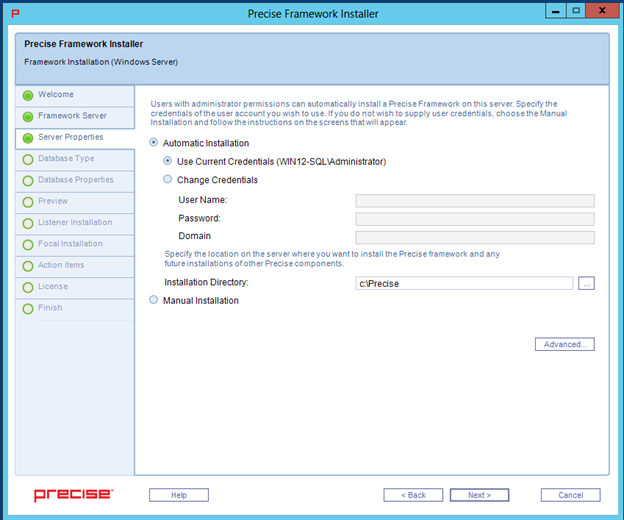
The Server Properties screen varies based on the server type selected in the previous screen. This example uses a Microsoft Windows server installation.
Framework installation for Windows Server
The Precise framework is created for an automatic or manual installation.
Select Manual Installation only in the event that you have a Windows server that does not allow remote installation or if you encounter issues during the automatic Windows server installation. For more information, see the next set of installation steps.
To install the Precise framework on your server using automatic installation
- Select Automatic Installation.
- If you want to use the credentials of the user account currently accessing the server:
- Select Use Current Credentials.
Select an installation folder by clicking the browse button (...), and then searching for the appropriate destination.
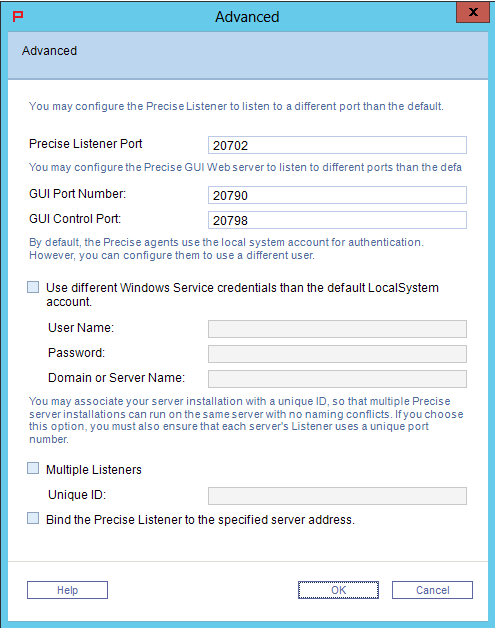
If you need to change Precise listener or GUI port numbers, click Advanced, and then complete the appropriate fields in the Advanced window. For more information about this window, see DRAFT - Precise framework installation.
- If you want to use a different user account with administrator permissions:
- Select Change Credentials.
- Complete the following fields:
- User Name
- Password
- Domain
Select an installation folder by clicking the browse button (...), and then searching for the appropriate destination.
If you need to change Precise listener or GUI port numbers, click Advanced, and then complete the appropriate fields in the Advanced window. For more information about this window, see DRAFT - Precise framework installation.
- If you want to use the credentials of the user account currently accessing the server:
- Click Next.
To install the Precise framework on your server using manual installation
- Select Manual Installation.
- Click Next.
For more information about manually installing the Precise framework on your server, see Advanced adding servers#Adding a Windows server using manual mode.
About the Advanced window
The Advanced window shows you which ports Precise uses. These ports are bi-directional.


